
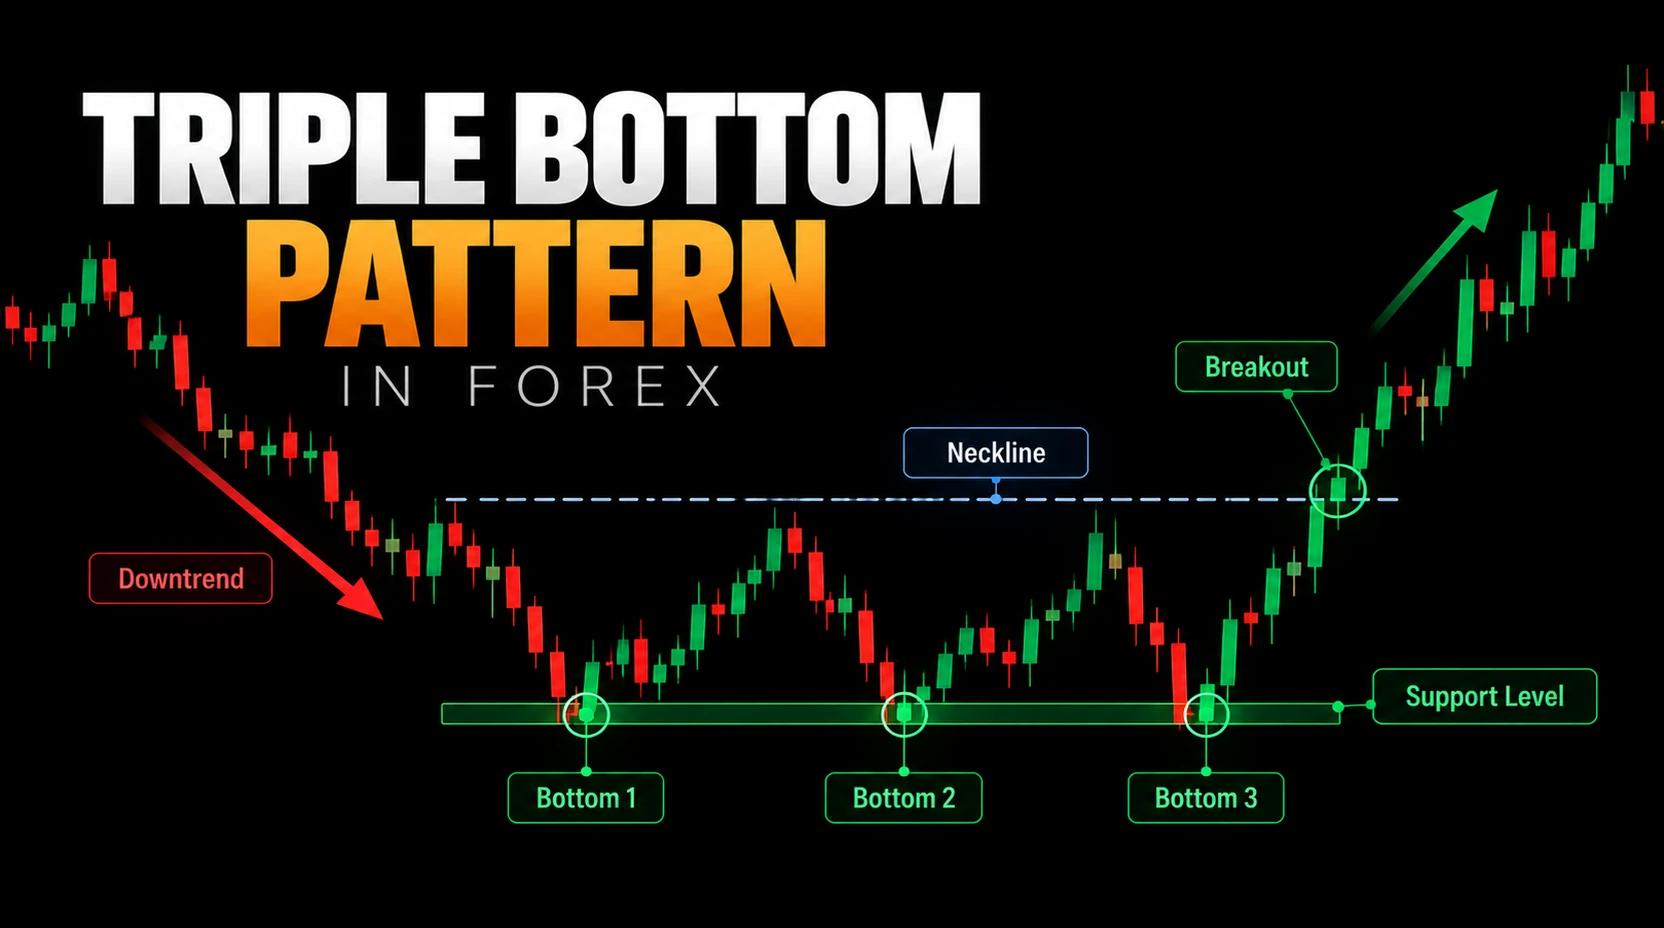
What Is a Triple Bottom Pattern in Forex?
A triple bottom is a possible bullish reversal structure after a decline, marked by three distinct price reactions near a common support zone. The intervening rebounds establish a resistance area, often called the neckline.
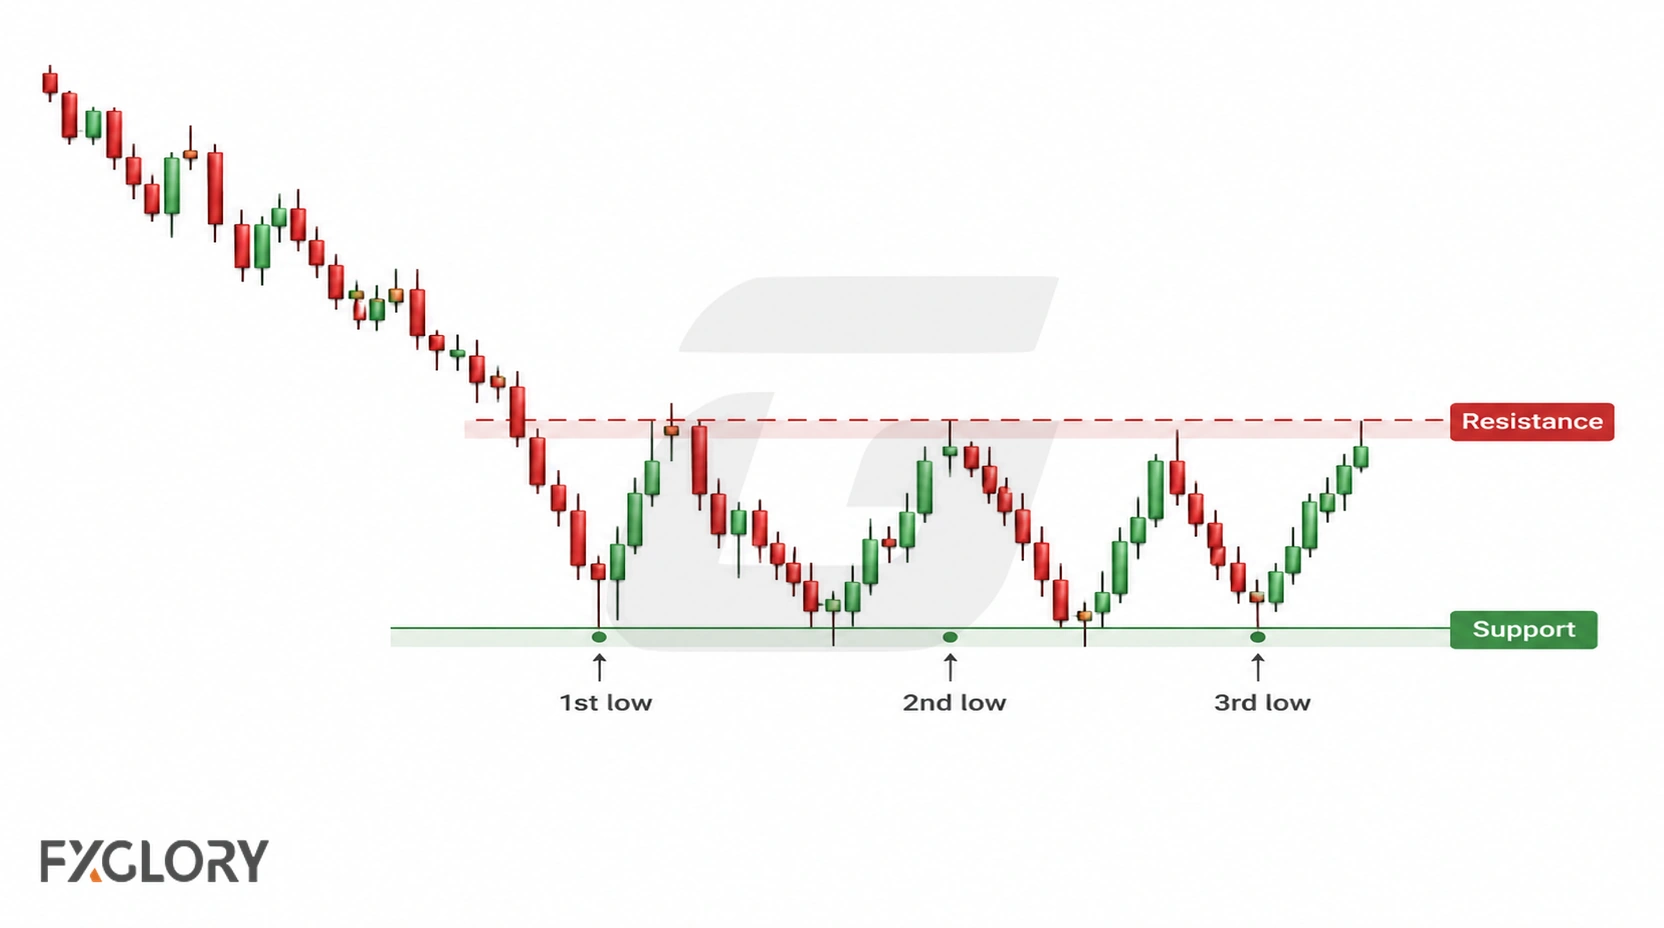
The lows are areas rather than exact matching prices. The prior downtrend and price behaviour at the neckline help distinguish a potential reversal from ordinary consolidation. For broader context, see the trend-exhaustion guide.
How Triple Bottom Patterns Form
Following a downward move, price rebounds from support, returns for a second test, and eventually makes a third distinct test. The intervening highs form the resistance zone that a bullish breakout method will evaluate.
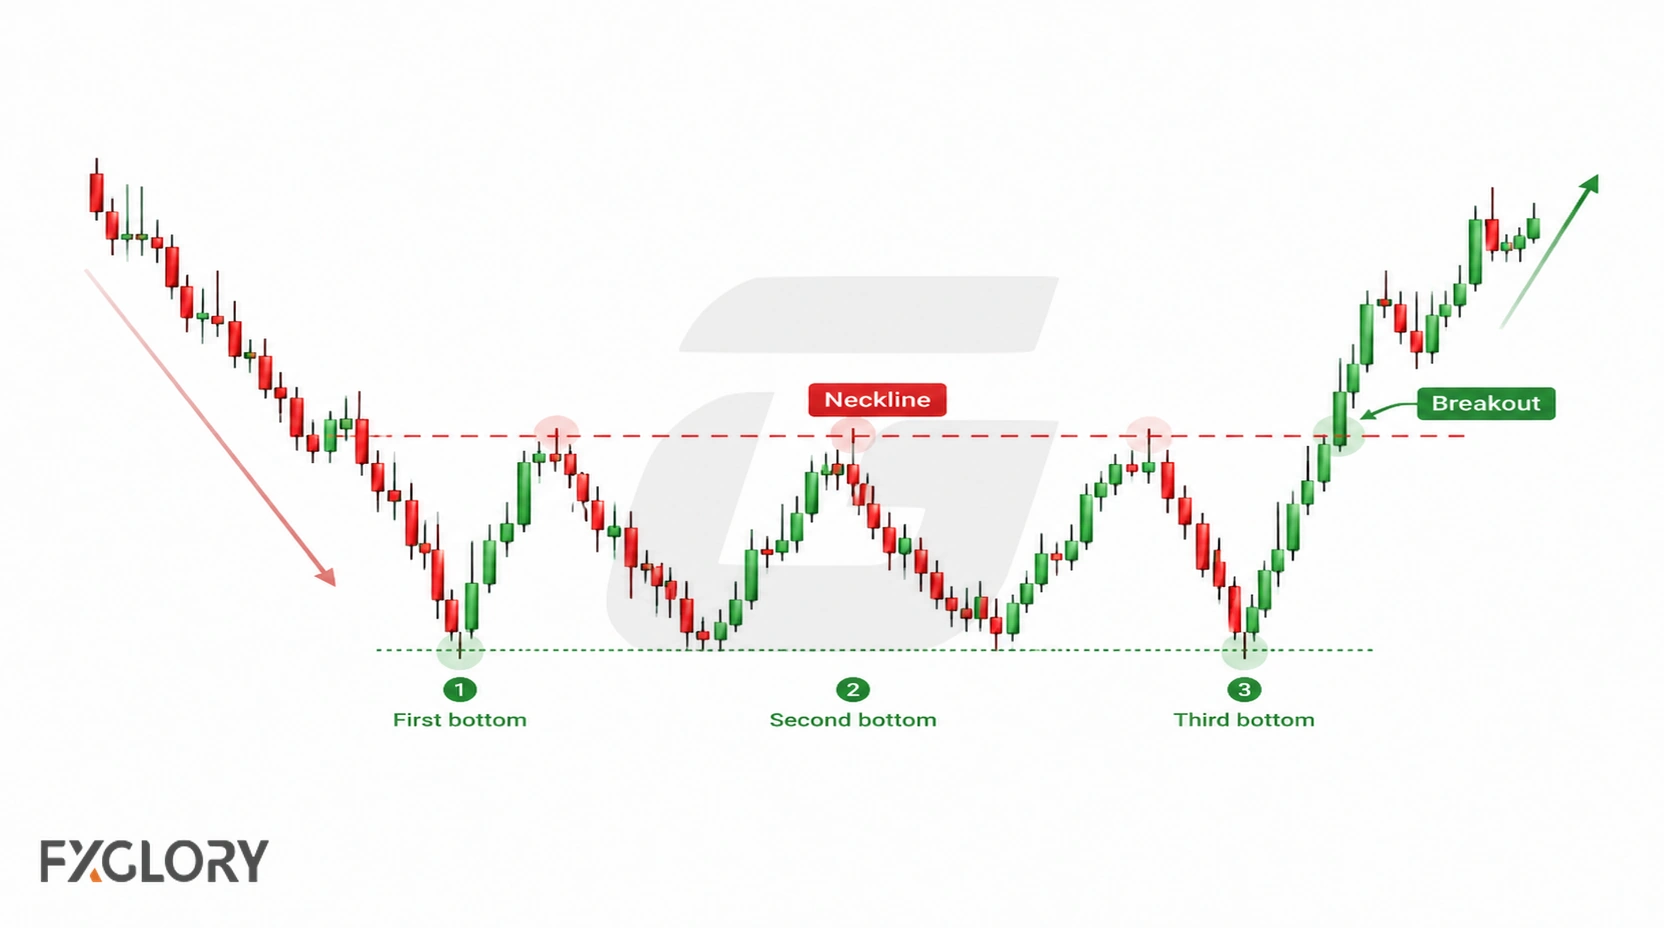
During formation, price may remain within a range for some time. A break below the support base challenges the bullish interpretation; a qualifying move through resistance instead creates a breakout scenario. The number of candles required varies, so avoid inventing a universal formation period.
Triple Bottom Pattern Anatomy
The annotated structure separates the lower support area, the intervening highs, and the potential breakout reference.
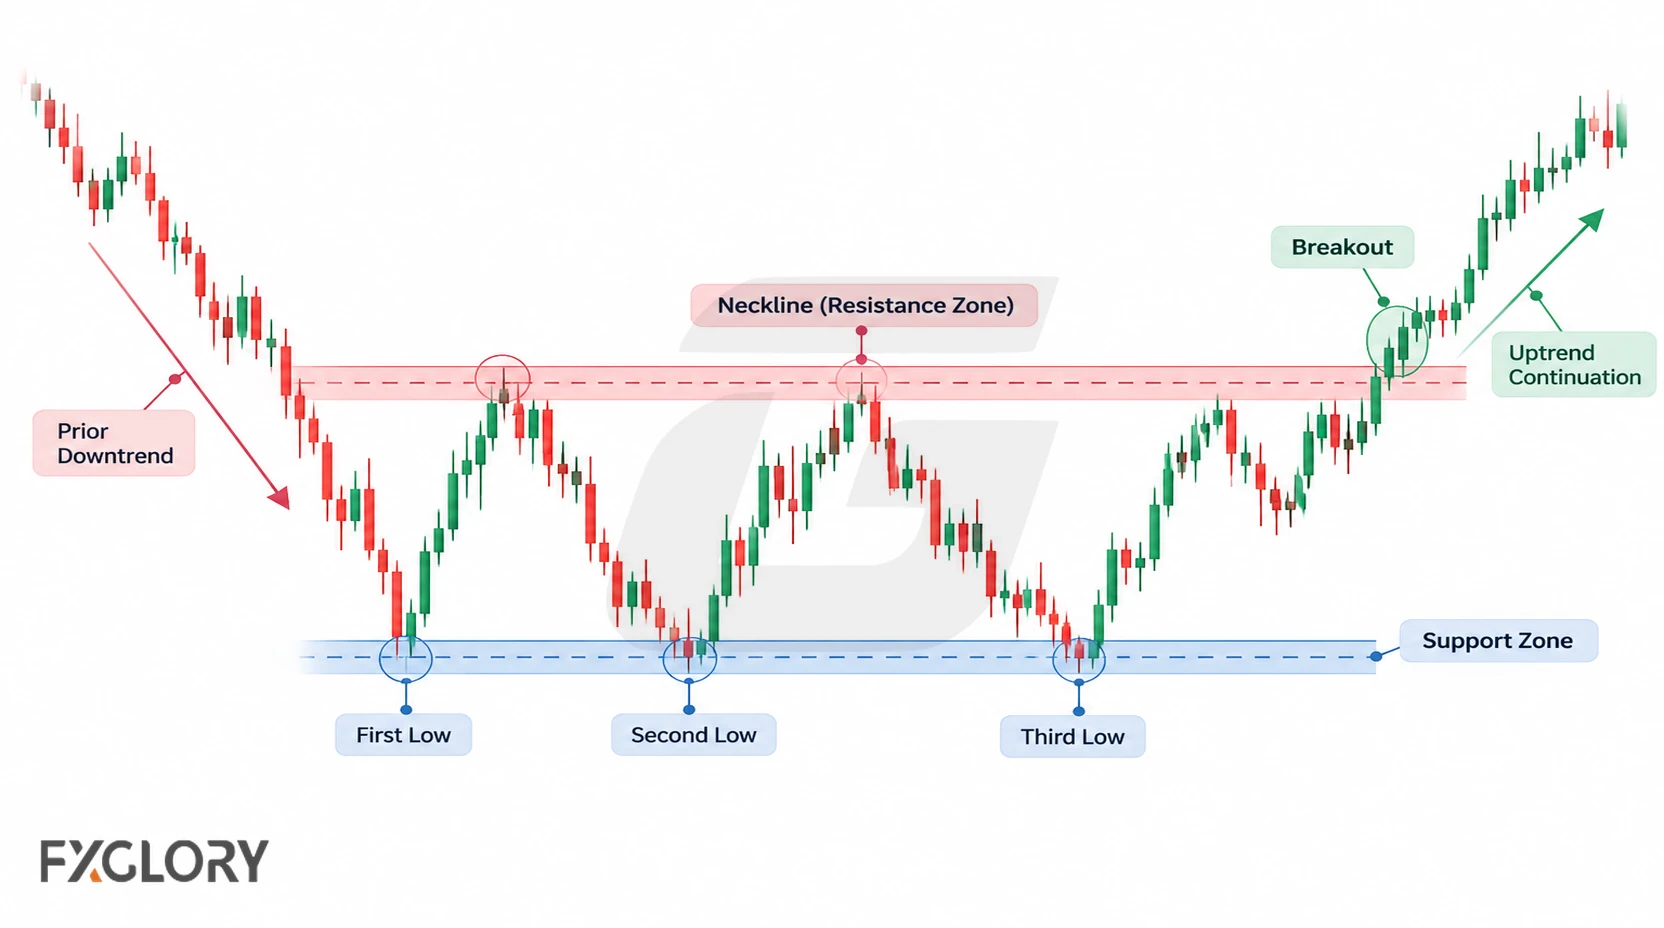
| Part | What It Means | Why It Matters |
|---|---|---|
| Prior move | The downward move before the structure forms | A triple bottom is usually read as a reversal candidate after selling pressure has already moved price lower |
| Support base | The lower area where price holds three times | Shows whether sellers are repeatedly failing near the same zone |
| First low | The first held move near support | Creates the first visible support reaction |
| Second low | The second held move near the same area | Can make the structure look like a W pattern before the third low forms |
| Third low | The third held move near support | Adds another support test, but still needs resistance behavior |
| Resistance ceiling | The upper area formed by the bounce highs | Shows the area buyers must clear before the bullish scenario develops |
| Neckline zone | The resistance area watched after the third low | A break above this area is often used to study whether the bullish scenario is developing |
| Invalidation | The condition that makes the triple bottom idea wrong | Defines when a specific bullish thesis must be reconsidered |
Support Base and Resistance Ceiling
Mark support as a zone that accommodates ordinary wick variation rather than a line chosen to force identical lows. The two intervening rebound highs can define one neckline level or a broader resistance zone when they differ.
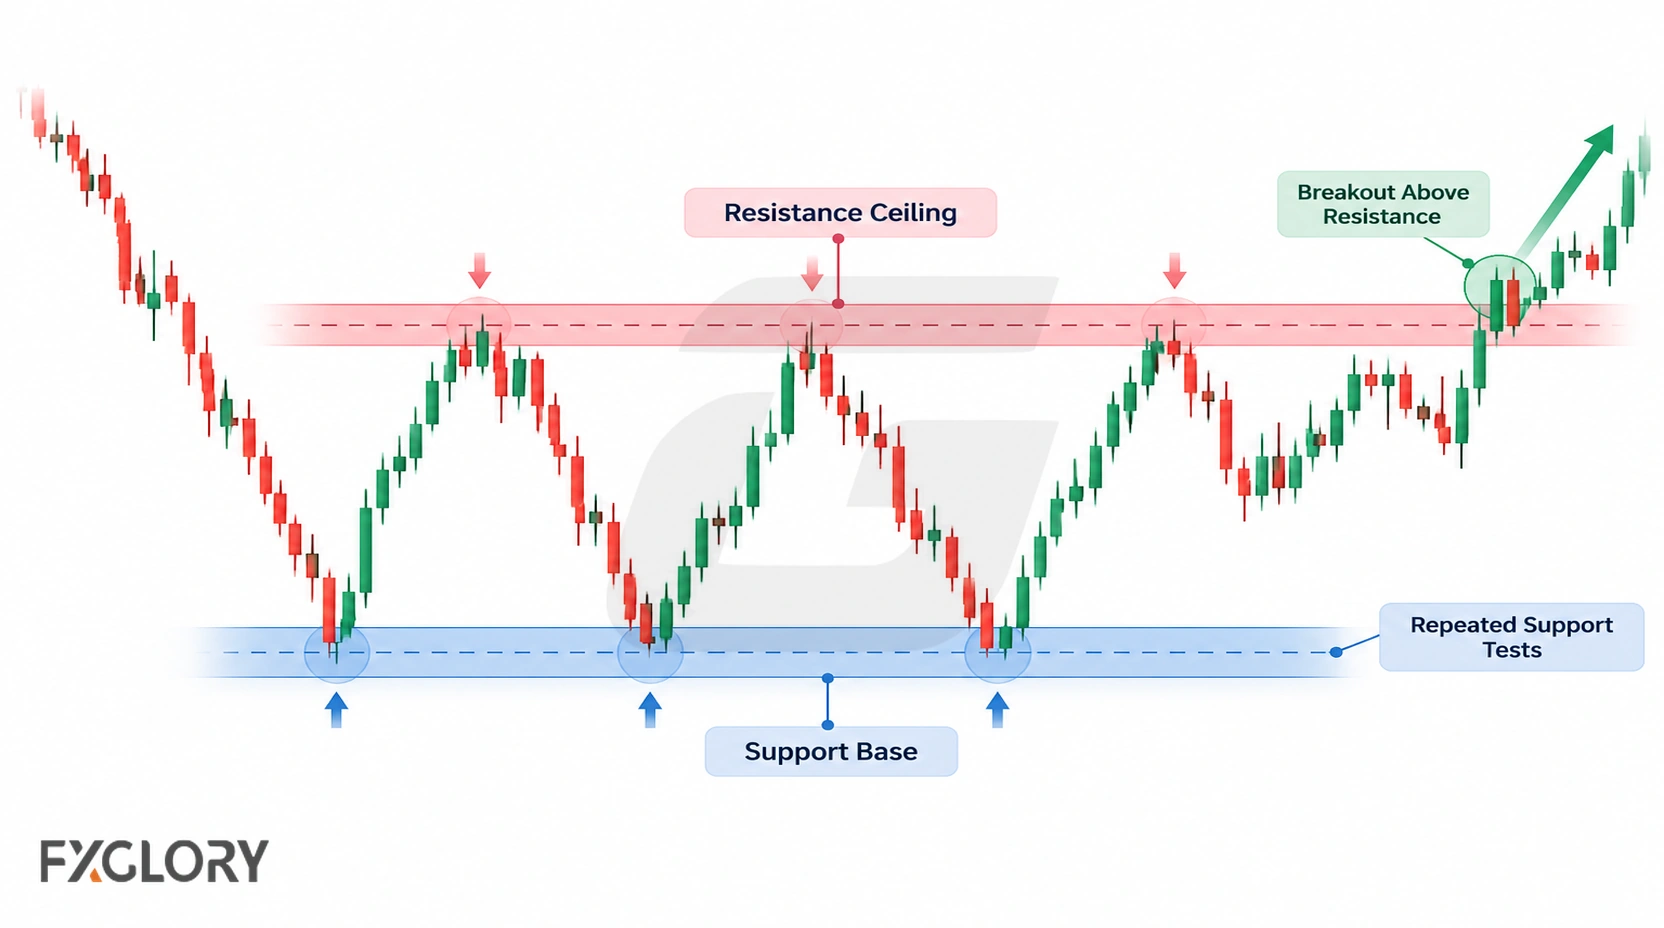
Price between the two zones is not equivalent to a confirmed reversal. A neckline retest becomes relevant only if a breakout actually occurs; its success or failure should be judged against the chosen entry method.
Triple Bottom Candidate vs Confirmed Pattern
Three support tests establish a candidate, not a confirmed bullish breakout. A method may require a completed candle above neckline resistance, sustained trading beyond the zone, or a later retest. Those are alternative confirmation rules, not universal requirements to combine.
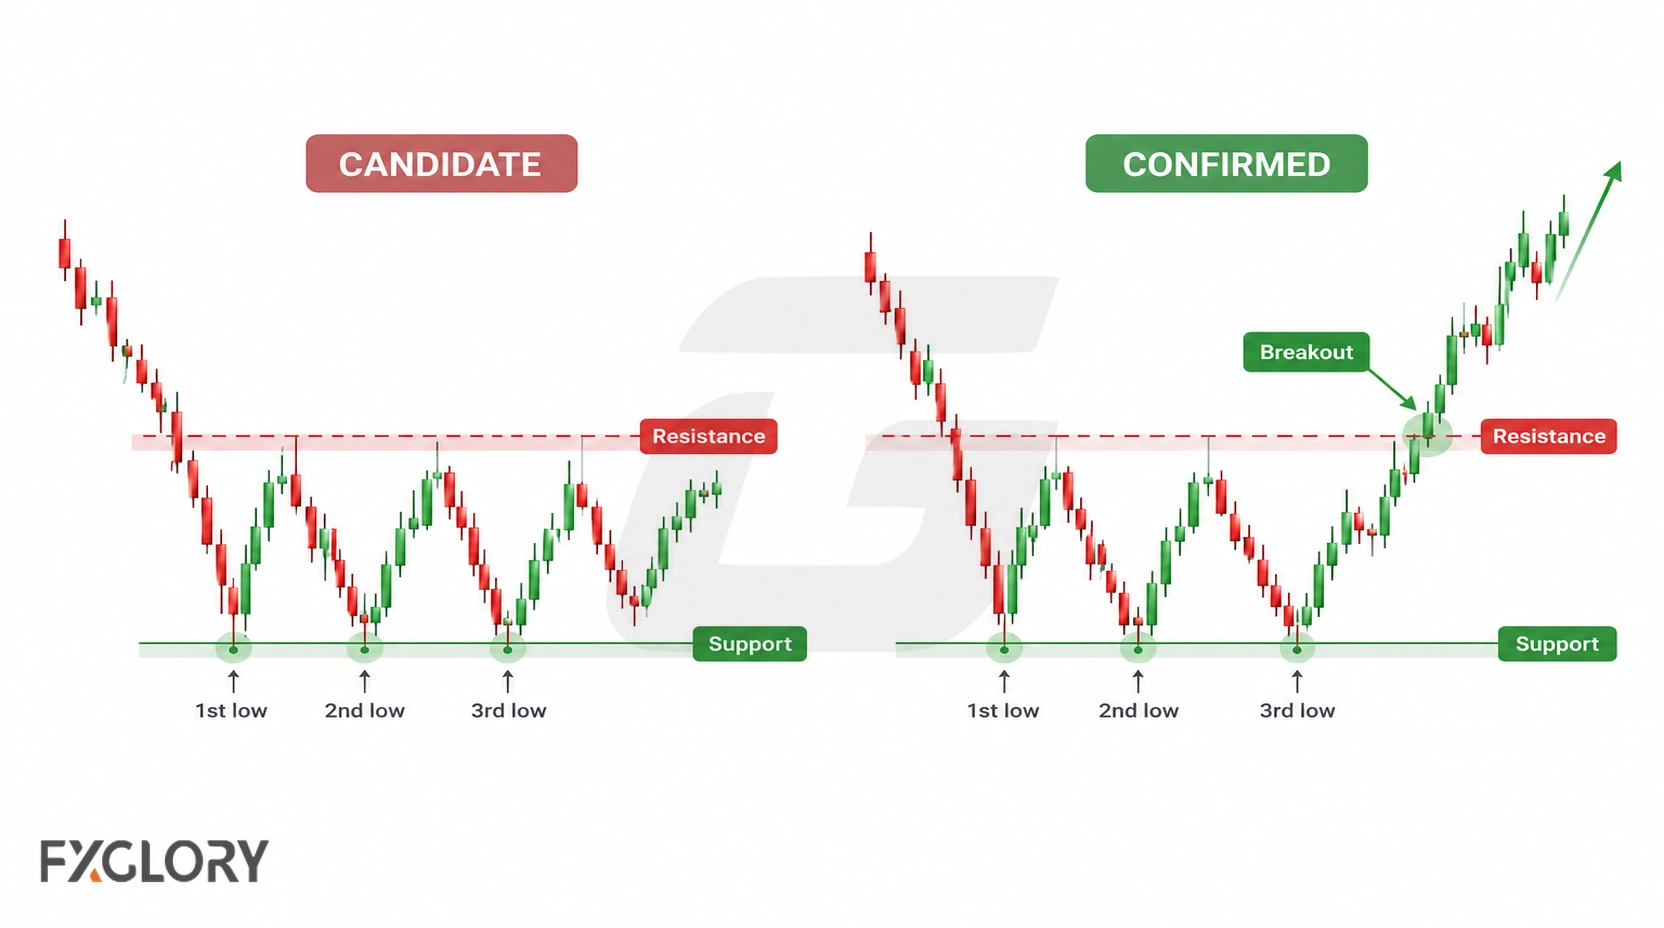
| State | Observation | Interpretation |
|---|---|---|
| Candidate | Three recognisable tests near support | Potential reversal, not confirmed |
| Unresolved | Price stays between support and resistance | Still unconfirmed; may become a range |
| Confirmed breakout | Price satisfies the chosen neckline-break rule | Bullish breakout scenario, not guaranteed follow-through |
| Failed breakout | Price returns below resistance after breaking it | Breakout thesis may be invalidated under its rules |
| Structural failure | Price decisively breaks the support base | Original three-test bullish thesis is undermined |
Neckline and Resistance in a Triple Bottom
The rebound highs between the lows are the reference for breakout evaluation. A completed close above the neckline, a sustained hold, and a retest provide different evidence at different times; a trader should choose which event qualifies before testing the method.
| Neckline Behavior | What It May Show | Careful Use |
|---|---|---|
| Resistance holds | Price does not break above the neckline | The triple bottom remains unconfirmed or may keep ranging |
| Clean break | Price moves above resistance with stronger follow-through | The bullish scenario becomes more developed but still carries risk |
| Retest | Price returns toward the broken resistance area | The retest can support or weaken the breakout idea |
| Return inside | Price breaks above then moves back below resistance | The breakout may be false |
| Neckline unclear | The intermediate highs do not form a usable area | The pattern may be too messy to rely on |
How Equal Should the Three Lows Be?
Evaluate price alignment and time separation separately. The lows may differ slightly in price while remaining within one defensible support zone; they also need to represent three distinguishable tests rather than neighbouring wick noise. There is no universal pip tolerance or candle-count rule.
| Low Quality | Cleaner Triple Bottom | Weaker Triple Bottom |
|---|---|---|
| Support area | All three lows react near a similar zone | Each low needs a different support level |
| Low shape | The lows show repeated holding around support | The lows are random spikes with little structure |
| Time spacing | The three tests are separated enough to show attempts | The lows are only adjacent wick noise or unrelated reactions |
| Middle low | The middle low is not clearly dominant | A much lower middle low may suggest inverse head and shoulders instead |
| Neckline | The bounces create a usable resistance area | The intermediate highs are too messy to define resistance |
If the central trough is materially deeper than the outer two, consider whether an inverse head and shoulders offers a more accurate description.
Triple Bottom vs W Pattern
A W pattern or double bottom has two principal support tests. A triple bottom adds a third distinct reaction before breakout evaluation. Do not retroactively call a two-low structure a triple bottom before the third test occurs.
Triple Bottom vs Inverse Head and Shoulders
Both structures have three troughs, but an inverse head and shoulders features a notably lower middle trough, or head, between higher shoulders. The geometry matters more than the number of lows alone.
| Comparison | Triple Bottom | Inverse Head and Shoulders |
|---|---|---|
| Low shape | Three lows around a similar support area | A lower middle low between two higher shoulders |
| Main message | Repeated support around the same area | Seller exhaustion after a final lower low |
| Neckline | Resistance between the repeated lows | Resistance connecting the reaction highs around the shoulders and head |
| Main confusion | Forcing a three-swing bottom into equal lows | Calling every three-low structure inverse head and shoulders |
| Careful reading | Check whether the middle low is clearly lower | Check whether the shoulder-head-shoulder structure is actually visible |
For the specialist treatment, see the broader neckline-based pattern guide.
Triple Bottom vs Rectangle and Descending Triangle
Repeated tests of a horizontal base can also belong to other structures. Compare the behaviour of the highs and the prior market trend before choosing a label.
| Structure | What It Looks Like | Careful Reading |
|---|---|---|
| Triple bottom | Three support holds after a downward move, followed by neckline pressure | Needs resistance break behavior before the bullish scenario develops |
| Rectangle | Price keeps rotating between horizontal support and resistance | If the range keeps holding, the structure may be a rectangle rather than a completed triple bottom |
| Descending triangle | Support stays similar while highs fall above it | Falling highs can show pressure building downward instead of bullish reversal |
| Ordinary range | Price moves sideways without clear reversal pressure | The market may simply be balanced or waiting for new information |
See horizontal range behavior or descending-triangle pressure for their distinct formation rules.
Triple Bottom vs Triple Top
A triple top is the bearish mirror structure: three tests of resistance after an upward move, with support providing the downside-breakout reference. See the three-resistance-test guide for details.
Clean vs Forced Triple Bottom Patterns
Identification quality concerns whether independent swings support the drawn zones, not whether a later trade wins. A visually clear candidate can still fail, while adjusting lines after seeing the outcome introduces hindsight bias.
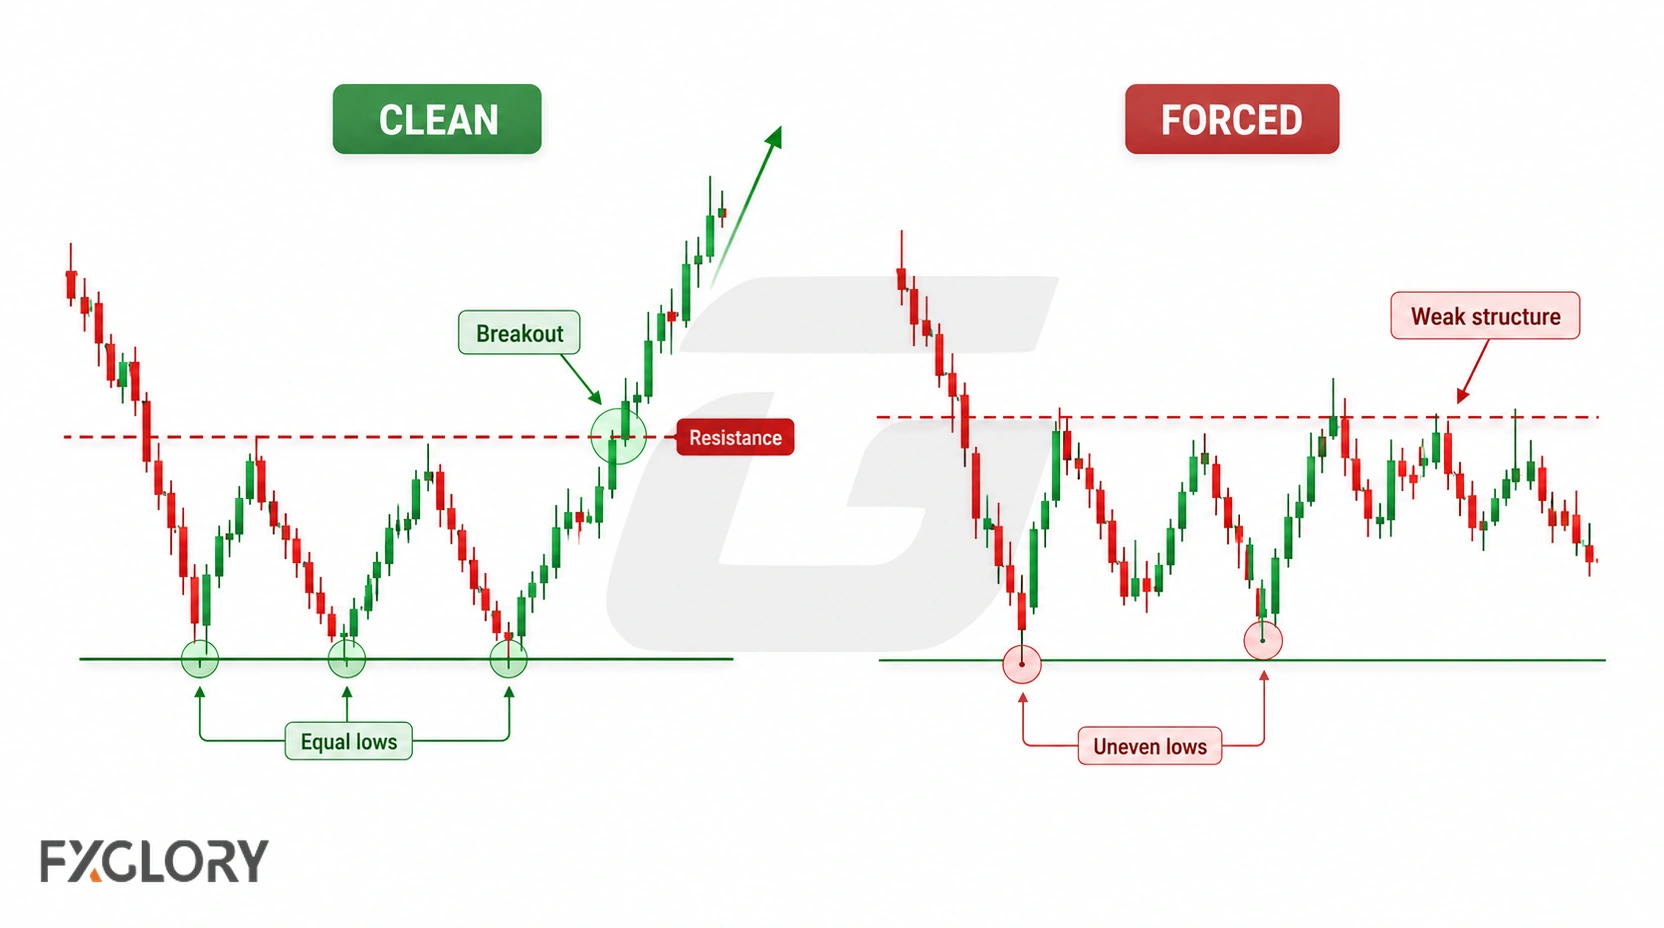
| Chart Factor | Cleaner Triple Bottom | Forced Triple Bottom |
|---|---|---|
| Prior move | Price has moved downward before the pattern | The structure appears in random sideways movement |
| Support base | The three lows react near a similar area | Support must be redrawn to include each low |
| Resistance ceiling | The bounces create a usable neckline or resistance zone | The highs are too messy or unrelated |
| Third low | The third test shows another support hold | The third low is chosen only to complete the label |
| Breakout behavior | Price challenges resistance after the third low | The pattern is assumed before resistance is tested |
| Context | The structure fits the broader trend and levels | The pattern ignores higher-timeframe support or resistance |
How to Confirm a Triple Bottom Pattern in Forex
Choose one explicit breakout rule before evaluating the price response. A candle close outside neckline resistance can qualify in one method; another may require a hold or successful retest. A retest is not guaranteed to occur.
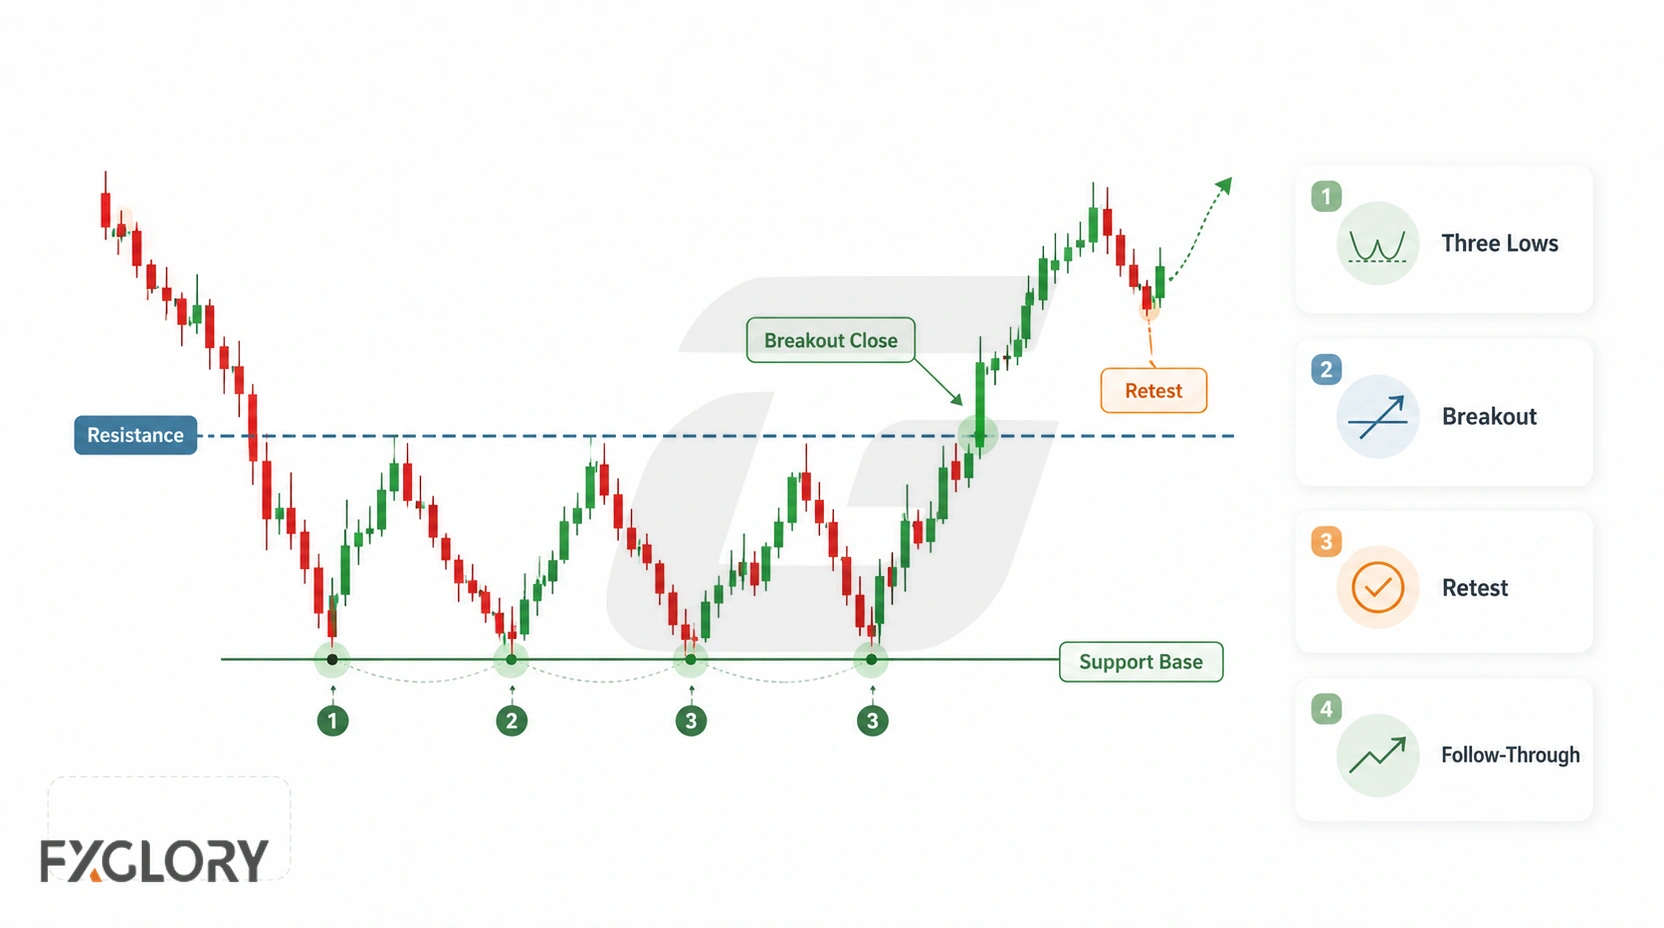
- Establish context: Identify the preceding decline and comparable support tests.
- Map resistance: Mark the intervening rebound highs and any nearby higher-timeframe level.
- Choose a trigger: Define the neckline break, closing condition or retest required for your method.
- Specify invalidation: Identify the price event that would contradict the entry thesis before calculating a stop and position size.
- Check execution: Consider prevailing spread, slippage, news timing and distance from the proposed entry to the invalidation level.
- Record the result: Judge the same rule consistently across successful, unresolved and failed breakouts.
For detailed execution and testing methods beyond pattern recognition, see the forex breakout strategy.
Invalidation: When the Triple Bottom Idea Fails
Absence of a neckline break is not, by itself, invalidation. Price may remain in an unresolved range. Separate the following events:
- Unconfirmed candidate: Price remains beneath resistance without breaking the support base; the reversal hypothesis is still pending.
- Failed breakout: Price meets a breakout trigger but then returns beneath the neckline, potentially cancelling that specific trade premise.
- Structural breakdown: Price establishes movement below the three-low support zone, undermining the bullish formation.
- Trade-level invalidation: Price reaches the explicit stop or structural cancellation level of the selected strategy; this need not match every pattern boundary.
A candidate can also be reclassified as a rectangle or triangle when later swings better fit those structures. Reclassification is an interpretation, not necessarily a losing trade.
Triple Bottom Scanner and Automation Caution
Scanners can flag clusters of local lows, but their recognition rules may differ from a manually identified structure. Check whether the tool uses completed candles, how it chooses swing lows, whether it revises earlier markings, and whether it separates candidates from confirmed breakouts.
A useful scanner report records the support tolerance, neckline rule and time of signal availability. Otherwise, attractive historical examples may reflect information not available when a trader would have acted.
Triple Bottom Measuring Principle
A common charting projection measures the vertical height from the support area to the neckline and adds that distance above the breakout level. This is a geometric illustration of a possible objective, not an estimated probability or promised move.
| Step | What It Does | Careful Use |
|---|---|---|
| Measure height | Estimate the distance between support and neckline | The range depends on clean lows and a usable neckline |
| Watch neckline behavior | Identify whether price breaks above resistance | A break can still fail |
| Use as reference | Project the height above the neckline area | The projection is only a scenario, not a promise |
| Check invalidation | Define where the idea becomes wrong | Invalidation should come before target focus |
For example, a hypothetical 60-pip height would project 60 pips above the selected neckline reference. Actual spreads, slippage, stop placement and the available market structure determine whether a trade plan offers acceptable risk and reward; the projection itself does not.
Forex Context: Sessions, News, Spread, Slippage, and Timeframes
A neckline break during an active session may behave differently from one in thin liquidity. Economic announcements can widen spreads or cause rapid movements through technical levels; execution prices may differ from the candle level used to define the pattern.
- Sessions and liquidity: Review whether a break occurs in active or thin trading conditions.
- Scheduled news: Consider event risk and potential changes in volatility.
- Spread and slippage: Include actual execution assumptions when planning stops and position size.
- Timeframe alignment: Check whether larger price structures obstruct the proposed breakout.
Volume and Tick Activity in Forex Triple Bottoms
Some approaches examine participation near the base or neckline. Because spot forex has no consolidated global volume tape, the available input is often broker-dependent tick activity, which records price updates rather than total transactions.
Tick patterns should be evaluated on a consistent feed, not treated as proof of institutional buying. For details, see tick-volume reading in forex.
Using Indicators and Candles With Triple Bottom Patterns
These tools answer different questions, rather than constituting extra compulsory conditions for a pattern.
| Tool Type | What It Can Help Read | Careful Use |
|---|---|---|
| Momentum indicators | Whether selling pressure is weakening near repeated support | Momentum can fade before price confirms a breakout |
| Trend-strength indicators | Whether the prior downward move is losing strength | They may lag during reversals or false breakouts |
| Volatility indicators | Whether movement is expanding around the neckline | High volatility can make false breaks more common |
| Candlestick reactions | Short-term rejection near support or the neckline | One candle is not the same as triple bottom confirmation |
| Tick activity | Activity around lows, neckline break, or retest areas | It is supporting context, not centralized market volume |
ATR-based volatility context measures recent movement size, not trade invalidation. Candlestick behavior around key areas can reveal short-term rejection, while the indicator guide explains other momentum and trend measures.
Example: Reading a Triple Bottom Pattern on GBP/USD
Hypothetical example, not a live signal: After a decline, suppose GBP/USD tests one support zone on three separate occasions and rebounds toward an identifiable neckline. The pattern is a candidate while price stays below that resistance.
Under a method requiring a completed close above the neckline, an intrabar move above it followed by a close back below would not trigger an entry. A qualifying close would create a bullish breakout scenario; a later return below the zone might meet that method's exit rule. A decisive break below the support base would undermine the original reversal thesis even without an upside trade having occurred.
This example provides no observed price levels, transaction results or evidence of profitability.
Common Mistakes With Forex Triple Bottom Patterns
Beyond the basic formation rules, the most consequential errors involve hindsight and inconsistent execution:
- Redrawing after the fact: Adjusting the neckline or support to fit the observed outcome.
- Confusing pattern and trade failure: Calling an unresolved range a failed breakout despite no breakout trigger occurring.
- Changing confirmation rules: Requiring a candle close in planning but accepting an intrabar wick after seeing price move.
- Chasing a distant entry: Ignoring how distance from the neckline changes stop distance and reward relative to risk.
- Overtrusting scanners: Treating an automated candidate label as a timestamped confirmation signal.
A Safer Way to Read Triple Bottom Patterns in Forex
A triple bottom is useful when it distinguishes a developing support structure from a separately defined breakout thesis. Keep the candidate, confirmation and invalidation states explicit, and evaluate the method with rules and market data that would actually have been available at the time.