
The D1 structure remains bearish, while a bullish H4 recovery and mixed momentum create a conditional, two-sided setup around the 0.80049 resistance area.
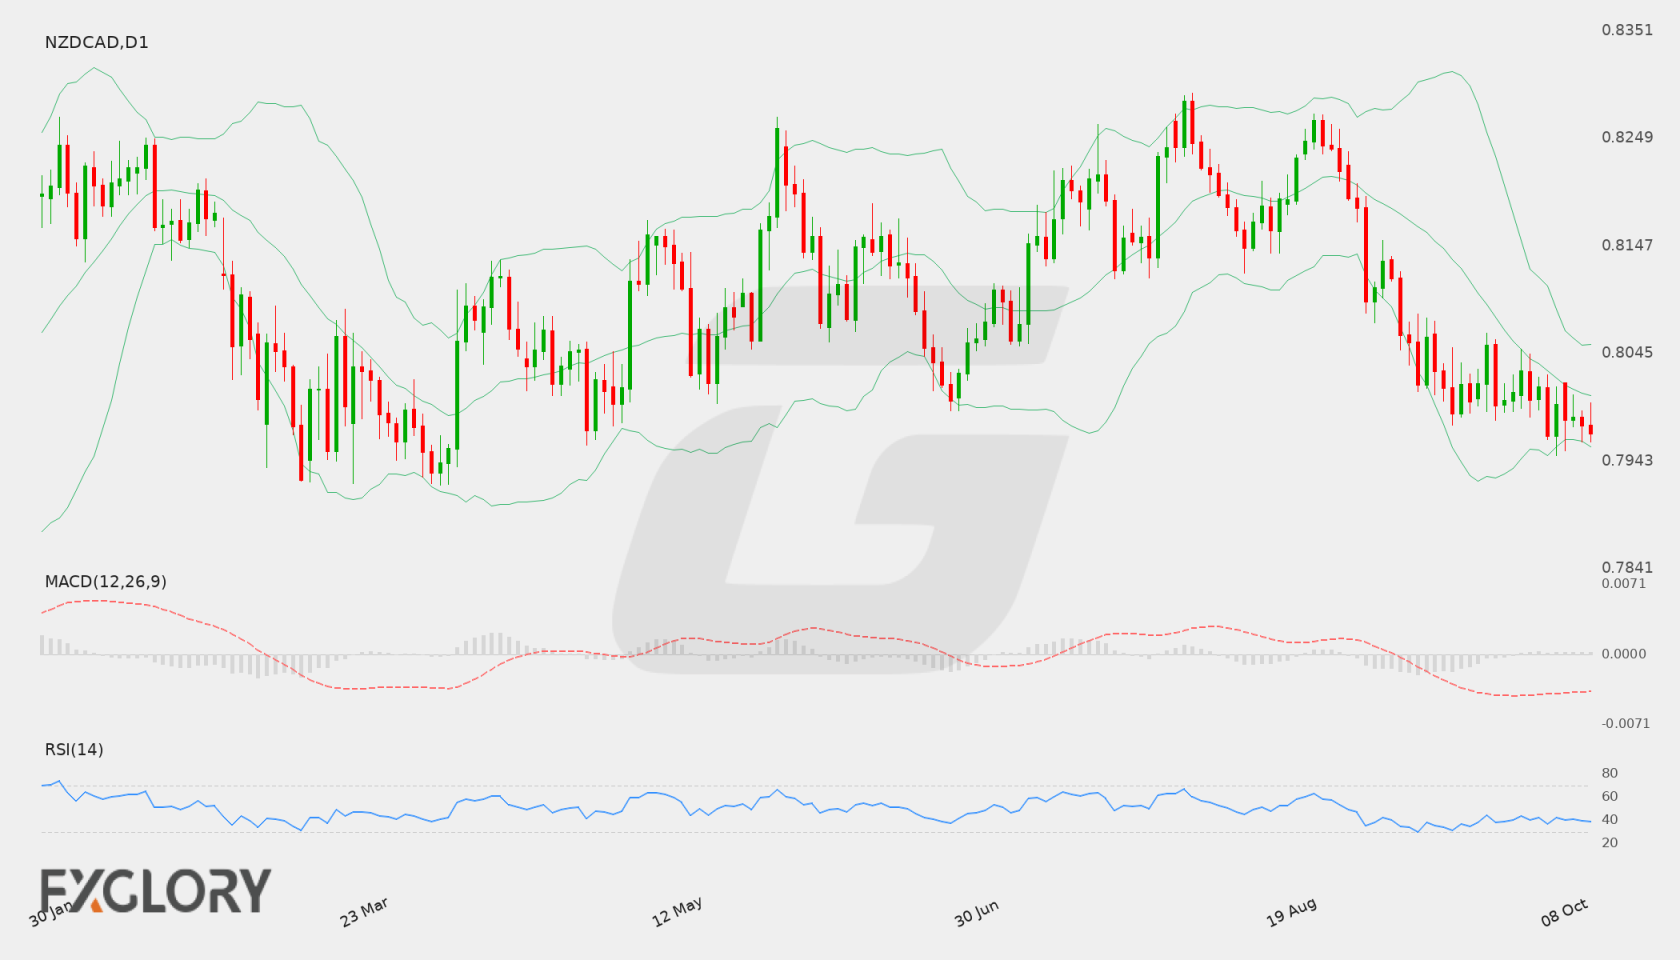
NZD/CAD Weekly Forecast at a Glance
In brief
The weekly bias is Bearish, supported by D1 structure and moving-average pressure, although bullish H4 momentum keeps recovery risk active around 0.80049.
The D1 timeframe controls the weekly assessment: the trend state is bearish, the close sequence is mixed, and the reference close at 0.79692 is below the EMA20 at 0.80152, EMA50 at 0.80697 and SMA200 at 0.80968. That alignment places the broader structure under pressure, while the mixed close sequence prevents the bearish case from being treated as one-directional.
H4 presents the main countertrend influence. Its bullish tactical state is accompanied by an H4 close of 0.80017, RSI at 59.64 and positive MACD histogram, placing short-term recovery pressure near the H4 resistance at 0.80054 and D1 resistance at 0.80049. A failure to sustain that recovery would leave the D1 structure in control; a completed D1 close above 0.80267 would materially change the formal weekly boundary.
| Price at last update | 0.79998 as of 10 Oct 2026 02:50 GMT+3 |
|---|---|
| Completed D1 reference close | 0.79692 as of 8 October 2026 |
| Primary support | 0.79437 |
| Secondary support | — |
| Primary resistance | 0.80049 |
| Bullish targets | 0.80471, 0.80784 |
| Bearish targets | |
| Formal weekly thesis invalidation | Upper 0.80267 — One completed D1 close above 0.80267 formally invalidates the bearish weekly thesis. |
Live NZD/CAD Tools
A forecast is a snapshot. These pages keep moving with the market.
- Live
Live chart & price
Watch NZD/CAD move tick by tick. Flip from the 1-minute chart to the monthly, with trading conditions right alongside.
- Live
Technical signals
Buy, sell or sit it out? Oscillators, moving averages and pivot points boiled down to one clear reading, updated live.
Economic calendar
Know what's coming before it hits the price: every scheduled release with impact, forecast and actual.
Historical data
Open, high, low and close on any timeframe from 1 minute to monthly. Test your idea, then download the data.
All NZD/CAD forecasts
Every weekly outlook in one place. Scroll back to see how earlier calls played out against the chart.
NZD/CAD Fundamental Drivers This Week
No scheduled events were provided for this forecast, so the weekly assessment is driven by the supplied D1 and H4 technical structure, momentum and volatility readings.
Current NZD/CAD Price and Weekly Market Context
The weekly structure is controlled by a bearish D1 trend, with the 0.79692 reference close below the D1 EMA20, EMA50 and SMA200. The falling EMA50 slope reinforces that pressure, while the rising SMA200 slope and mixed D1 close sequence show that the broader moving-average picture is not uniformly aligned. H4 is bullish, with its close at 0.80017 above the H4 EMA20 and EMA50, so the tactical picture currently complicates rather than confirms the D1 direction.
- D1 trendbearishClose vs 50 EMA and 200 SMA
- H4 tacticalbullishH4 close vs 20 and 50 EMA
- MomentummixedRSI and MACD histogram
- VolatilitystableD1 ATR change
Is NZD/CAD Bullish or Bearish This Week?
The bearish scenario remains the primary framework because D1 trend and moving-average positioning lean lower. The bullish alternative is supported by the H4 recovery and positive short-term momentum, while the neutral scenario reflects the mixed D1 close sequence and the opposing timeframe signals around 0.80049–0.80054.
Scenario 1 of 3Bullish continuation
- D1 confirmation
- A bullish weekly interpretation would require a completed D1 close above the formal upper boundary at 0.80267, placing the current H4 recovery into a broader structural context.
- H4 tactical signal
- The bullish tactical case would strengthen if H4 maintained its recovery above the listed H4 resistance at 0.80054 and price progressed toward the permitted bullish levels at 0.80471 and 0.80784.
- Targets
- 0.80471, 0.80784
- Scenario failure condition
- The bullish alternative would weaken if the H4 recovery failed around the 0.80049–0.80054 resistance area and price returned toward the supplied support at 0.79437.
Scenario 2 of 3Base / neutral
- D1 confirmation
- The consolidation scenario is supported by the mixed D1 close sequence and the absence of full agreement between the bearish D1 trend and bullish H4 condition.
- H4 tactical signal
- A neutral outcome would be consistent with H4 retaining its bullish tactical state while failing to establish a D1 structural shift above 0.80267.
- Targets
- The neutral path centers on two-sided interaction between the 0.79437 support and the 0.80049 primary resistance, with 0.80054 as the relevant H4 resistance reference.
- Scenario failure condition
- The consolidation scenario would weaken if a completed D1 close established a clear move above 0.80267 or if price broke decisively away from the supplied support and resistance framework.
Scenario 3 of 3Bearish reversal
- D1 confirmation
- The bearish scenario is supported by the D1 bearish trend, a reference close of 0.79692 below the EMA20, EMA50 and SMA200, and a falling EMA50 slope.
- H4 tactical signal
- The bearish case would gain tactical support if the H4 recovery failed at the 0.80011–0.80054 area and H4 momentum ceased to support the current bullish condition.
- Targets
- Not identified
- Scenario failure condition
- The bearish scenario would weaken materially after one completed D1 close above 0.80267, because that would remove the formal boundary supporting the weekly view.
“Not identified” means the available analysis did not establish that condition.
NZD/CAD D1 Outlook and H4 Technical Triggers
The daily timeframe controls the weekly thesis. H4 evidence is used only for earlier confirmation, tactical warning and scenario-failure context. Complete live H4, H1 and intraday readings remain on the Technical page.
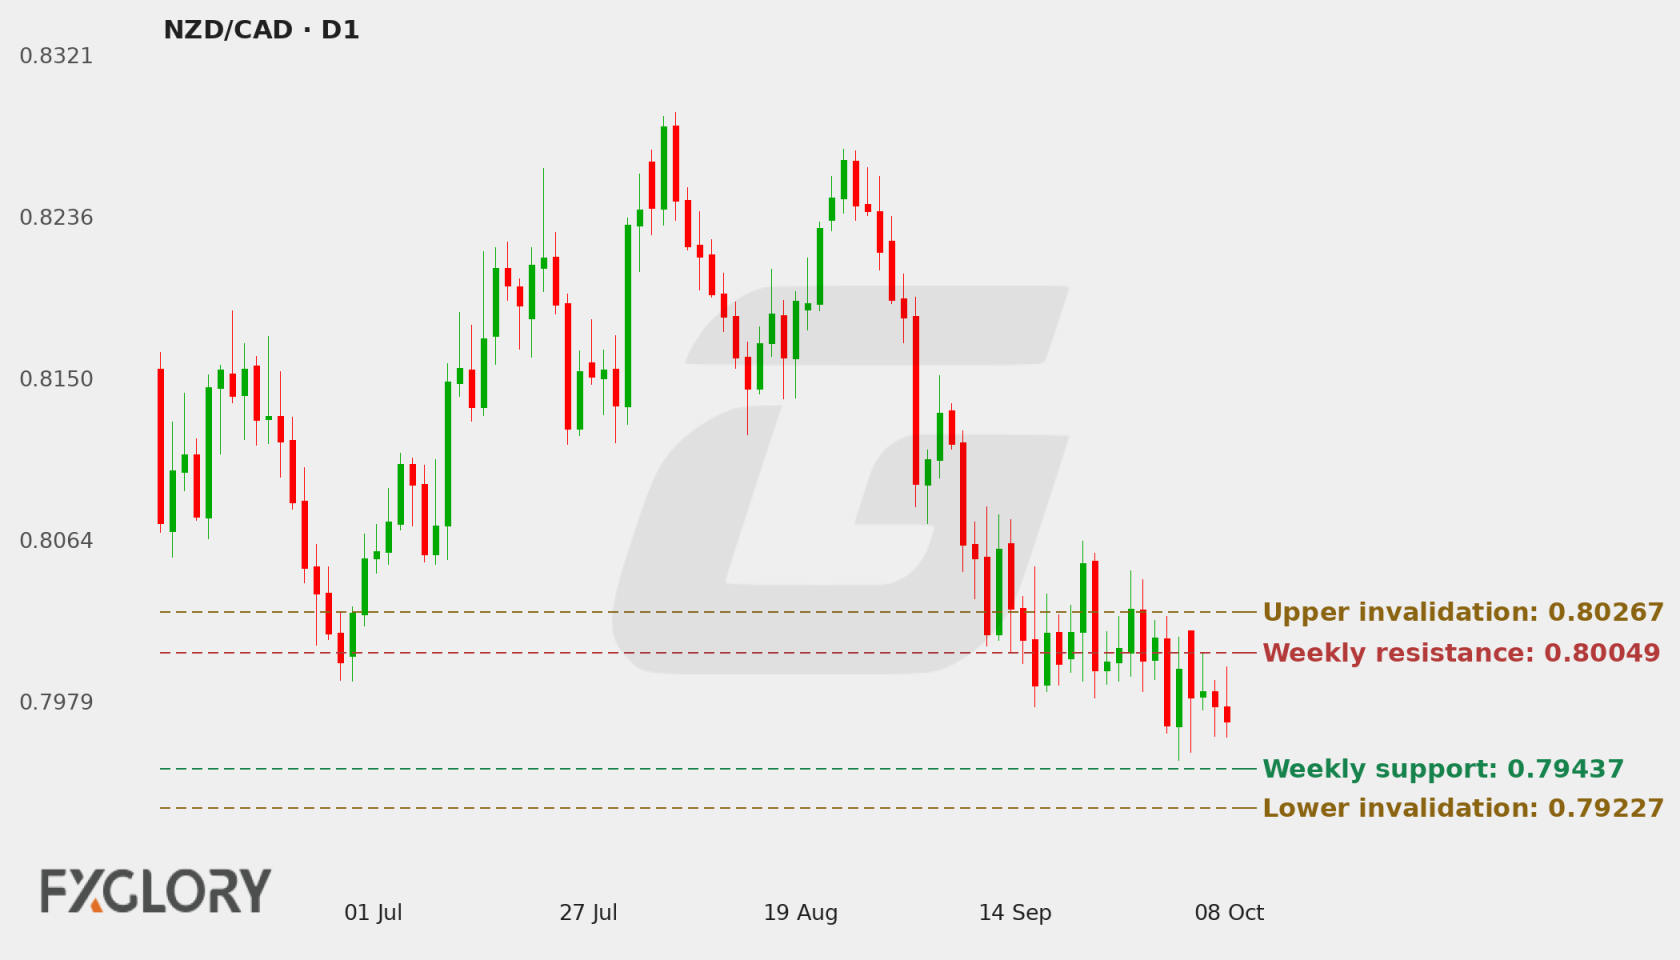
D1 Price Action and Market Structure
D1 price action is mixed within a bearish trend context. The reference close at 0.79692 is below the Bollinger middle at 0.80049 and below the EMA20, EMA50 and SMA200, while the falling EMA50 slope reinforces downside structure. The rising SMA200 slope and mixed close sequence are counterweights that argue for conditional interpretation rather than an unqualified continuation claim.
H4 Tactical Triggers
H4 currently provides countertrend recovery evidence: its close at 0.80017 is above the EMA20 at 0.7982 and EMA50 at 0.79878, RSI is 59.64, and the MACD histogram is positive at 0.000364. However, H4 resistance at 0.80054 sits close to the D1 primary resistance at 0.80049, so the tactical recovery still needs to overcome a defined resistance cluster before it can alter the D1-led weekly thesis.
Technical Indicators at a Glance
Automated technical summary
The technical picture is mixed across timeframes. D1 remains bearish with a reference close below its listed moving averages and a falling EMA50 slope, while H4 is bullish with price above its short-term moving averages and positive MACD histogram. Stable volatility limits directional interpretation and keeps level interaction central.
Selected snapshot: D1 with H4 tactical context. Updated 11 October 2026.
- RSI38.57Neutral
- MACDAbove signalBullish
- Bollinger Bands13% of bandLower half
- Moving averagesBelow bothBearish
- ATR49.0 pipsStable
RSI (14)
Neutral
H4 59.64
D1 RSI at 38.57 is consistent with weak momentum within the bearish structure but does not by itself establish a new support or reversal signal. H4 RSI at 59.64 shows stronger short-term momentum and is the clearest countertrend input.
- D1 RSI
- 38.57
- H4 RSI
- 59.64
MACD (12, 26, 9)
Bullish momentum
D1 MACD remains negative, although its histogram is positive at 0.000206, showing mixed momentum rather than clean bearish acceleration. H4 MACD is also tactically firmer, with a positive histogram of 0.000364 and MACD above its signal value.
- MACD
- -0.003536
- Signal
- -0.003742
- Histogram
- 0.000206
Bollinger Bands (20, 2σ)
Lower half
Striped ends = price outside the bands.
The D1 close at 0.79692 is below the Bollinger middle at 0.80049 and above the lower band at 0.79564, indicating pressure within the lower half of the band structure without establishing a directional outcome from volatility bands alone. H4 close at 0.80017 is near its upper band at 0.80026, making the listed H4 resistance relevant to tactical follow-through.
- Position in band
- 13%
- Band width
- 97.0 pips (1.21%)
Moving averages (D1)
Bearish structure
- 50 EMA falling0.80697Price is 100.5 pips below (-1.25%)
- 200 SMA rising0.80968Price is 127.6 pips below (-1.58%)
Moving-average evidence favors the D1 bearish thesis because the reference close is below EMA20, EMA50 and SMA200, and the EMA50 slope is falling. The rising SMA200 slope introduces a longer-horizon counterweight. H4 is more constructive, with its close above EMA20 and EMA50, reinforcing the timeframe disagreement.
- D1 close
- 0.79692
- 50 EMA
- 0.80697
- 200 SMA
- 0.80968
ATR (14)
Stable volatility
One ATR either side of the latest close. A measure of move size, not a price target.
Stable volatility describes the environment rather than direction. D1 ATR at 0.0049 and H4 ATR at 0.00178 indicate that level tests may develop across different tactical horizons, but ATR does not determine whether support or resistance will hold.
- D1 ATR
- 0.0049 (0.61%)
- H4 ATR
- 0.00178 (0.22%)
Technical conclusion: The controlling evidence remains the bearish D1 structure: 0.79692 is below the listed D1 moving averages, the EMA50 slope is falling, and RSI is weaker than the H4 reading. The strongest counterargument is the bullish H4 recovery, supported by price above its short-term averages and positive MACD histogram. The next technical focus is the interaction between 0.79437 support and the 0.80049–0.80054 resistance area; a completed D1 close above 0.80267 would materially change the formal weekly framework.
View all live NZD/CAD oscillators, moving averages, pivot points and timeframe signals.
NZD/CAD Weekly Support, Resistance and Invalidation
| Level | Role | Timeframe | Why it matters |
|---|---|---|---|
| 0.79437 | Primary support | D1 | It is the only supplied D1 support candidate and marks the nearest stated downside reference below the 0.79692 D1 close. |
| 0.80049 | Primary resistance | D1 | It is the D1 primary resistance and also the Bollinger middle, making it central to whether the H4 recovery can challenge the broader structure. |
| 0.80471 | Secondary resistance / bullish target | D1 | It is the next supplied resistance and permitted bullish target above the primary resistance. |
| 0.80784 | Tertiary resistance / bullish target | D1 | It is the higher supplied resistance and permitted bullish target if the bullish alternative progresses beyond 0.80471. |
| 0.80011 | H4 support | H4 | It is the supplied H4 support reference beneath the 0.80017 H4 close. |
| 0.80054 | H4 resistance | H4 | It is the supplied H4 resistance immediately relevant to the current tactical recovery. |
These are forecast-specific market-structure levels. Formula-based Classic, Fibonacci and Camarilla pivots remain on the Technical page.
Economic News & Events to Watch for NZD/CAD This Week
No scheduled events available for this period.
Calendar source: FXGlory economic calendar. Retrieved 11 Oct 2026 17:26 GMT+3. View the complete NZD/CAD economic calendar.
NZD/CAD Outlook for 11–17 October 2026
The weekly framework remains conditionally bearish because D1 structure, moving-average positioning and the falling EMA50 slope outweigh the more constructive H4 picture. The 0.79692 reference close is below the principal D1 moving averages, while mixed D1 closes and mixed momentum keep the setup from being one-sided.
The bullish H4 recovery is the key risk to immediate bearish follow-through, particularly around 0.80049 and 0.80054. Failure there would keep the D1 thesis dominant and return focus to 0.79437; a completed D1 close above 0.80267 would materially alter the formal weekly interpretation.
Weekly Forecast Risks and What Would Change the Outlook
- Timeframe disagreement: The D1 trend is bearish while H4 is bullish, so short-term recovery can complicate the timing and immediacy of the D1-led weekly thesis.
- Mixed momentum: D1 MACD remains negative but its histogram is positive, while H4 momentum is firmer, leaving directional pressure less uniform.
- Mixed D1 close sequence: The mixed close sequence reduces the strength of a simple continuation narrative even though the broader D1 trend remains bearish.
- Stable volatility: Stable volatility may allow the market to consolidate around the supplied levels, delaying a decisive test of support or resistance.
Formal weekly invalidation: The bearish weekly thesis is formally invalidated by one completed D1 close above 0.80267. One completed D1 close below 0.79227 confirms lower structural extension and continuation.
NZD/CAD Weekly Forecast FAQs
Is NZD/CAD bullish or bearish this week?
The weekly bias is Bearish because the D1 trend is bearish and price is below the listed D1 moving averages, despite bullish H4 conditions.
What scenario would strengthen for NZD/CAD this week?
The primary scenario is continued D1 pressure with H4 recovery acting as a countertrend test. A sustained shift above the supplied resistance structure would make the bullish alternative more relevant, while mixed closes can support consolidation.
What are the key NZD/CAD support and resistance levels?
The main weekly support is 0.79437. The primary resistance is 0.80049, followed by 0.80471 and 0.80784; H4 also lists 0.80011 as support and 0.80054 as resistance.
What would invalidate this NZD/CAD forecast?
The bearish weekly thesis is formally invalidated by one completed D1 close above 0.80267.
Methodology, Data and Sources
- Price-data source: FXGlory price feed (NZDCAD)
- Live quote timestamp: 10 Oct 2026 02:50 GMT+3
- Weekly analysis timestamp: 11 October 2026
- Chart timestamp: 11 October 2026 (redrawn daily)
- Technical snapshot timestamp: 11 October 2026
- Calendar-data source: FXGlory economic calendar
- Calendar retrieval timestamp: 11 Oct 2026 17:26 GMT+3
- Candle convention: FXGlory D1 and H4 candles; D1 candle dates are evaluated in UTC and invalidation uses completed D1 closes only.
- Indicator settings: D1 RSI(14), MACD(12,26,9), Bollinger Bands(20,2), EMA(50), SMA(200), ATR(14); H4 RSI/MACD/Bollinger/EMA/ATR.
- Level-selection method: Weekly D1 support/resistance levels are structural market levels. Formal invalidation uses a hard 0.75× D1 ATR(14) minimum anchor distance plus a 0.20× D1 ATR(14) outward buffer; H4 levels are tactical only.
- Weekly forecast method: D1 controls the weekly thesis; H4 supplies tactical confirmation/warning only.