
The weekly thesis remains controlled by a bearish D1 trend, while mixed momentum and a bullish H4 state leave room for tactical recovery and two-sided event risk.
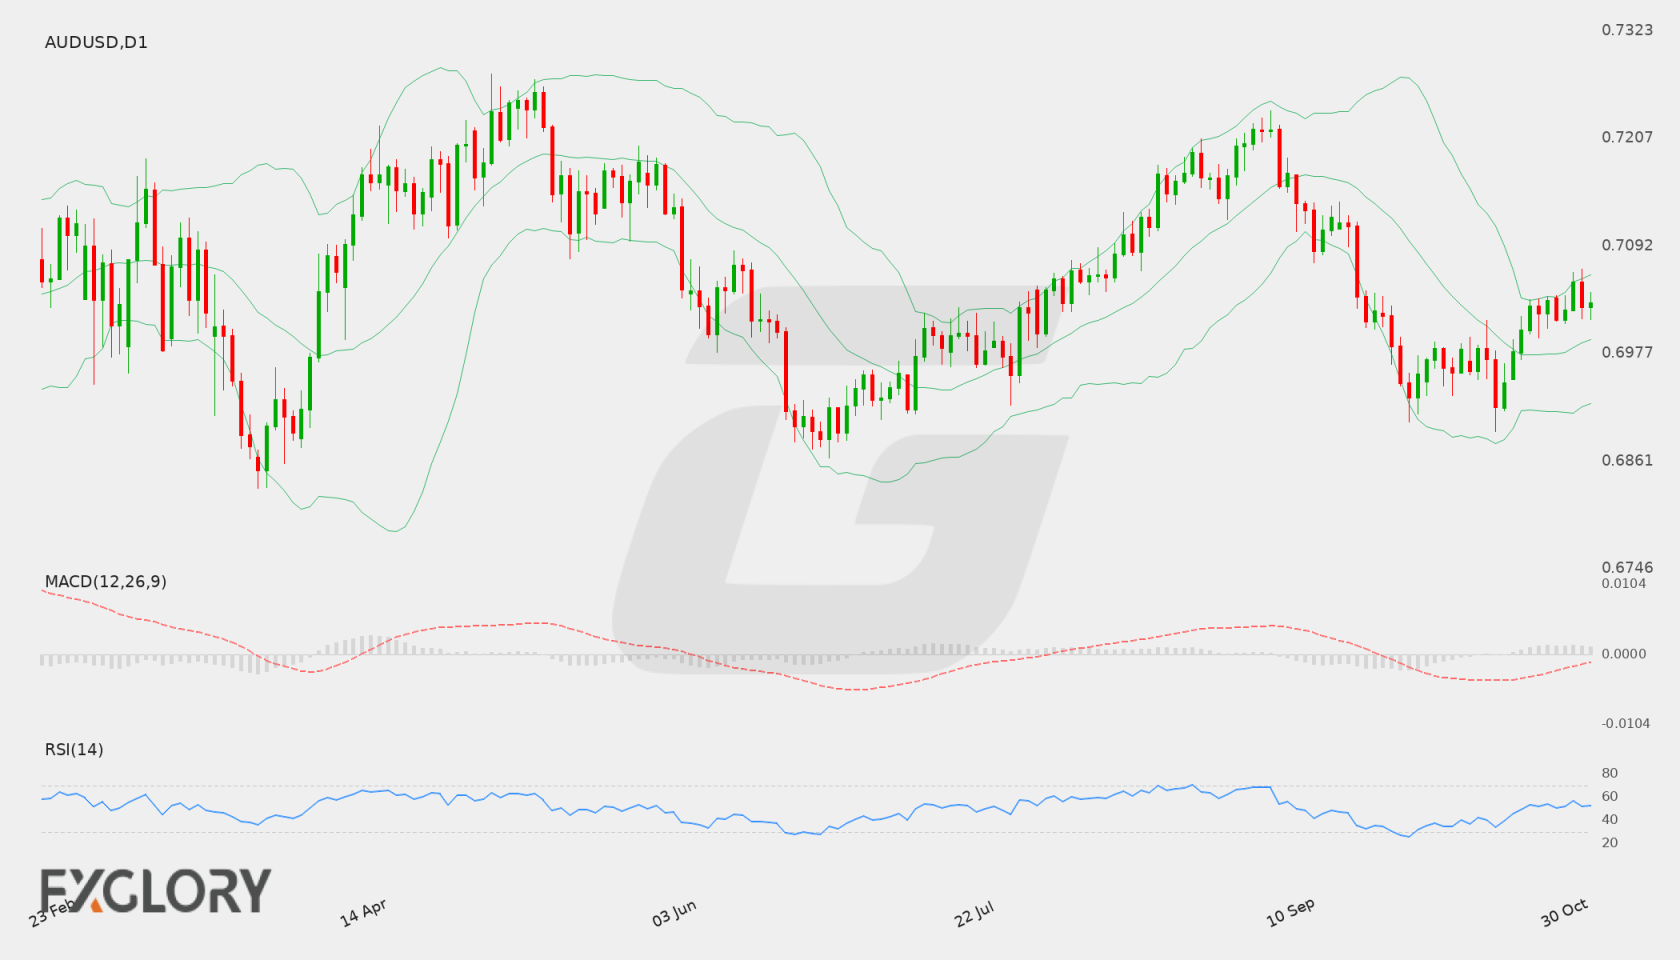
AUD/USD Weekly Forecast at a Glance
In brief
AUD/USD retains a bearish weekly bias as D1 structure remains weak, although bullish H4 conditions and mixed momentum leave room for a conditional recovery.
The D1 timeframe remains the controlling influence: the trend state is bearish, the close sequence is mixed, and the 0.70306 close is below the D1 EMA50 and SMA200 while remaining above the EMA20 and Bollinger middle. This combination preserves a weak broader structure without showing uniform downside momentum.
The main counterweight is tactical rather than structural. H4 is bullish, with the close above its EMA20 and EMA50 and above H4 support, but its MACD is below its signal and its histogram is negative. A move through the supplied resistance area would therefore improve the recovery case, while renewed pressure through support would restore the D1 trend’s influence.
- Bullish targets
-
- T10.70868
- T20.71279
- Bearish targets
-
- T10.69826
- T20.69609
- Invalidation
- One completed D1 close above 0.72407.
Selected key events
- Congressional Elections3 Nov 2026 (All Day)High
- Cash Rate3 Nov 2026 06:30 GMT+3High
- RBA Monetary Policy Statement3 Nov 2026 06:30 GMT+3High
| Price at last update | 0.70147 as of 02 Nov 2026 11:50 GMT+3 |
|---|---|
| Completed D1 reference close | 0.70306 as of 30 October 2026 |
| Primary support | 0.70082 |
| Secondary support | 0.69826 |
| Primary resistance | 0.70565 |
| Bullish targets | 0.70868, 0.71279 |
| Bearish targets | 0.69826, 0.69609 |
| Formal weekly thesis invalidation | Upper 0.72407 — One completed D1 close above 0.72407 formally invalidates the bearish weekly thesis. |
Live AUD/USD Tools
A forecast is a snapshot. These pages keep moving with the market.
- Live
Live chart & price
Watch AUD/USD move tick by tick. Flip from the 1-minute chart to the monthly, with trading conditions right alongside.
- Live
Technical signals
Buy, sell or sit it out? Oscillators, moving averages and pivot points boiled down to one clear reading, updated live.
Economic calendar
Know what's coming before it hits the price: every scheduled release with impact, forecast and actual.
Historical data
Open, high, low and close on any timeframe from 1 minute to monthly. Test your idea, then download the data.
All AUD/USD forecasts
Every weekly outlook in one place. Scroll back to see how earlier calls played out against the chart.
AUD/USD Fundamental Drivers This Week
Scheduled economic events relevant to AUD/USD during 2–7 November 2026 include ISM Manufacturing PMI, Congressional Elections, Cash Rate. Directional impact depends on the released data relative to supplied expectations.
Scroll table sideways for more columns →
| Event | Scheduled | Importance | Consensus | Previous |
|---|---|---|---|---|
| ISM Manufacturing PMI | 2 Nov 2026 18:00 GMT+3 | Medium | 54.5 | 54.5 |
| Congressional Elections | 3 Nov 2026 (All Day) | High | — | — |
| Cash Rate | 3 Nov 2026 06:30 GMT+3 | High | 4.85% | 4.60% |
| RBA Monetary Policy Statement | 3 Nov 2026 06:30 GMT+3 | High | — | — |
| RBA Rate Statement | 3 Nov 2026 06:30 GMT+3 | High | — | — |
Current AUD/USD Price and Weekly Market Context
The weekly structure is led by a bearish D1 trend, but the technical picture is not one-sided. D1 momentum is mixed: RSI is above 50, MACD is above its signal while both the MACD sign is negative and the histogram sign is positive. H4 is bullish tactically, yet its MACD is below its signal and its histogram is negative, so the shorter timeframe provides recovery pressure and an early warning rather than a replacement for the D1 thesis.
- D1 trendbearishClose vs 50 EMA and 200 SMA
- H4 tacticalbullishH4 close vs 20 and 50 EMA
- MomentummixedRSI and MACD histogram
- VolatilitystableD1 ATR change
Is AUD/USD Bullish or Bearish This Week?
The favored scenario is bearish continuation or renewed downside pressure while D1 structure remains bearish and price stays below the primary resistance. A bullish alternative requires H4 recovery to develop through resistance and would initially represent tactical improvement. A neutral scenario is plausible if price remains between the supplied support and resistance while mixed momentum and stable volatility restrain directional development.
Scenario 1 of 3Bullish reversal
- D1 confirmation
- A bullish weekly interpretation would require the D1 structure to improve beyond the current bearish state, with price action developing above the supplied resistance framework rather than only producing an H4 recovery.
- H4 tactical signal
- The bullish tactical case strengthens if H4 maintains its close above H4 support and its EMA20 and EMA50 while progressing through 0.70322 and toward the supplied resistance levels.
- Targets
- 0.70868, 0.71279
- Scenario failure condition
- The recovery case would weaken if H4 loses its position above 0.70281 support and the D1 bearish structure again dominates price action.
Scenario 2 of 3Base / neutral
- D1 confirmation
- The base scenario is supported by the mixed D1 close sequence and mixed momentum, which leave the bearish trend present but not fully confirmed by every momentum measure.
- H4 tactical signal
- The neutral case is reinforced if bullish H4 price positioning and negative H4 histogram pressure continue to offset each other without a decisive development through H4 support or resistance.
- Targets
- The consolidation framework is bounded by the supplied weekly support at 0.70082 and resistance at 0.70565, with 0.69826 and 0.70868 marking the next supplied reference levels if the range resolves.
- Scenario failure condition
- The base case would weaken if D1 price action develops decisively beyond the supplied weekly support or resistance structure and the opposing timeframe signals lose their balance.
Scenario 3 of 3Bearish continuation
- D1 confirmation
- The bearish case gains structural support while the D1 trend remains bearish, the EMA50 slope remains falling, and the close stays below the D1 EMA50 and SMA200.
- H4 tactical signal
- The bearish setup becomes more relevant if H4 fails to hold 0.70281 support and its tactical bullish condition gives way, allowing pressure toward the weekly support sequence.
- Targets
- 0.69826, 0.69609
- Scenario failure condition
- The bearish scenario would be materially weakened if H4 recovery extends through 0.70322 and price develops above the supplied weekly resistance framework.
AUD/USD D1 Outlook and H4 Technical Triggers
The daily timeframe controls the weekly thesis. H4 evidence is used only for earlier confirmation, tactical warning and scenario-failure context. Complete live H4, H1 and intraday readings remain on the Technical page.
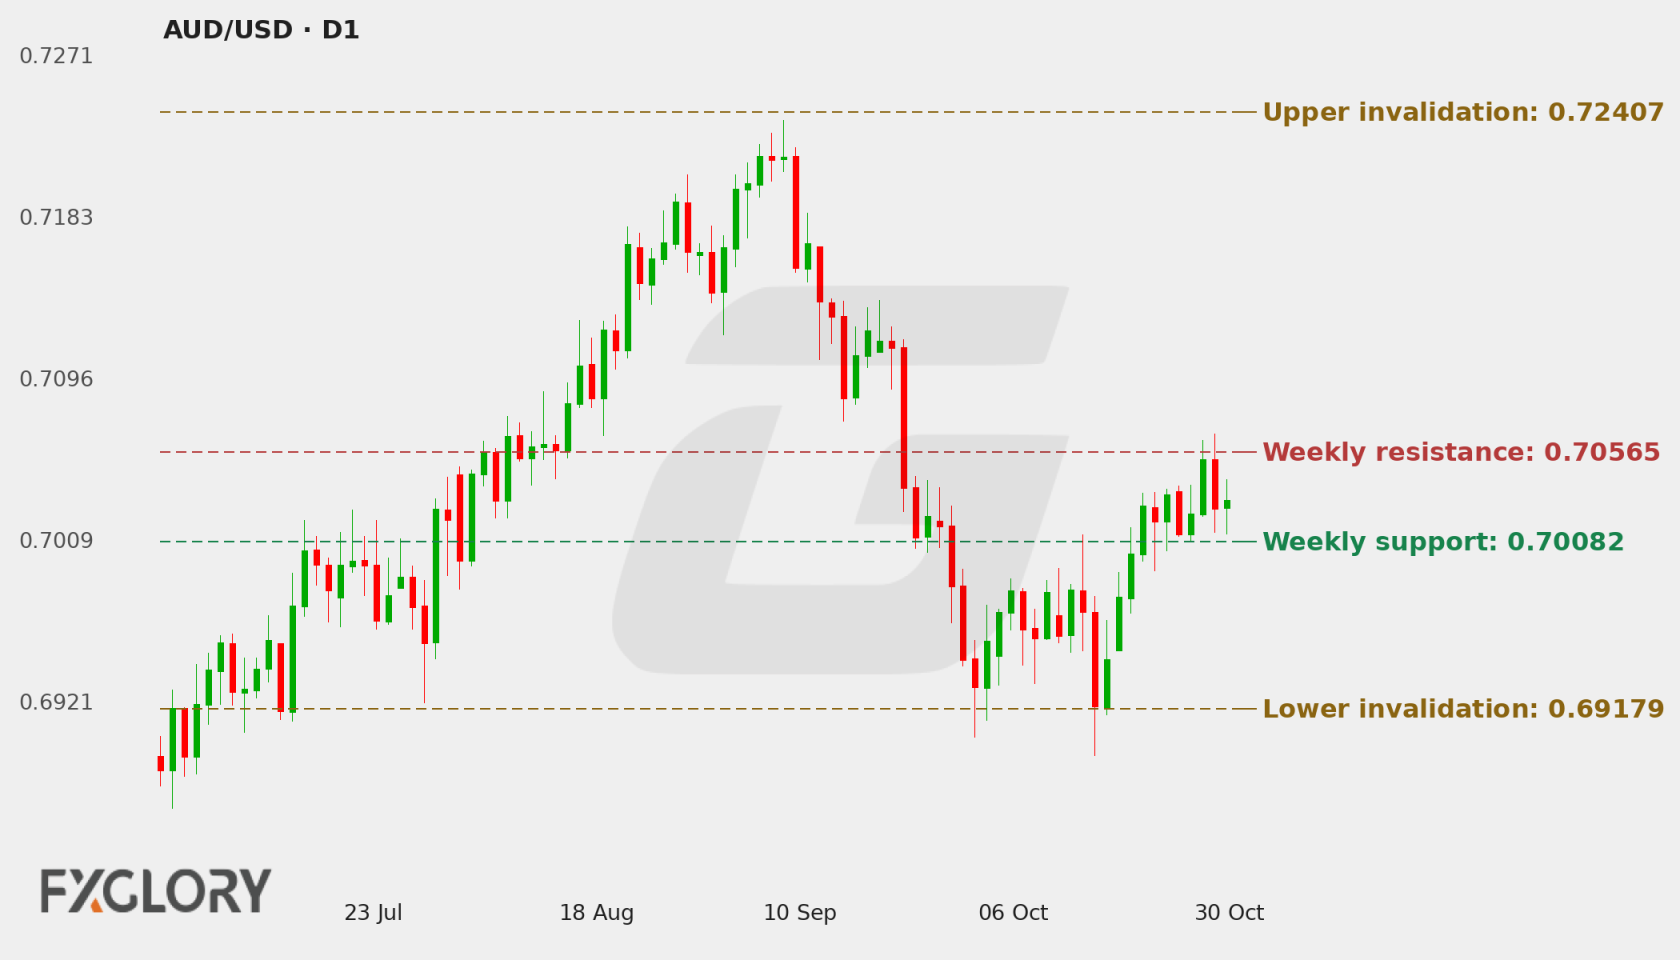
D1 Price Action and Market Structure
The 0.70306 D1 close is above D1 support and below D1 resistance. It is above the EMA20 and Bollinger middle, but below the EMA50 and SMA200, while the EMA50 slope is falling and the SMA200 slope is rising. The mixed close sequence therefore sits inside a broader bearish trend structure with some near-term recovery evidence.
H4 Tactical Triggers
H4 is bullish tactically: its 0.70299 close is above H4 support, the EMA20 and EMA50, and RSI is above 50. However, H4 MACD is below its signal, its histogram sign is negative, and the close is below the Bollinger middle and H4 resistance. H4 therefore signals recovery pressure but not clean tactical alignment.
Technical Indicators at a Glance
Automated technical summary
The D1 trend state is bearish, H4 is bullish, momentum is mixed and volatility is stable. D1 MACD is above its signal with a positive histogram sign while its sign is negative; H4 MACD is below its signal with a negative histogram sign while its sign is positive. Price structure remains below the D1 EMA50 and SMA200 but above the EMA20 and Bollinger middle.
Selected snapshot: D1 with H4 tactical context. Updated 2 November 2026.
- RSI52.57Neutral
- MACDAbove signalBullish
- Bollinger Bands78% of bandUpper half
- Moving averagesBelow bothBearish
- ATR42.6 pipsStable
RSI (14)
Neutral
H4 50.92
D1 and H4 RSI are both above 50, which provides some recovery support against the bearish D1 trend. Because the broader D1 trend remains bearish and other momentum readings are mixed, RSI does not establish a standalone weekly reversal.
- D1 RSI
- 52.57
- H4 RSI
- 50.92
MACD (12, 26, 9)
Bullish momentum
D1 MACD is above its signal and its histogram sign is positive, although its MACD sign is negative. H4 MACD is below its signal and its histogram sign is negative, although its MACD sign is positive. The opposing timeframe readings explain the mixed momentum classification.
- MACD
- -0.000082
- Signal
- -0.001198
- Histogram
- 0.001116
Bollinger Bands (20, 2σ)
Upper half
Striped ends = price outside the bands.
D1 price is above the Bollinger middle while H4 price is below its Bollinger middle. This split places D1 in a modest recovery position inside a bearish broader structure, while H4 has not fully translated its bullish tactical state into broader price positioning.
- Position in band
- 78%
- Band width
- 138.6 pips (1.98%)
Moving averages (D1)
Bearish structure
- 50 EMA falling0.70314Price is 0.8 pips below (-0.01%)
- 200 SMA rising0.70565Price is 25.9 pips below (-0.37%)
The moving-average structure is more supportive of the bearish D1 thesis than the H4 picture. D1 close is below the EMA50 and SMA200 but above the EMA20, with a falling EMA50 slope; H4 close is above both the EMA20 and EMA50, creating the principal timeframe conflict.
- D1 close
- 0.70306
- 50 EMA
- 0.70314
- 200 SMA
- 0.70565
ATR (14)
Stable volatility
One ATR either side of the latest close. A measure of move size, not a price target.
Stable volatility suggests a measured environment rather than a directional signal. The D1 ATR provides a wider movement reference than H4 ATR, so event-driven repricing could produce faster tests of the existing levels without establishing direction by itself.
- D1 ATR
- 0.00426 (0.61%)
- H4 ATR
- 0.00171 (0.24%)
Technical conclusion: The central weekly thesis remains bearish because D1 trend and moving-average structure place the close below the EMA50 and SMA200, with a falling EMA50 slope. The strongest counterargument is the bullish H4 positioning combined with RSI readings above 50 and D1 MACD above its signal. That conflict makes tactical recovery possible without replacing D1 control; 0.70082 and 0.70565 are the immediate weekly reference levels, followed by the supplied secondary levels.
View all live AUD/USD oscillators, moving averages, pivot points and timeframe signals.
AUD/USD Weekly Support, Resistance and Invalidation
| Level | Role | Timeframe | Why it matters |
|---|---|---|---|
| 0.70082 | Primary support | D1 | The D1 close is above this support, making it the first supplied downside reference for assessing whether bearish pressure is returning. |
| 0.69826 | Secondary support and bearish reference target | D1 | This is the next supplied support and bearish target below primary support, relevant if 0.70082 fails to contain downside pressure. |
| 0.70565 | Primary resistance | D1 | The D1 close is below this resistance, and the level also coincides with the supplied D1 SMA200 value, making it the first structural recovery test. |
| 0.70868 | Secondary resistance and bullish reference target | D1 | This level is the next supplied resistance above primary resistance and the first bullish reference target if recovery extends. |
| 0.70322 | Tactical Resistance | H4 | Immediate H4 tactical resistance level. |
| 0.70281 | Tactical Support | H4 | Immediate H4 tactical support level. |
These are forecast-specific market-structure levels. Formula-based Classic, Fibonacci and Camarilla pivots remain on the Technical page.
Economic News & Events to Watch for AUD/USD This Week
Selected events may increase AUD/USD volatility. Direction depends on the released value relative to consensus and previous results.
Scroll table sideways for more columns →
| Event | Date and time | Importance | Previous | Consensus |
|---|---|---|---|---|
| Congressional Elections | 3 Nov 2026 (All Day) | High | — | — |
| Cash Rate | 3 Nov 2026 06:30 GMT+3 | High | 4.60% | 4.85% |
| RBA Monetary Policy Statement | 3 Nov 2026 06:30 GMT+3 | High | — | — |
| RBA Rate Statement | 3 Nov 2026 06:30 GMT+3 | High | — | — |
| RBA Press Conference | 3 Nov 2026 07:30 GMT+3 | High | — | — |
Showing 5 of 14 scheduled events; high-importance events appear first.
Calendar source: FXGlory economic calendar. Retrieved 02 Nov 2026 09:56 GMT+3. View the complete AUD/USD economic calendar.
AUD/USD Outlook for 2–7 November 2026
AUD/USD enters 2–7 November 2026 with a bearish D1 structure, but the weekly picture is moderated by a bullish H4 state and mixed momentum. The 0.70306 D1 close remains below the D1 EMA50 and SMA200 while above the EMA20 and Bollinger middle, leaving the broader trend weaker than the near-term recovery evidence.
The key technical balance is between 0.70082 support and 0.70565 resistance. A break through the support sequence would keep attention on the supplied bearish references, while recovery through resistance would strengthen the tactical bullish alternative. RBA events and the USD calendar, especially the high-impact releases on 6 Nov 2026 16:30 GMT+3, may increase the speed of those tests without supplying a predetermined direction.
Weekly Forecast Risks and What Would Change the Outlook
- H4 bullish positioning: H4 close is above H4 support, EMA20 and EMA50, so shorter-term recovery pressure may delay or complicate the bearish D1 path.
- Mixed D1 momentum: D1 RSI is above 50, MACD is above its signal and the histogram sign is positive even though MACD sign is negative, reducing directional alignment.
- Mixed close and moving-average structure: The D1 close sequence is mixed, with price above EMA20 and Bollinger middle but below EMA50 and SMA200, leaving the broader trend and near-term positioning in tension.
- Scheduled event concentration: High-impact RBA events on 3 Nov 2026 and high-impact USD employment releases on 6 Nov 2026 may increase volatility and speed technical level tests.
- Stable volatility may delay resolution: Stable volatility can support compression and slower development, allowing two-sided conditions to persist before a clearer weekly directional move.
Formal weekly invalidation: The bearish weekly thesis is formally invalidated by one completed D1 close above 0.72407. One completed D1 close below 0.69179 confirms lower structural extension and continuation.
AUD/USD Weekly Forecast FAQs
Is AUD/USD bullish or bearish this week?
The weekly bias is Bearish because the D1 trend state is bearish and the D1 close remains below the EMA50 and SMA200, despite bullish H4 conditions and mixed momentum.
What scenario would strengthen for AUD/USD this week?
The primary scenario is continued two-sided pressure with downside risk favored while D1 remains structurally bearish. A recovery scenario becomes more relevant if H4 strength carries price through resistance, but that would remain tactical unless D1 structure improves.
What are the key AUD/USD support and resistance levels?
The key weekly levels are 0.70082 support and 0.70565 resistance, followed by 0.69826 and 0.70868. The permitted bearish reference targets are 0.69826 and 0.69609, while bullish reference targets are 0.70868 and 0.71279.
What would invalidate this AUD/USD forecast?
The bearish weekly thesis is formally invalidated by one completed D1 close above 0.72407.
Methodology, Data and Sources
- Price-data source: FXGlory price feed (AUDUSD)
- Live quote timestamp: 02 Nov 2026 11:50 GMT+3
- Weekly analysis timestamp: 2 November 2026
- Chart timestamp: 2 November 2026 (redrawn daily)
- Daily check: Every day at 04:00 GMT+3: the latest completed D1 close is checked against the invalidation levels and the chart is redrawn.
- Technical snapshot timestamp: 2 November 2026
- Calendar-data source: FXGlory economic calendar
- Calendar retrieval timestamp: 02 Nov 2026 09:56 GMT+3
- Candle convention: FXGlory D1 and H4 candles; D1 candle dates are evaluated in UTC and invalidation uses completed D1 closes only.
- Indicator settings: D1 RSI(14), MACD(12,26,9), Bollinger Bands(20,2), EMA(50), SMA(200), ATR(14); H4 RSI/MACD/Bollinger/EMA/ATR.
- Level-selection method: Weekly D1 support/resistance levels are structural market levels. Formal invalidation uses a hard 1.00× D1 ATR(14) minimum anchor distance plus a 0.10× D1 ATR(14) outward buffer; H4 levels are tactical only.
- Weekly forecast method: D1 controls the weekly thesis; H4 supplies tactical confirmation/warning only.