

What Is A Pin Bar Forex Strategy?
A pin bar forex strategy uses a completed candle with a prominent wick as one observation within a documented entry and exit plan. The wick records a high or low reached during that period; the close shows where price finished relative to that extreme.
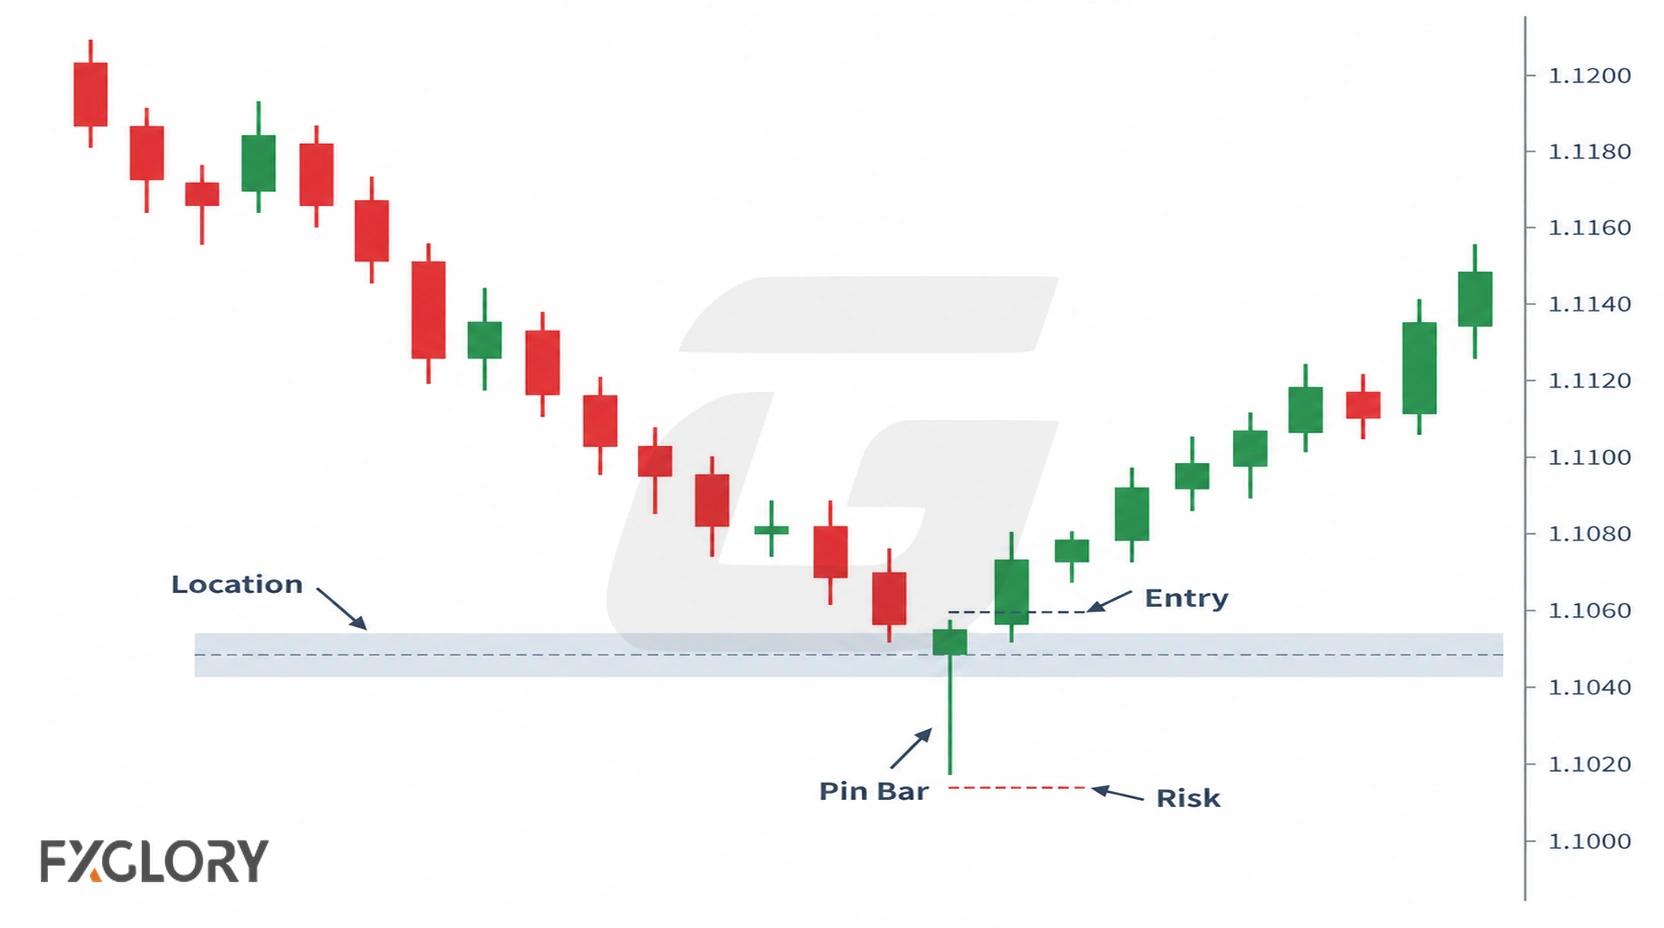
The trade interpretation depends on the chosen market setting. For example, a lower wick at an existing range floor presents a different scenario from the same wick after an established downtrend has broken its prior support.
This page focuses on pin-bar-specific decisions: how to judge wick quality, how to review location, how entry methods can be planned, where stops and targets can be reviewed, how failed pin bars happen, and when the setup should be skipped.
For the broader candlestick-strategy framework that connects candle behavior with market context, entries, exits, stop placement, false-signal rules, spread checks, and account risk, use the Forex Candlestick Strategy guide.
For the anatomy-only explanation of pin bar structure, long wicks, body position, bullish pin bars, bearish pin bars, and similar candle comparisons, use the Pin Bar In Forex guide.
Pin Bar Pattern vs Pin Bar Strategy
Pattern identification uses a completed candle’s wick, real body and close; a strategy defines the conditions under which a trade would be considered or rejected.
Keep a structural match even when no trade qualifies: an untradeable setup is not necessarily a misidentified candle.
| Item | What It Means | Why It Is Not Enough Alone |
|---|---|---|
| Pin bar pattern | A candle has a dominant wick and closes away from the tested extreme | The candle does not define trend, target, stop, or risk |
| Pin bar meaning | The candle shows an intraperiod extreme and a close away from it | It does not reveal trader intent, prove a liquidity event, or predict follow-through |
| Pin bar strategy | The trader has context, trigger, invalidation, stop, target, and risk rules | The plan can still be invalid if spread, volatility, or structure changes |
Forex Pin Bar Decision Sequence
This ordered framework keeps context, pattern identification, strategy rules and executable risk decisions separate. Apply the same sequence when recording accepted and rejected setups.
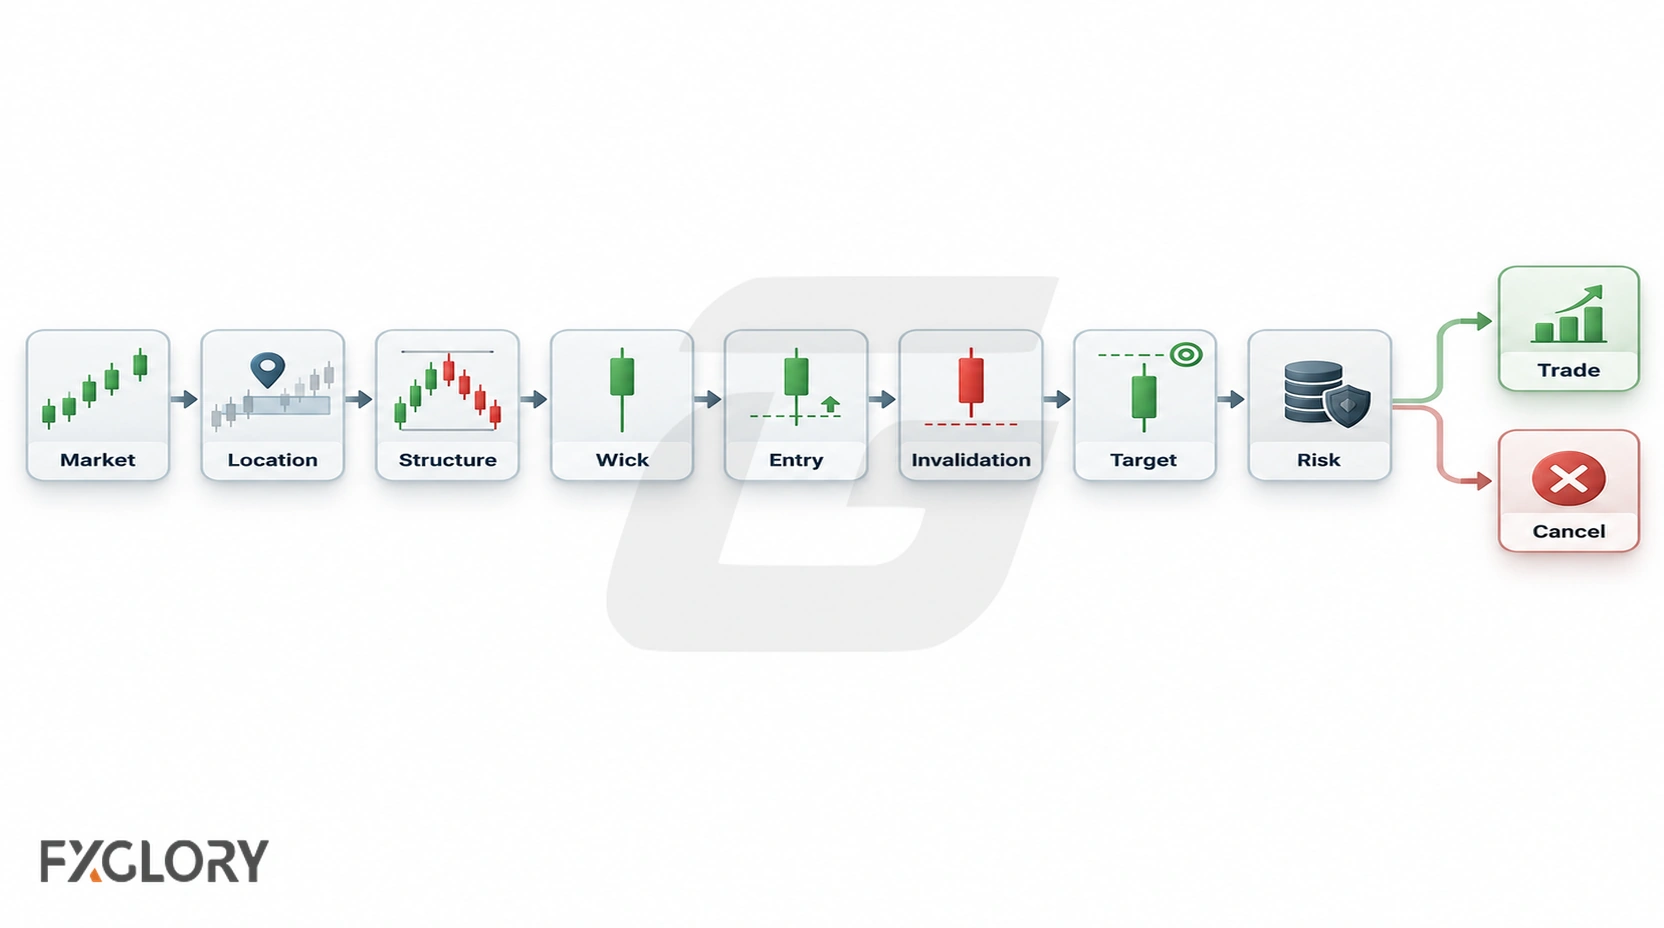
| Step | Decision | Continue Only If |
|---|---|---|
| 1. Market condition | The market is trending, ranging, pulling back, breaking out, reversing, or unclear | The condition supports a pin bar review |
| 2. Location | The candle forms near support, resistance, trend structure, range edge, pullback zone, or failed-break area | The candle has a reason beyond wick shape |
| 3. Pin bar structure | The wick, body, close, and candle range are clear after the candle closes | The pattern is not forced while the candle is still forming |
| 4. Wick quality | The wick tests a meaningful area and closes away from the extreme | The candle meets the predefined wick and close criteria for this setup |
| 5. Entry trigger | The strategy defines close, break, retrace, retest, or no-entry rules | The documented trigger is met, rather than assumed |
| 6. Invalidation | The trader knows where the rejection idea is wrong | The stop is not guessed after entry |
| 7. Target | The target uses next structure, support/resistance, swing point, range, measured move, trail, or time rule | The target still makes sense after spread |
| 8. Risk | Position size, margin, and account limits fit the stop distance | The trade does not break daily or account-level risk rules |
| 9. Cancel rule | The setup has a written failure condition | A pre-entry cancellation rule and a post-entry exit rule are distinguished |
Pin Bar Quality Filters
Use observable candle features and levels marked before the candle formed. No universal wick-to-body ratio or minimum protrusion makes every pin bar tradeable; define any quantitative filter before testing it.
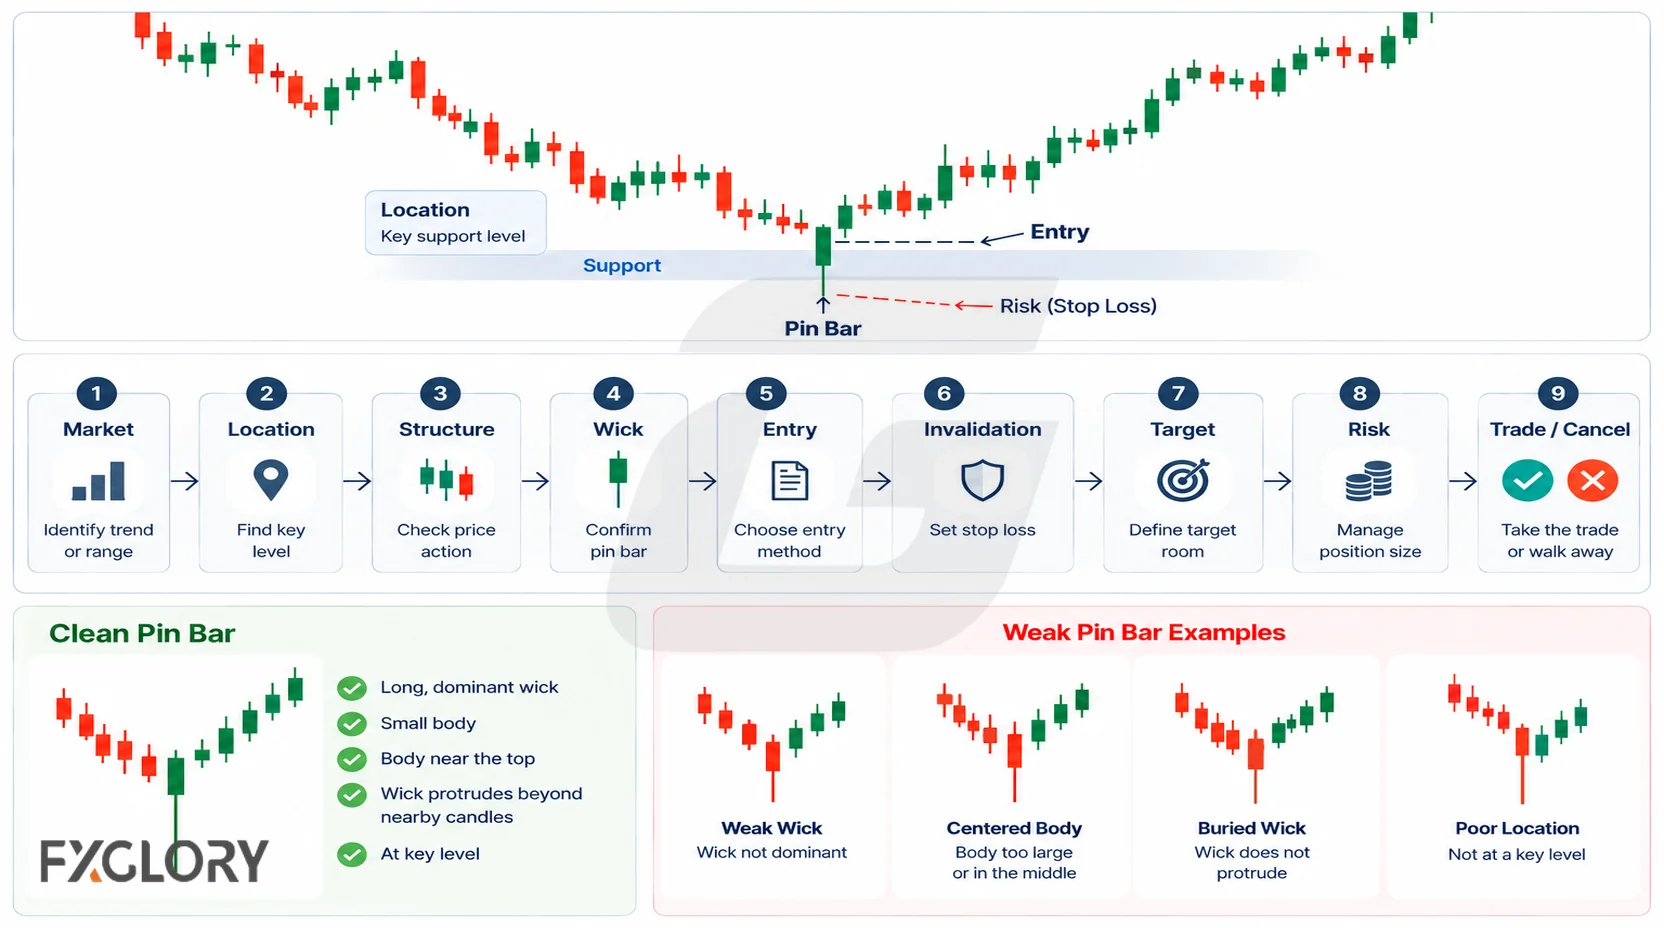
| Quality Check | Better Version | Weak Version |
|---|---|---|
| Dominant wick | The wick clearly tests one side of the candle range | Wick is only slightly larger than the body |
| Close location | The candle closes away from the tested extreme | Candle closes near the middle with unclear rejection |
| Body position | Body sits near the opposite side of the rejected wick | Body is centered and the candle looks indecisive |
| Tail protrusion | The wick stands out beyond nearby candle ranges or a visible level | Wick is buried inside overlapping candles |
| Useful location | Pin bar forms near support, resistance, pullback, range edge, or failed break | No premarked level or specified trend/range reference is present |
| Market condition | Trend, range, pullback, or level context is visible before the candle forms | Trader decides the context after seeing the candle |
| Target room | There is space before the next support, resistance, or swing obstacle | The candle points directly into the next obstacle |
| Spread check | Entry and target still make sense after spread | Small target is damaged by cost |
| Event risk | Scheduled news and session conditions are checked before entry | Pin bar is accepted during unstable volatility without a rule |
Pin Bar At Support And Resistance
At premarked support or resistance, compare the candle high, low and close with the boundaries of the level. A wick can cross a level and finish back inside it; whether that event is followed by rejection or a sustained breakout is a separate question.
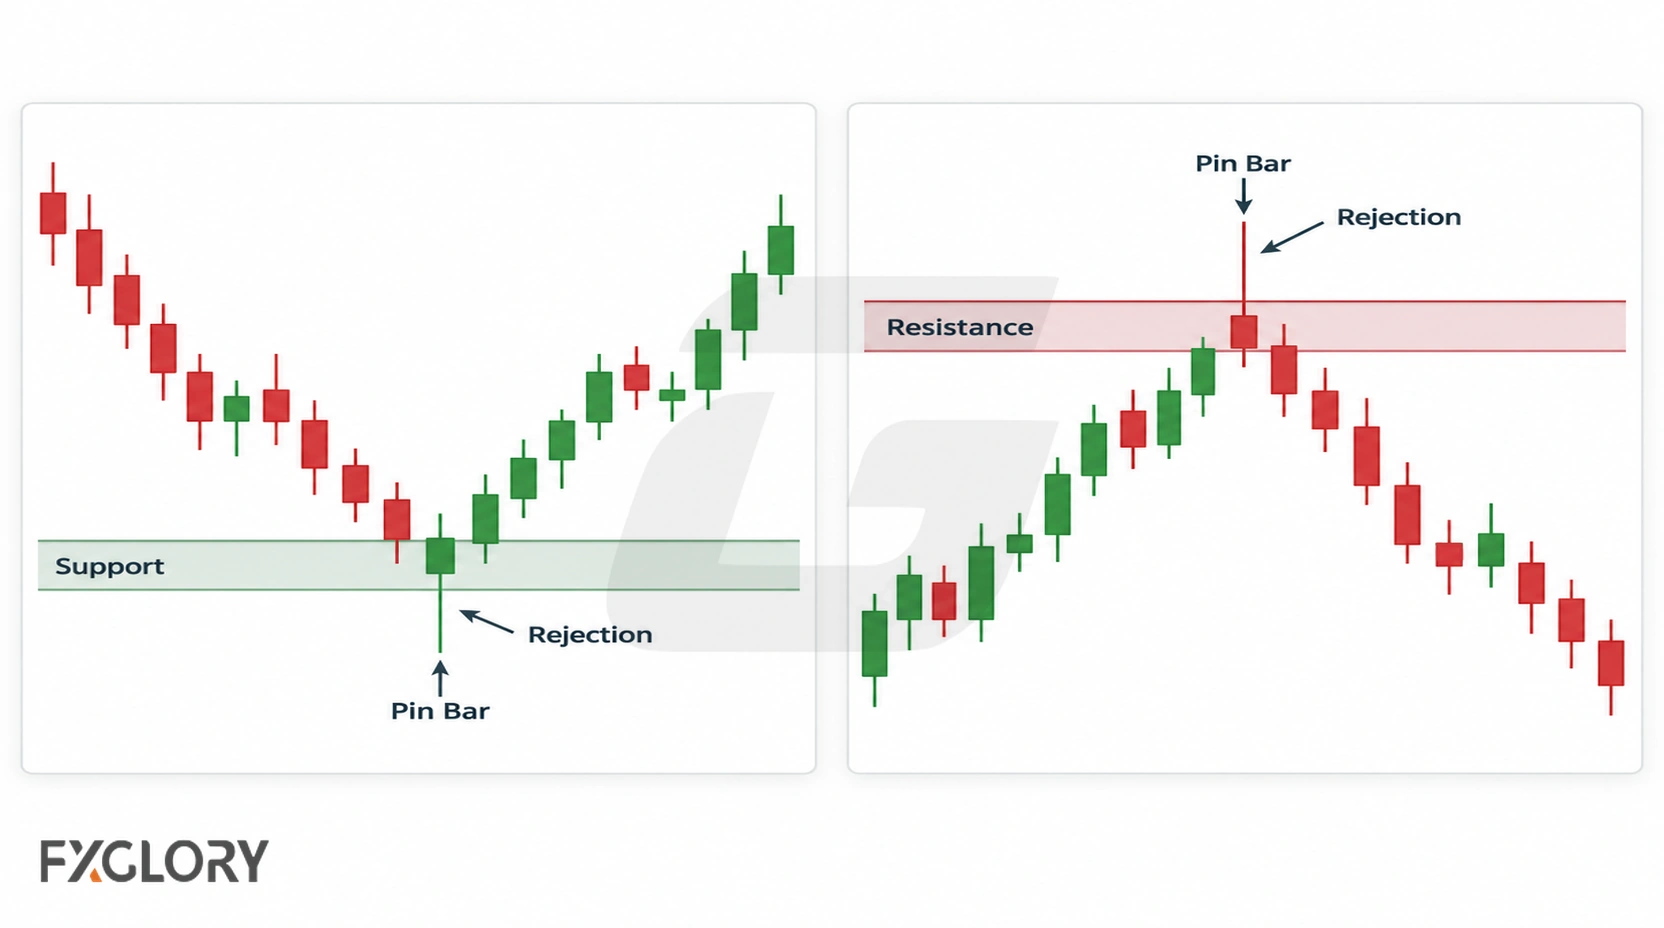
The level should be marked before the pin bar forms. If support or resistance is added only after the candle appears, the trader may be fitting the chart around the desired trade.
| Location | Possible Use | Risk |
|---|---|---|
| Bullish pin bar near support | Review whether lower-price rejection appears at a valid support area | A subsequent candle can close below the support zone |
| Bearish pin bar near resistance | Review whether higher-price rejection appears at a valid resistance area | Resistance may break or become support |
| Pin bar after a false breakdown | Review whether price returned above support after testing below it | Follow-through may fail if range structure is weak |
| Pin bar after a false breakout | Review whether price returned below resistance after testing above it | Breakout may resume after a short pullback |
| Pin bar at role-reversal zone | Review retest behavior after a broken level | Old level may not hold after the break |
| Pin bar in the middle of a range | Usually lower-quality unless the strategy has a written rule | Target and invalidation may be unclear |
For level quality, role reversal, false breaks, wicks, and spread-aware support/resistance rules, use the forex support and resistance strategy guide.
Pin Bar In Pullbacks And Trends
In a pullback strategy, identify the broader trend and the correction before looking for a pin bar. A candle that tests a premarked pullback zone and closes back toward the trend gives a defined observation, not proof that continuation has begun.
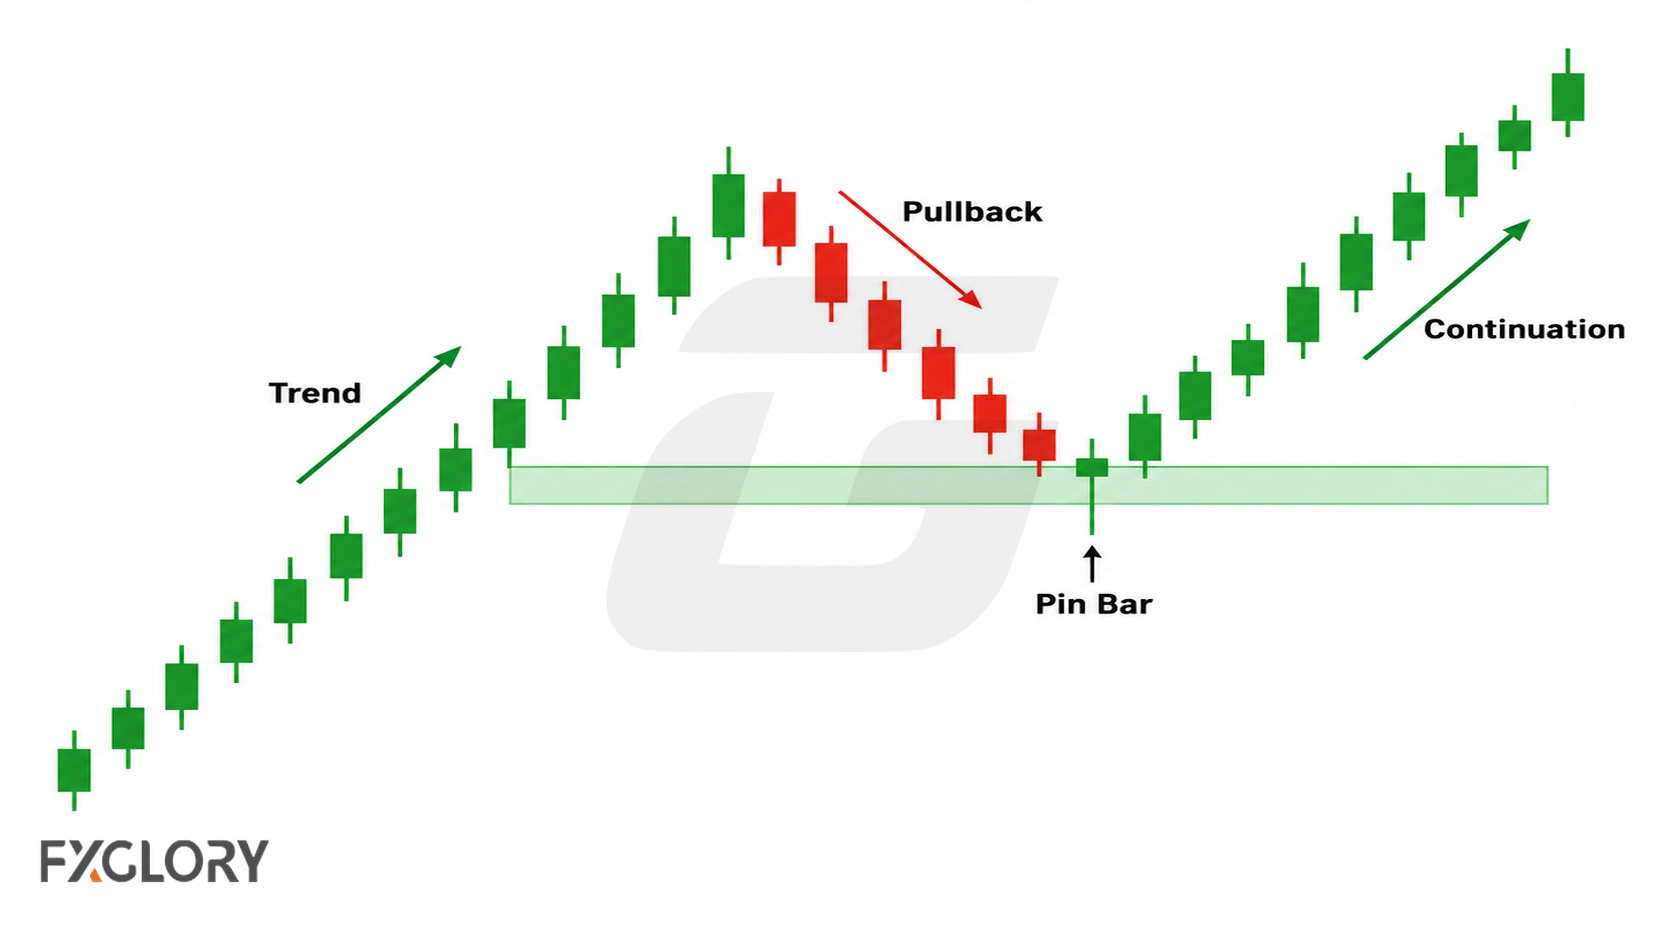
For an uptrend example, record the preceding swing low and the zone identified for a pullback; determine whether either has been breached before the signal closes. Compare distance to the next overhead obstacle with the planned stop and entry instead of using undefined labels such as an exhausted move or controlled correction.
| Trend Situation | Useful Pin Bar Role | Weak Use |
|---|---|---|
| Uptrend pullback | Bullish lower-wick rejection may help review whether the pullback is slowing | Trader buys after the uptrend structure has already failed |
| Downtrend pullback | Bearish upper-wick rejection may help review whether the rally is failing | Trader sells after the downtrend structure has already failed |
| Strong trend expansion | Observe whether the candle tests a marked swing or expansion boundary | Trader chases the next candle without target room |
| Weak or choppy trend | Pin bar may be too noisy to support a clean decision | Every wick is labeled as trend continuation |
| Countertrend pin bar | May be reviewed only if the level and invalidation are clear | Trader fights a trend because one wick appeared |
For directional structure, use the forex trend trading strategy guide. For correction behavior, use the forex pullback strategy guide.
Pin Bar In Ranges
Mark the range boundaries from earlier price action. Near the lower edge, compare a lower wick and close with range support; near the upper edge, compare an upper wick with resistance. In the range middle, calculate the distance to both boundaries before deciding whether an entry and target can fit the chosen risk rule.
| Range Area | Useful Pin Bar Role | Weak Use |
|---|---|---|
| Support edge | Review whether lower-price rejection appears near the range low | Trader buys every lower wick without checking range quality |
| Resistance edge | Review whether higher-price rejection appears near the range high | Trader sells every upper wick without checking breakout risk |
| Middle of range | Usually weaker because target and invalidation are less clear | Trader enters because a wick appeared |
| Range break | Pin bar may help review whether the break failed or continued | Trader keeps using range rules after the edge fails |
For full range-edge and midpoint rules, use the forex range trading strategy guide.
Pin Bar Entry Methods
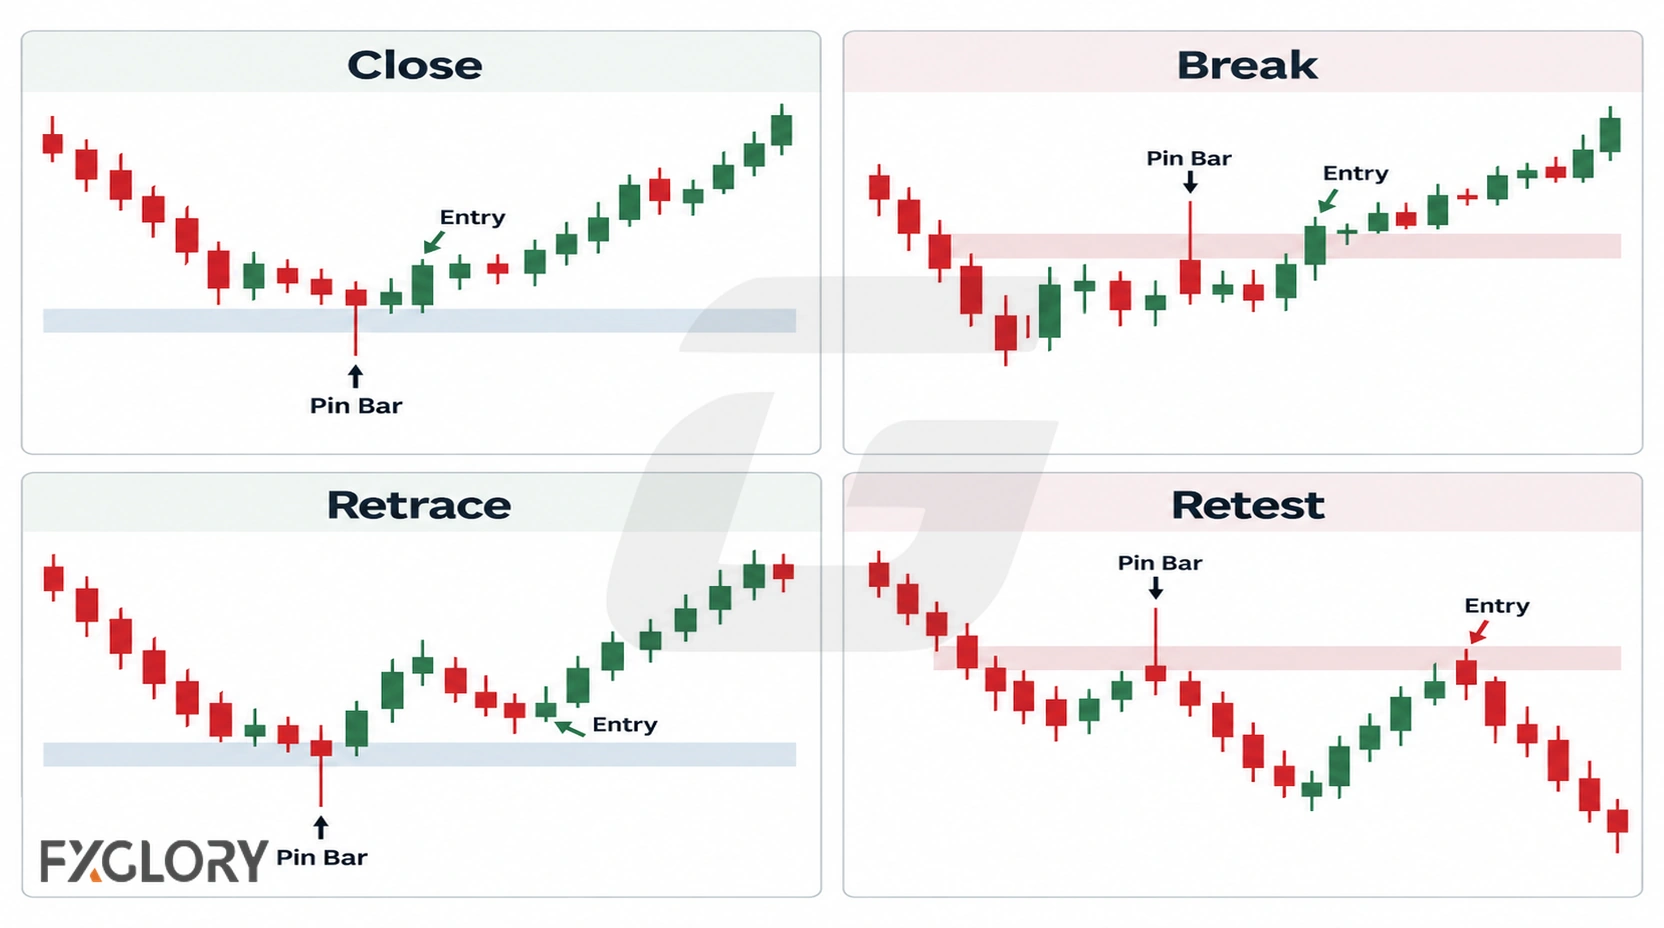
Choose the trigger and order type before evaluating the completed signal. An entry immediately after the pin bar closes differs from a break of its high or low, and an intrabar break differs from a later completed-candle close.
| Entry Method | Possible Use | Main Risk |
|---|---|---|
| Entry after pin bar close | Trader evaluates the completed candle and then considers a market or specified next-bar order | Entry may be later and closer to the next obstacle |
| Break of pin bar high or low | Entry requires a specified price trade beyond the completed bar’s high or low, without necessarily waiting for that later candle to close | Break can fail quickly if context is weak |
| Subsequent candle-close confirmation | Require a later completed candle to close beyond an explicitly marked level in the intended direction | Later confirmation may arrive after much of the target room is consumed |
| Retrace entry | A planned limit order or trigger requires price to return to a specified area within the completed pin bar range | Retrace may never happen or may move through the candle idea |
| Halfway or 50% retrace review | Trader reviews a deeper entry only if the candle, level, and risk still fit | Trader treats the midpoint as automatic support or resistance |
| Retest entry | Price first breaks a predefined level and subsequently returns to test that level according to the plan | Retest may fail or reduce target room |
| No-entry rule | Trader skips if the pin bar does not trigger the written rule | Impatience creates early or late entries |
For a fuller execution framework, use the forex entry and exit strategy guide.
Stop Placement Around Pin Bars
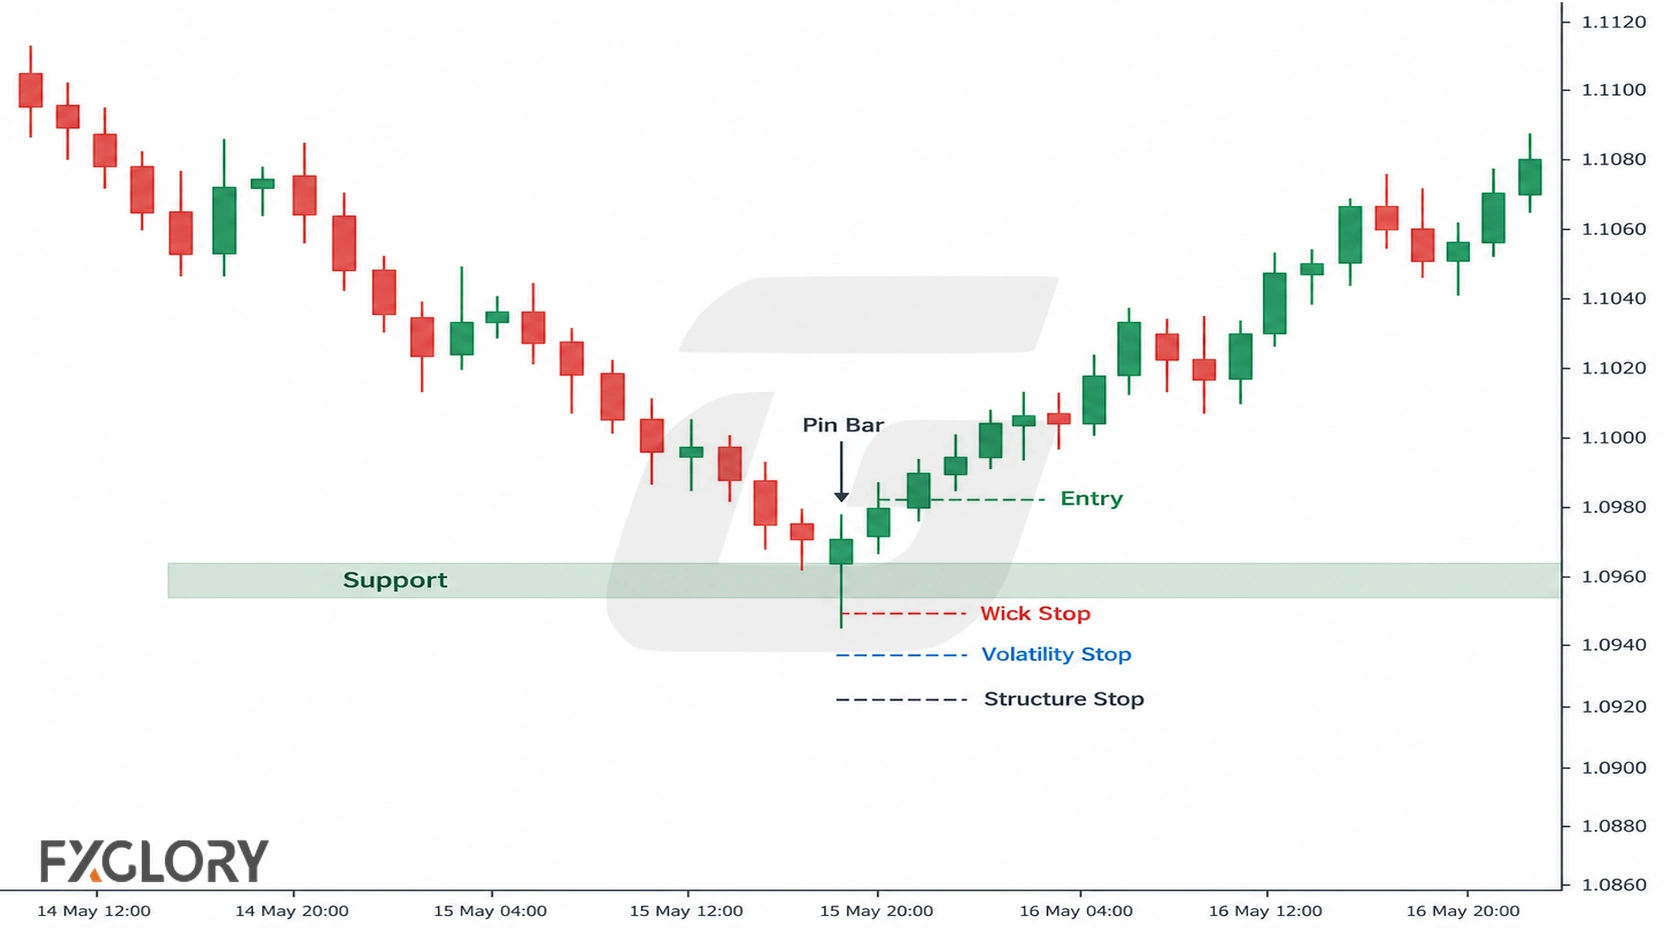
Each proposed stop method must identify an observable price or volatility condition that invalidates the particular trade setup. The wick extreme and a nearby swing boundary are alternatives, not interchangeable universal rules.
| Stop Method | Possible Rule | Weak Version |
|---|---|---|
| Beyond pin bar wick | Stop is placed beyond the rejected high or low | An arbitrary buffer is used without reference to the tested setup |
| Beyond full candle range | Stop is placed beyond the full signal candle | The resulting permitted trade size cannot fit the risk budget |
| Beyond support or resistance | Stop is placed where the level and pin bar idea fail together | Level quality is ignored |
| Beyond swing high or low | Stop uses structure instead of candle shape alone | Structure is chosen after entry |
| Volatility-adjusted stop | ATR or recent candle size helps review normal movement | Volatility is used to justify oversized risk |
After measuring the entry-to-stop distance, calculate a permitted lot size from the chosen account-risk limit and pip value. For account-level rules, use the forex risk-management strategy page.
Targets And Exit Rules
A pin bar trade should define the target and exit rule before entry. If the trader decides the exit only after the trade is open, the pin bar strategy becomes reactive.
| Exit Method | Possible Rule | Weak Version |
|---|---|---|
| Next support or resistance | Target is planned near the next meaningful zone | Target ignores nearby obstacles |
| Swing high or swing low | Target uses recent market structure | Target is chosen without checking current context |
| Range edge | Target uses the opposite side of a valid range only if space remains | Target assumes the range will hold before price confirms it |
| Measured candle range | Target references the size of the pin bar or setup range | Measured move is forced when structure is too close |
| R-multiple target | Target is based on planned risk only if nearby structure allows it | Fixed R target ignores support, resistance, and spread |
| Trailing exit | Trade is managed by structure, ATR, moving average, or written trailing rule | Trail is changed emotionally after each pullback |
| Time exit | Trade is reviewed or closed if price does not respond within the planned window | A stalled pin bar setup becomes an unplanned hold |
| Invalidation exit | Exit when the rejection reason disappears | Trader holds because the wick looked strong earlier |
Hypothetical target-room example: Suppose a bearish pin bar at premarked resistance has a high of 1.1010 and a low of 1.0988. A break-entry plan considers a sell at 1.0987, with a stop at 1.1012: the entry-to-stop distance is 25 pips. If the next marked support is at 1.0980, the available price distance to that target is only 7 pips, or 0.28 times the initial stop distance before spread, slippage and any fees. The candle may qualify structurally, but the trader can reject the setup if that target room fails a prewritten minimum. These figures are invented solely to illustrate planning, not observed prices or a backtest.
Failed Pin Bars And Wick Traps
Distinguish a completed pin bar from a failed price scenario and a trade-plan exit. A candle that met the wick/body criteria remains a valid pattern even when later candles move contrary to the anticipated direction. A strategy may separately specify a completed close beyond the rejected extreme, a stop fill, or an elapsed number of candles without follow-through.
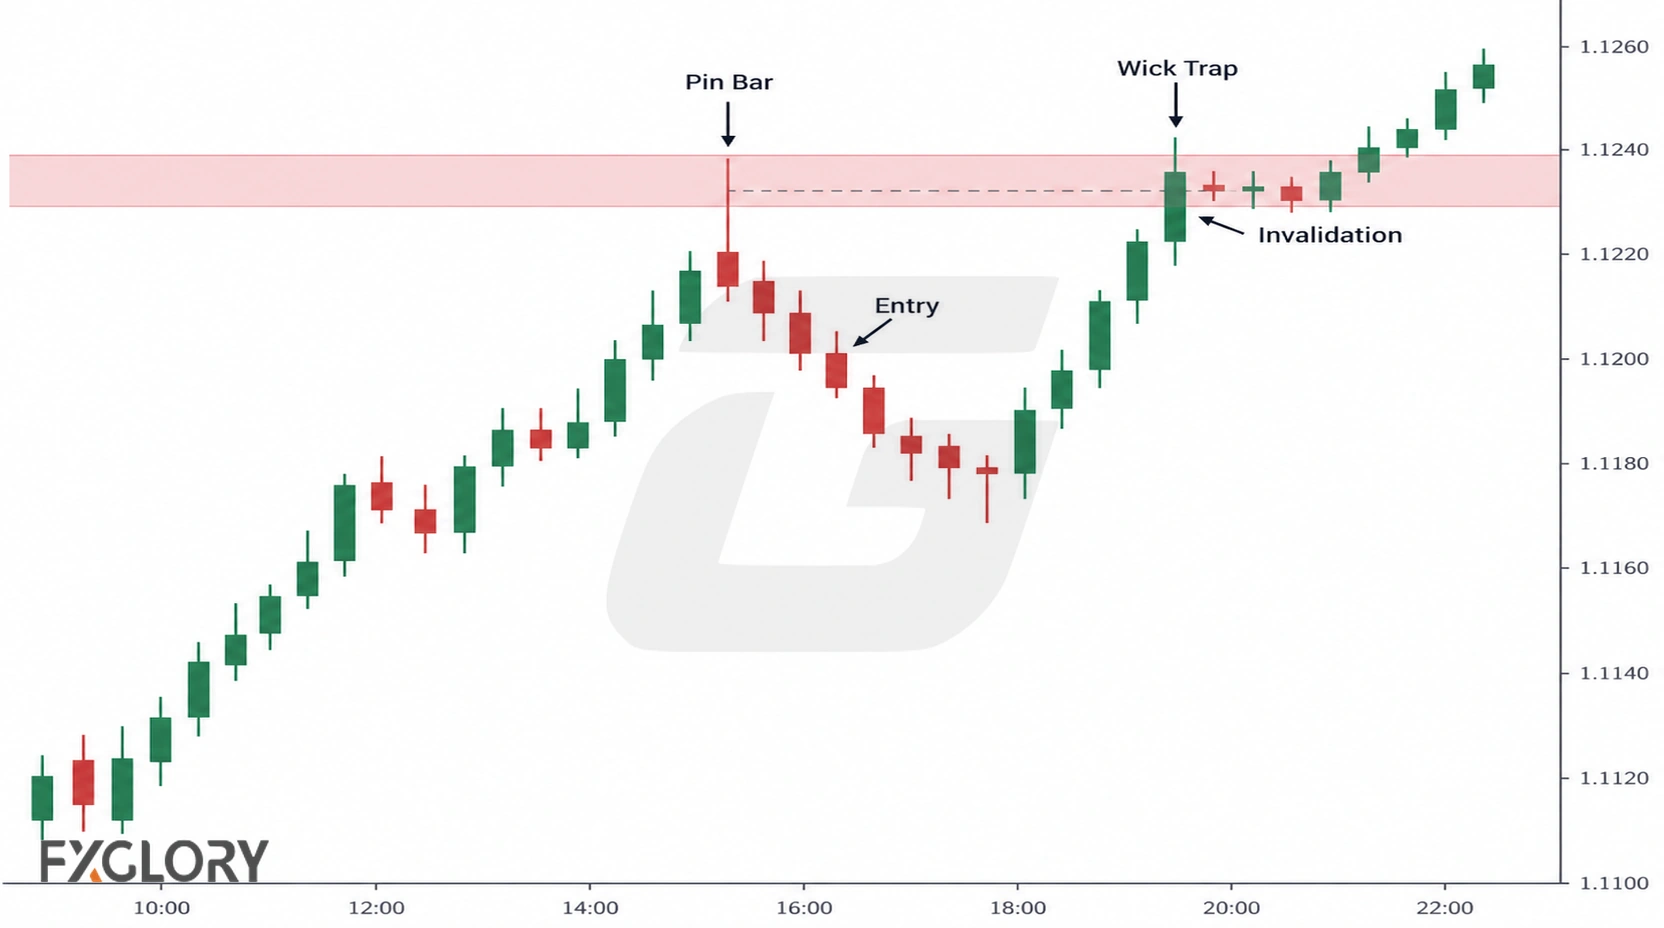
Use wick trap only when an apparent rejection of a premarked level is subsequently contradicted under a stated rule. A wick through resistance followed by a close back below it is the initial observation; a later sustained move above the rejected high may defeat the bearish scenario. A brief intrabar break and a completed close above that high are different failure rules.
| Failure Type | What Happens | Response |
|---|---|---|
| Immediate wick break | Price trades beyond the rejected extreme after the completed signal | Apply an intrabar-break cancellation only if explicitly specified |
| Close against the pin bar | A subsequent candle closes beyond a previously specified rejection or scenario level | Apply that close-based failure rule without reclassifying the original candle |
| No follow-through | No required follow-through appears within the predefined review window | Cancel an unfilled setup or apply the written time exit |
| Pin bar inside chop | Long wick appears inside overlapping candles | Do not treat the wick as clean rejection |
| News-driven pin bar | Fast movement creates a dramatic wick during unstable conditions | Use event-risk rules or skip |
| Repeated failed pin bars | Several wicks fail around the same area | Record repeated unsuccessful follow-through and overlapping candles; do not infer hidden liquidity |
Pin Bar Combos And Double Pin Bars
Some traders review pin bars together with other candle structures, such as an inside bar after a pin bar, a pin bar after an inside bar, or two nearby pin bars testing a similar area. These combinations describe additional observable candle relationships; a pattern name is not evidence of improved success rates.
A pin bar and inside bar combination may show rejection followed by compression, or compression followed by rejection. A double pin bar may show repeated testing of an area. A double pin bar can be compared by the exact highs, lows, closes and spacing of the two tests; whether those tests improve a strategy requires separate evaluation.
| Combination | Possible Reading | Weak Use |
|---|---|---|
| Pin bar then inside bar | Rejection followed by compression | Trader assumes compression must break in the pin bar direction |
| Inside bar then pin bar | Compression followed by a rejection candle | Trader ignores the mother bar or broader structure |
| Double pin bar | Repeated testing of a similar area | Trader counts wicks without checking level quality |
| Pin bar near engulfing candle | Rejection appears near a pressure-shift candle | Trader stacks pattern names without a clear plan |
For the inside-bar side of these combinations, use the forex inside bar strategy guide. For broader pattern definitions, use the forex candlestick patterns guide.
Pin Bar Indicators And Scanners
Pin bar indicators and scanners search for candles meeting specified wick/body ratios, range sizes or closing positions. Their usefulness depends on a stable definition, finished candles and consistent price-feed settings; a chart-level alert is not itself an executable entry.
| Tool Use | Possible Help | What It Cannot Replace |
|---|---|---|
| Pin bar scanner | Finds candles with selected wick/body proportions | Market context and level quality |
| Alert script | Notifies when a candle matches a selected structure | Stop placement, target room, and spread review |
| Wick/body filter | Applies a consistent structural rule | Support, resistance, trend, and volatility review |
| Indicator confirmation | May add momentum, volatility, or trend context | Risk control and invalidation logic |
Forex-Specific Spread, Wick, Session, And News Rules
Forex candle highs, lows and closing prices can differ across brokers or feed conventions, while the actual fill uses tradable bid/ask quotations. The table separates chart appearance from the execution condition that needs checking.
| Forex-Specific Issue | Why It Matters | Better Rule |
|---|---|---|
| Spread near entry | Small pin bar setups can lose target room after cost | Check spread before accepting small targets |
| Long wick | A wick establishes an intraperiod price extreme and the eventual close, not the identity or intent of participants | Use location and invalidation instead of wick shape alone |
| Session change | Quoted spread, market depth and price range can differ across session boundaries | Check the current spread and the session used to test the signal |
| News event | Price jumps, quote widening and slippage can alter entry/stop execution | Use the event-risk rule or stand aside |
| Broker-feed difference | Minor high, low, open, or close differences can change candle appearance | Do not force borderline pin bars |
| Volatility expansion | Large candles can make stop distance too wide | Calculate position size only after stop distance is clear |
Short-term pin bar setups can be sensitive to cost. Check the spread conditions that affect trade planning before accepting a small candle-based target. When stop distance, position size, leverage exposure, and margin need to be reviewed together, use the margin calculator before the order is placed.
Why Pin Bar Forex Strategies Fail
Use realized failures to diagnose which part of the process broke: classification, pre-entry filter, execution, risk limit, or adherence to a recorded exit. A losing outcome despite correct rules is different from a rule breach.
| Failure Reason | What Happens | Better Rule |
|---|---|---|
| Every long wick is traded | Signals are selected without the stated wick/body criteria | Trade only setups that pass context and quality checks |
| No location | Pin bar appears in random movement | Require support, resistance, trend, range, pullback, or failed-break context |
| Entering before close | The candle changes shape before completion | Judge pin bars after close unless the strategy has a written early-entry rule |
| Messy price action | Setups are selected without a clearly mapped range boundary or swing reference | Require the specified chart reference before classification |
| Stop has no invalidation | Trader does not know where the rejection idea is wrong | Do not enter without invalidation |
| Target too close | Nearby structure or spread weakens the setup | Skip if target room is poor after cost |
| News-event wick | Fast movement creates a dramatic candle during unstable conditions | Use the event-risk rule or stand aside |
| Overleveraging | A normal failed pin bar becomes an account-level problem | Size after stop distance and margin review |
| Recovery re-entry | Trader re-enters after a failed pin bar to recover a loss | Stop trading when the risk rule is reached |
Risk Rules And No-Trade Conditions
This table is a pre-entry rejection screen. A candle can meet the pin bar definition while failing one or more of these independent conditions.
| No-Trade Condition | Why It Matters | Action |
|---|---|---|
| Candle has not closed | The final wick, body, and close can change | Wait for completion unless the strategy says otherwise |
| Market condition is unclear | The wick may have no useful context | Skip until structure is clearer |
| No meaningful location | The pin bar has no chart reason | Skip |
| Pin bar appears in messy chop | No predefined swing or range reference differentiates the signal from neighboring overlapping candles | Skip unless the written approach explicitly handles this condition |
| Weak wick quality | The signal does not meet the method’s stated wick/body and close rules | Record a nonqualifying pattern, not a failed trade |
| Target is too close | Nearby levels or spread reduce usefulness | Skip if reward is weak after cost |
| Stop is unclear | The trader cannot define where the idea is wrong | Do not enter |
| News risk is too close | Spread, speed, and volatility can change quickly | Use event rule or stand aside |
| Daily stop reached | More attempts can become recovery trades | Stop trading for the session |
| Recovery motive appears | The trade exists because the trader wants to recover a prior loss | Step away and review the plan |
Testing And Review Before Live Trading
Test whether a documented pin bar method would have behaved consistently across multiple price regimes and instruments. State the candle definition, timeframe, level-marking rule and order assumptions before collecting examples, and avoid drawing reference levels using candles that had not yet formed.
Include both signals that qualified and those rejected by the written filter; keep historical, simulated and live-execution results separate. A backtest using completed candles must not assume a fill at a price available only before the signal was complete.
- Log currency pair, broker/feed, timestamp, candle timeframe and quote-side convention for each candidate.
- Record the context level as marked from previously available prices, the signal’s open, high, low, close, and whether the defined structure qualified.
- Record signals rejected by each filter, including target room, event window and spread; document the reason before the hypothetical outcome is known.
- For each qualifying setup, record the intended order type, trigger, entry, stop, target, size and allowed holding period.
- Model bid/ask spread, slippage, commissions and realistic order fills; do not assume a completed candle could have been traded before its close.
- Record planned versus simulated or actual fill, exit reason, realized R, maximum adverse excursion, and rule deviations when the data support those measures.
- Report sample size and results by pair, timeframe and relevant market condition; do not invent win rates or treat an optimized historical sample as live evidence.
Pin Bar Forex Strategy Checklist
Use this short checklist at the decision point; the earlier testing section describes how to evaluate many recorded signals.
- Identify the market condition and reference level from price action that existed before the signal.
- Confirm the completed candle meets your stated wick, body and close rule.
- Choose the specified entry method and trigger; if it has not occurred, do not enter.
- Check the next structural obstacle and whether the planned target offers enough room relative to the stop and costs.
- Set a price-based invalidation and permitted position size; review spread, margin and total currency exposure.
- Check scheduled news, session conditions and any daily loss or trade-count limit.
- Record the no-entry rule, setup-expiry condition and post-entry exit procedure.