

What Is A Forex Risk Management Strategy?
A forex risk management strategy is the trade-approval rule set used before a position is accepted. It checks whether the setup still fits after stop distance, position size, spread, leverage exposure, margin requirement, risk-reward, drawdown, and no-trade conditions are reviewed.
Use this risk layer after a setup is identified and before the trade is accepted; the wider account routine belongs in the trading plan, while margin requirements should be checked with the calculator.
For the full rule set around market selection, setup, entry, exit, risk, and review, use the forex trading system framework. For setup construction, use the forex trading setup framework. For the wider account-level document, use the trading plan template.
Forex Trading Risk vs Corporate FX Risk
The phrase forex risk management can mean different things. In corporate finance, it often refers to business exposure from exchange-rate changes, invoices, cash flows, or cross-border operations. That is not the focus of this page.
This page focuses on trading risk: the risk created by opening and managing leveraged forex positions. The main questions are stop distance, position size, spread, margin, leverage exposure, risk-reward, drawdown, and whether the trade should be skipped.
| Risk Context | Main Question | This Page Covers | Not The Focus Here |
|---|---|---|---|
| Forex trading risk | Should this trade be accepted? | Stops, size, spread, margin, leverage, drawdown, no-trade rules | Business invoice hedging or treasury policy |
| Corporate FX risk | How does currency movement affect business exposure? | Only as a distinction | Transaction exposure, translation exposure, economic exposure |
Risk Strategy vs Trading System vs Trading Plan
A risk management strategy is one layer of a larger trading process. The trading setup identifies an opportunity; risk rules determine whether it fits account limits; the trading system coordinates entries, exits, and review; and the trading plan documents the wider account routine.
| Layer | What It Controls | Example | Wrong Use |
|---|---|---|---|
| Trading setup | Whether a trade idea exists | Breakout, pullback, range reaction, trend continuation | Assuming a valid setup is automatically tradable |
| Risk management strategy | Whether the trade fits account risk | Stop distance, position size, spread, margin, drawdown, no-trade rules | Choosing size before stop distance is known |
| Trading system | The full operating rule set | Market, setup, entry, exit, risk, review | Calling risk rules the whole system |
| Trading plan | The wider account and routine document | Schedule, risk limits, markets, review habits, account rules | Trading without written limits |
For system-level structure, use the system rule sequence. For entry and exit pairing, use the entry-to-exit rule chain.
Forex Risk-Approval Sequence Before Entry
Risk should be checked in a fixed order. If the trader starts with position size or profit target first, the trade can look acceptable before the real risk is measured.
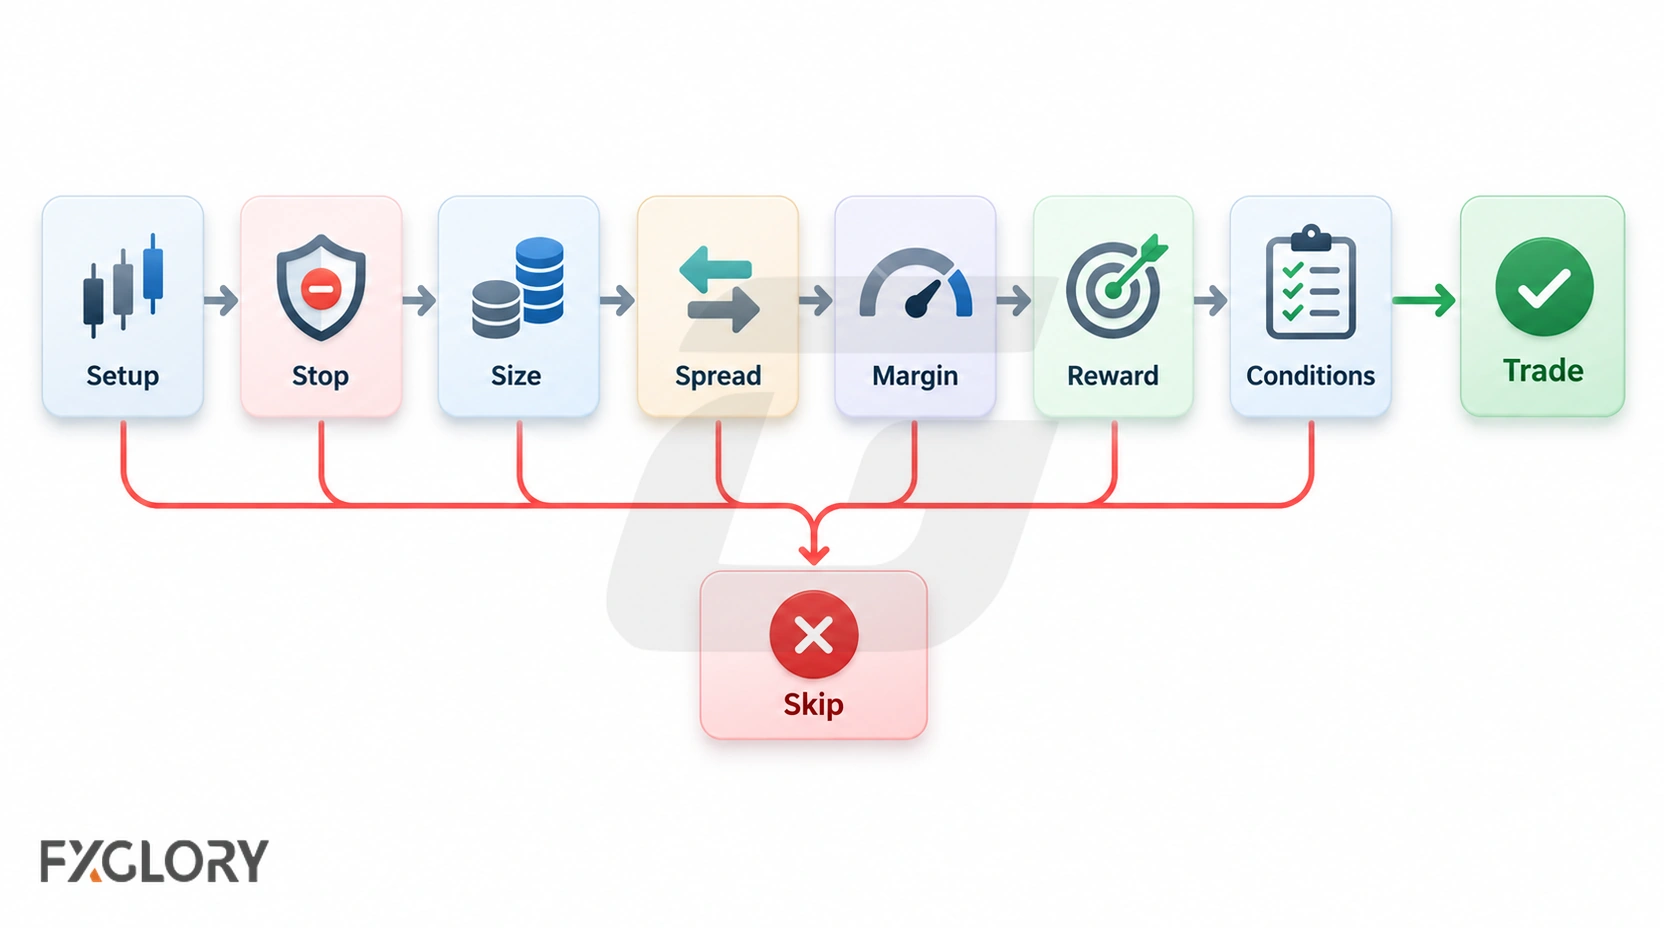
| Step | Risk Question | Continue Only If | Skip If |
|---|---|---|---|
| 1. Setup valid? | Does the trade idea exist by rule? | The setup has context, trigger area, and invalidation | The setup is unclear or emotional |
| 2. Stop distance known? | Where is the trade wrong? | The invalidation point can be defined before entry | The stop is guessed after entry |
| 3. Position size fits? | Does size match the stop distance? | Account exposure fits the written risk rule | Size is chosen before risk is known |
| 4. Spread acceptable? | Does the expected move still make sense after spread? | The target and stop still fit after cost | The target is too small after spread |
| 5. Margin acceptable? | Does leverage exposure fit the account? | Margin requirement and exposure are checked | The trade strains available margin |
| 6. Reward realistic? | Is the target reasonable relative to risk and market structure? | Target logic fits the setup and market condition | The target ignores nearby reaction areas |
| 7. Conditions safe enough? | Are event, session, gap, and volatility risks acceptable? | The plan defines whether to trade, reduce, or skip | Risk conditions are outside the plan |
Risk Per Trade: Why The Same Setup Can Require Different Size
Risk per trade should be tied to the account plan and the stop distance. The same chart setup can require a smaller or larger position depending on how far the invalidation point is from entry.
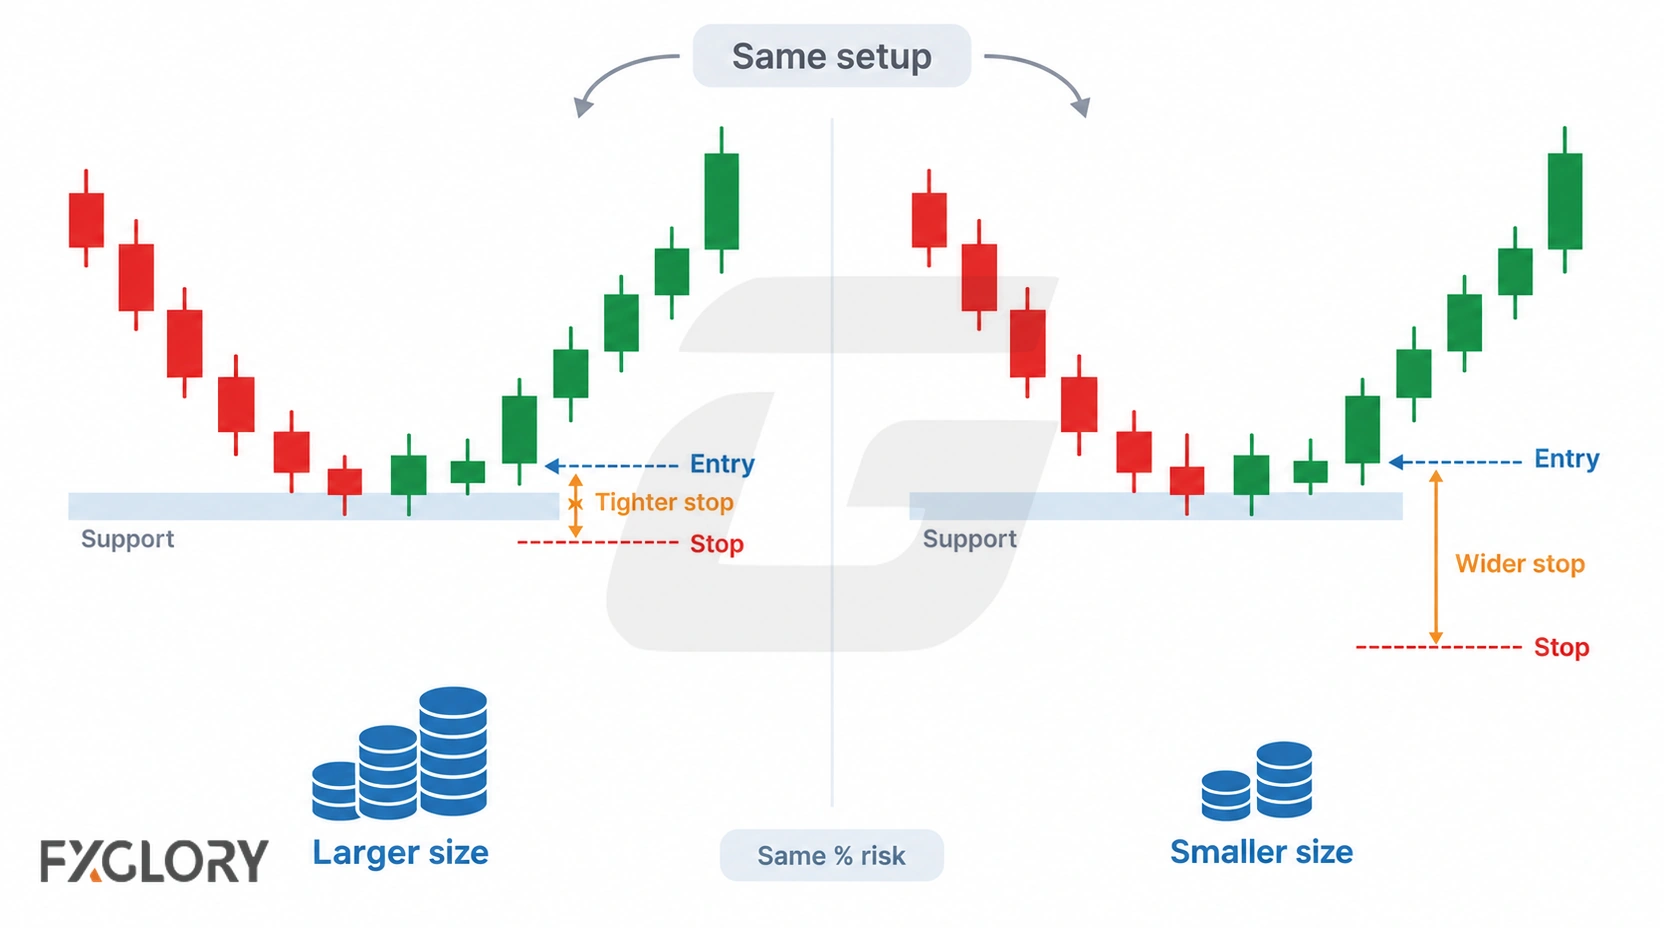
A fixed lot size can create inconsistent risk if stop distance changes. A small stop and a wide stop do not expose the account in the same way when position size stays unchanged.
| Situation | Risk Issue | Better Rule |
|---|---|---|
| Stop is wider than usual | Same size creates larger exposure | Review whether position size must be reduced or trade skipped |
| Stop is very tight | Trade may be vulnerable to normal movement and spread | Check whether the stop still matches structure and volatility |
| Target is small | Spread can weaken the expected reward | Review whether the expected move is large enough after cost |
| Volatility rises | Stop distance and execution risk can change | Review whether the system still allows the trade |
Account Risk Limits Before Trade Risk
A trade-risk rule should sit inside wider account limits. A single trade may fit the stop and position-size rule, but the account can still be overexposed if several trades are open, a losing streak is active, or the session loss limit has already been reached.
| Limit Type | Question | Risk-Control Use |
|---|---|---|
| Risk per trade | What is the planned loss if this trade exits at its protective stop? | Limits the intended loss from one setup; gaps and slippage may cause a larger realized loss |
| Total open risk | What is the sum of planned stop-based losses across open positions? | Checks combined planned risk without treating it as a guaranteed maximum loss, especially for correlated trades |
| Session or daily loss limit | Has the account reached the planned stop point for the day? | Prevents revenge trading after losses |
| Drawdown rule | Has the account reached a review or reduction threshold? | Defines when to reduce size, pause, or review the system |
Stop Distance Before Position Size
Stop distance should come before position size. The stop is not just a number on the chart; it represents the point where the trade idea no longer fits the setup or risk plan.
A price-based protective stop may use structure, volatility, or a predefined invalidation price. Its distance from the proposed entry is a sizing input. A time-based exit or a review triggered by changed market conditions is a separate management rule, not a substitute for defining protective price risk before position size is accepted.
| Risk Or Exit Rule | What It Checks | Risk If Misused |
|---|---|---|
| Structure stop | Whether price breaks the level or swing that supported the trade | Stop is placed where it is convenient, not where the idea is wrong |
| Volatility stop | Whether normal movement needs more room | Stop becomes too wide for account risk |
| Time-based exit or review | Whether the trade fails to develop within the planned window | Short-term trade becomes unplanned long-term exposure |
| Changed-condition exit or review | Whether spread, volatility, or event risk changes the setup | The trade continues after the original condition is gone |
For entry, invalidation, stop, and exit pairing, use the entry and exit strategy framework.
Position Size, Pip Value, And Account Exposure
Position size connects the chart idea to account exposure. The trade should not be sized only by confidence, signal strength, or how clean the setup looks.
The risk management strategy should define how size is reviewed after stop distance is known. It should also consider pip value, account exposure, and whether several open trades create similar directional risk.
| Size Decision | Question | Risk-Control Use |
|---|---|---|
| Lot size | How much market exposure does the trade create? | Set only after stop distance and account risk are known |
| Pip value | How much does each pip movement affect the account? | Connects price movement to account impact |
| Total exposure | Are multiple trades creating the same risk? | Checks concentration across related pairs or directions |
| Size adjustment | Does the trade still fit after volatility or stop distance changes? | Allows reduce, skip, or review decisions before entry |
Simple Position-Sizing Logic
Position sizing starts with the amount the account plan allows to be risked, then compares that amount with stop distance and pip value. The exact calculation depends on account currency, pair, contract size, and platform conditions, so it should be checked before live trading.
For a hypothetical USD 10,000 account risking 0.50% (USD 50), assume a 25-pip protective-stop distance and an approximate EUR/USD pip value of USD 10 per pip per standard lot. The estimated size is USD 50 ÷ (25 × USD 10) = 0.20 standard lots, or about 20,000 EUR of notional exposure. These are illustrative inputs, not a backtest trade or universal contract settings.
Pip value and contract size can differ by pair, account currency, and trading instrument. Learn to calculate pip value in your account currency before using the formula. The estimate must also be reviewed for spread, commission where applicable, potential slippage, available lot increments, margin, leverage exposure, and the account's total open risk. A stop-based money-risk figure is planned, not guaranteed.
Leverage And Margin Risk
Leverage can increase exposure relative to account size. Margin requirements decide whether the account can support the position, but available margin does not mean the trade risk is automatically acceptable.
A risk management strategy should check leverage exposure and margin before the trade is placed. If the position size only fits because the account is using too much exposure, the setup may need to be reduced or skipped.
| Check | Question | Weak Practice |
|---|---|---|
| Leverage exposure | How large is the position compared with the account? | Using leverage because it is available |
| Margin requirement | Does the position fit account conditions? | Entering without checking margin impact |
| Free margin pressure | Can normal movement create pressure on the account? | Leaving too little room for volatility |
| Multiple positions | Do open trades combine into larger exposure? | Reviewing each trade alone while total exposure grows |
Before connecting stop distance, position size, leverage exposure, and account risk, use the FXGlory margin calculator. Review FXGlory leverage conditions.
Spread, Slippage, And Execution Risk
Spread affects the trade before the position has time to develop. This matters most for short-term trades, small targets, frequent systems, and tight stops.
Slippage and execution conditions can also affect entry and exit prices. A risk strategy should define when the spread or execution environment makes a trade unsuitable, even if the setup itself is valid.
| Cost Or Execution Factor | Risk Question | Skip Or Review If |
|---|---|---|
| Spread | Is the expected move large enough after cost? | Target is too small relative to spread |
| Tight stop | Can normal spread and noise affect the stop? | Stop is too close for the setup and condition |
| Fast market | Can price move before entry or exit is filled? | Volatility exceeds the system's rules |
| Low-liquidity period | Can conditions change around session transitions? | The system is not designed for that window |
Before using short-target, low-timeframe, or frequent-entry methods, review FXGlory spreads. For order-placement and platform workflow context, review FXGlory trading platforms.
Risk-Reward And Target Realism
Risk-reward is useful only when the target is realistic. A target should not be placed where the chart has no reason to reach. Nearby support, resistance, session conditions, volatility, and spread can all affect whether the target makes sense.
| Risk-Reward Check | Useful Question | Weak Version |
|---|---|---|
| Target location | Is there a reasonable path to the target? | Target is selected only to make the ratio look better |
| Stop location | Is the stop placed where the idea is wrong? | Stop is tightened only to improve the ratio |
| Spread impact | Does cost weaken the expected reward? | Risk-reward is calculated without trading cost |
| Volatility fit | Does recent movement support the target distance? | Target ignores current movement conditions |
| Trade management | Will the trade use fixed target, trailing, partial, or time exit? | Exit method is decided after entry |
Drawdown, Losing Streaks, And After-Loss Rules
Drawdown is a decline from a preceding peak in account equity or balance, depending on the series being measured. A loss measured against starting capital is a different comparison unless that starting value is also the relevant peak. State which series and reference point a rule uses.
Risk management also needs rules for what happens after losses. A losing streak can pressure the trader into increasing size, changing methods, or taking trades outside the plan.
After-loss rules should be written before the losses occur. They can define when to reduce exposure, stop for the session, review trade notes, or pause until conditions return to the system's rules.
| After-Loss Situation | Risk Rule | Weak Reaction |
|---|---|---|
| One planned loss | Record whether the rule was followed | Change the system immediately |
| Multiple losses in a row | Reduce, pause, or review according to the written plan | Increase size to recover |
| Large drawdown | Stop trading and review account-level rules | Keep trading with the same exposure |
| Rule-breaking loss | Separate strategy result from discipline issue | Blame the market without reviewing the decision |
| Emotional pressure | Use a no-trade or session-stop rule | Revenge trade or force the next setup |
Correlation And Concentration Risk
Several trades can create the same exposure even when they use different pairs. A trader may think each trade is separate, while the account is actually exposed to one currency, one direction, or one market condition.
| Concentration Type | Risk Question | Review Rule |
|---|---|---|
| Same currency exposure | Are several trades exposed to the same currency move? | Review total exposure, not only each individual trade |
| Same direction exposure | Are trades all depending on the same market direction? | Limit grouped risk according to the plan |
| Same strategy exposure | Are all trades using the same setup in the same condition? | Review whether one market condition can affect all trades |
| Same event exposure | Could one news event affect several open positions? | Review event timing before adding exposure |
News, Session, Weekend, And Gap Risk
Some risks come from timing. Scheduled news, session changes, weekend gaps, low-liquidity periods, and fast volatility can change spread, execution conditions, and stop behavior.
The risk strategy should define whether the system trades through these conditions, reduces exposure, tightens review rules, or skips the trade entirely.
| Timing Risk | What Can Change | System Rule Needed |
|---|---|---|
| Scheduled news | Volatility, spread, execution, stop behavior | Trade, reduce, close, or avoid according to written rules |
| Session transition | Liquidity, spread, movement quality | Define active and inactive trading windows |
| Weekend exposure | Gap risk and changed market conditions | Define whether positions can remain open |
| Low-volatility period | Targets may become unrealistic | Review target distance and no-trade rules |
| High-volatility period | Stops may need more room or trade may be skipped | Review stop distance, size, spread, and margin |
No-Trade Rules Caused By Risk
A risk rule should be allowed to cancel a trade. If the setup looks valid but the risk does not fit, the risk rule should control the decision.
- Stop distance is unknown: The trade idea has no clear invalidation point.
- Stop is too wide for the account plan: The setup needs more room than the allowed exposure supports.
- Position size does not fit: The desired trade size creates too much account risk.
- Spread is too large relative to target: The expected move is too small after cost.
- Margin requirement is unsuitable: The trade strains available margin or exposure limits.
- Risk-reward is forced: The target is moved only to make the trade look acceptable.
- Event risk is outside the plan: Volatility or execution conditions may change beyond the system's rules.
- Correlation risk is too high: Several trades depend on the same currency, direction, or market condition.
- Drawdown rule is active: The plan requires reduced risk, pause, or review after losses.
- Emotional pressure is present: The trade is driven by revenge, boredom, or fear of missing out.
Common Forex Risk Management Mistakes
Use the trade journal to diagnose how a decision departed from the written rule. Unlike the pre-entry no-trade list, these are checks to make after a trade or review period.
- Size chosen before the stop: Compare the recorded lot size and actual stop distance with the amount the plan allowed at entry.
- Stop changed under pressure: Check whether a modification followed a predefined structure rule or was made merely to avoid recognizing a loss.
- Trading costs underestimated: Compare the expected spread and charges with the entry and exit conditions recorded for small-target trades.
- Available leverage mistaken for acceptable risk: Review whether the original position exposure passed both the stop-risk and margin checks.
- Target adjusted to force a ratio: Compare the target selected before entry with actual support, resistance, and available price room.
- Margin impact overlooked: Reconstruct free-margin and total-position exposure at entry, not only after prices moved.
- Setup differences ignored: Group results by stop distance, volatility, and market condition instead of assuming equal risk across all signals.
- Correlated exposure accumulated: Review whether positions shared the same currency or event sensitivity at the time they were opened.
- After-loss plan abandoned: Compare trading activity after a losing streak with the original size-reduction and pause rules.
- Trade records incomplete: Record both rules followed and rules broken so a strategy loss is not confused with a process error.
Forex Risk Management Strategy Checklist
Before accepting a forex trade, answer these questions.
- Is the setup valid by rule?
- Where is the trade idea invalid?
- How far is the stop from the entry?
- Does the stop fit structure, volatility, and account risk?
- What position size fits after stop distance is known?
- What is the account exposure if the stop or invalidation condition is reached?
- What is the total open risk across active trades?
- Is a session, daily, or drawdown limit already active?
- Does the trade still make sense after spread?
- Does slippage or fast movement need a skip or review rule?
- Does the margin requirement fit the account plan?
- Does leverage exposure remain acceptable?
- Is the target realistic based on structure, volatility, and spread?
- Does risk-reward fit without forcing the stop or target?
- Are there correlated trades or grouped exposure?
- Is news, session timing, weekend exposure, or gap risk relevant?
- Does the trade need to be reduced, skipped, or reviewed before entry?
Review FXGlory's risk disclosure.
Backtesting Notes For Forex Risk Management Strategy
This hypothetical educational model uses one risk-approval process around one daily trade-candidate generator: a 20-candle compression breakout candidate, predefined stop distance, fixed fractional risk, spread-cost filter, margin check, total-open-risk cap, grouped currency exposure cap, drawdown-based risk reduction, after-loss pause, fixed 1.5R target comparison, failure exit, and spread/slippage sensitivity. It does not test every stop method, every position-sizing method, every leverage policy, corporate FX risk, discretionary loss control, or every exit style.
The model reviewed EURUSD, GBPUSD, USDJPY, AUDUSD, USDCAD, and USDCHF on daily candles using public yfinance OHLC data where available. Each candidate was accepted only after the risk-management checks passed.
The original structured research specifies the candidate generator more precisely: the range high and low use the preceding 20 completed daily candles; its width must be between 1.00 and 4.00 ATR(14), and the combined high-low range of the preceding five completed candles must be no more than 0.80 of the 20-candle width. A long candidate requires a completed daily close 0.10–1.25 ATR(14) above the range high and in the candle's upper 35%; a short candidate requires a close the same distance below the range low and in the lower 35%. Candidate entries occur at the next daily open.
For both directions, the model defines the protective stop beyond the signal candle extreme with a 0.25 ATR(14) buffer, a fixed 1.5R target, an exit at the daily close if price closes back inside the former 20-candle range after entry, and a maximum hold of 20 daily candles. When both the stop and target are touched within one daily candle, the model records the stop first. These are the study's recorded rules, not general recommendations or newly calculated results.
| Rule Area | Educational Model Rule |
|---|---|
| Candidate setup | Daily 20-candle compression breakout candidate |
| Starting model equity | 10,000 educational units |
| Base risk per accepted trade | 0.50% of current model equity |
| Reduced-risk state | 0.25% risk per accepted trade after 6% model equity drawdown |
| Hard pause | New entries pause after 10% model equity drawdown |
| Total open planned risk cap | 2.00% of current model equity |
| Grouped currency exposure cap | 1.25% planned open risk per currency group |
| Stop-distance filter | At least 8 pips and no more than 180 pips |
| Cost filter | Baseline round-turn cost must not exceed 20% of planned stop distance |
| Cost-adjusted reward filter | Target distance after estimated round-turn cost must be at least 1.10R |
| Margin assumption | Educational 1:100 leverage assumption for margin estimation |
| New trade margin cap | No more than 15% of current model equity |
| Total margin cap | No more than 35% of current model equity after adding the trade |
| After-loss rule | After 3 consecutive closed losing trades, new entries pause for 5 trading days |
The review records candidate count, accepted trades, rejected candidates, rejection reasons, acceptance rate, trade count, win rate, average win in R, average loss in R, expectancy in R, profit factor, maximum drawdown in R, model equity drawdown, worst losing streak, average holding period, ending model equity, maximum open planned risk, maximum margin usage, pair-level behavior, direction-level behavior, exit reasons, and spread/slippage sensitivity.
| Cost Input | Assumptions Used |
|---|---|
| Spread | 0.5, 1.5, and 3.0 pips |
| Slippage | 0.1, 0.5, and 1.0 pips per side |
| Baseline comparison | 1.5-pip spread and 0.5-pip slippage per side |
| Swap and rollover | Not included |
Educational Risk-Test Results
The hypothetical backtest used public yfinance daily OHLC data from 2016-06-29 through 2026-06-29 where available. The baseline cost assumption used a 1.5-pip spread and 0.5-pip slippage per side. The baseline result was negative, with expectancy of -0.2377R and total net result of -10.4584R. The model equity change was -514.38 educational units from a 10,000-unit starting balance.
| Risk-Approval Metric | Baseline Result |
|---|---|
| Candidates reviewed | 53 |
| Accepted trades | 44 |
| Rejected candidates | 9 |
| Acceptance rate | 83.02% |
| Starting model equity | 10000 |
| Ending model equity | 9485.62 |
| Net model equity change | -514.38 |
| Max model equity drawdown | -5.75% |
| Max open planned risk | 1% |
| Max margin used | 4.45% |
| Max concurrent trades | 2 |
| Trade Metric | Baseline Result |
|---|---|
| Number of trades | 44 |
| Win rate | 18.18% |
| Average win | 1.4053R |
| Average loss | -0.6028R |
| Expectancy | -0.2377R |
| Profit factor | 0.5181 |
| Maximum drawdown | -11.75R |
| Worst losing streak | 15 |
| Average holding period | 1.39 daily candles |
| Median holding period | 1 daily candle |
| Total net result | -10.4584R |
Here, one R expresses a trade outcome relative to its planned initial monetary risk. Summed trade results in R are not the same measurement as the percentage decline in model equity from a prior peak, so the reported -11.75R maximum drawdown and -5.75% maximum model equity drawdown should not be equated. The baseline maximum equity drawdown stayed below the model's 6% reduced-risk threshold and 10% hard-pause threshold; these baseline results therefore do not demonstrate the effects of either drawdown-triggered control.
Risk-Approval Rejection Reasons
| Rejection Reason | Count |
|---|---|
| stop too tight | 4 |
| after loss pause | 4 |
| cost too large vs stop | 1 |
Pair-Level Baseline Results
| Pair | Trades | Win Rate | Expectancy | Profit Factor | Max Drawdown | Total Net Result |
|---|---|---|---|---|---|---|
| AUDUSD | 6 | 16.67% | -0.3037R | 0.4346 | -1.901R | -1.8224R |
| EURUSD | 10 | 30% | 0.1668R | 1.6489 | -1.4608R | 1.6685R |
| GBPUSD | 6 | 16.67% | -0.169R | 0.5788 | -1.8598R | -1.0137R |
| USDCAD | 6 | 16.67% | -0.1655R | 0.5954 | -2.2538R | -0.9932R |
| USDCHF | 10 | 10% | -0.739R | 0.1543 | -6.2463R | -7.3898R |
| USDJPY | 6 | 16.67% | -0.1513R | 0.6066 | -2.2875R | -0.9077R |
Spread And Slippage Sensitivity
| Spread (pips) | Slippage/Side (pips) | Trades | Win Rate | Expectancy | Profit Factor | Max Drawdown | Total Net Result |
|---|---|---|---|---|---|---|---|
| 0.5 | 0.1 | 44 | 22.73% | -0.1822R | 0.5956 | -9.4238R | -8.0171R |
| 0.5 | 0.5 | 44 | 18.18% | -0.2069R | 0.5592 | -10.4544R | -9.1021R |
| 0.5 | 1 | 44 | 18.18% | -0.2377R | 0.5181 | -11.75R | -10.4584R |
| 1.5 | 0.1 | 44 | 18.18% | -0.213R | 0.5506 | -10.7135R | -9.3734R |
| 1.5 | 0.5 | 44 | 18.18% | -0.2377R | 0.5181 | -11.75R | -10.4584R |
| 1.5 | 1 | 44 | 18.18% | -0.2685R | 0.4808 | -13.0456R | -11.8146R |
| 3 | 0.1 | 44 | 18.18% | -0.2593R | 0.4916 | -12.6569R | -11.4077R |
| 3 | 0.5 | 44 | 18.18% | -0.2839R | 0.4634 | -13.6934R | -12.4927R |
| 3 | 1 | 44 | 18.18% | -0.3147R | 0.4309 | -14.989R | -13.849R |
Exit Reason Counts
| Exit Reason | Baseline Count |
|---|---|
| range failure close | 19 |
| stop first same bar | 1 |
| stop loss | 16 |
| target 1.5R | 8 |