
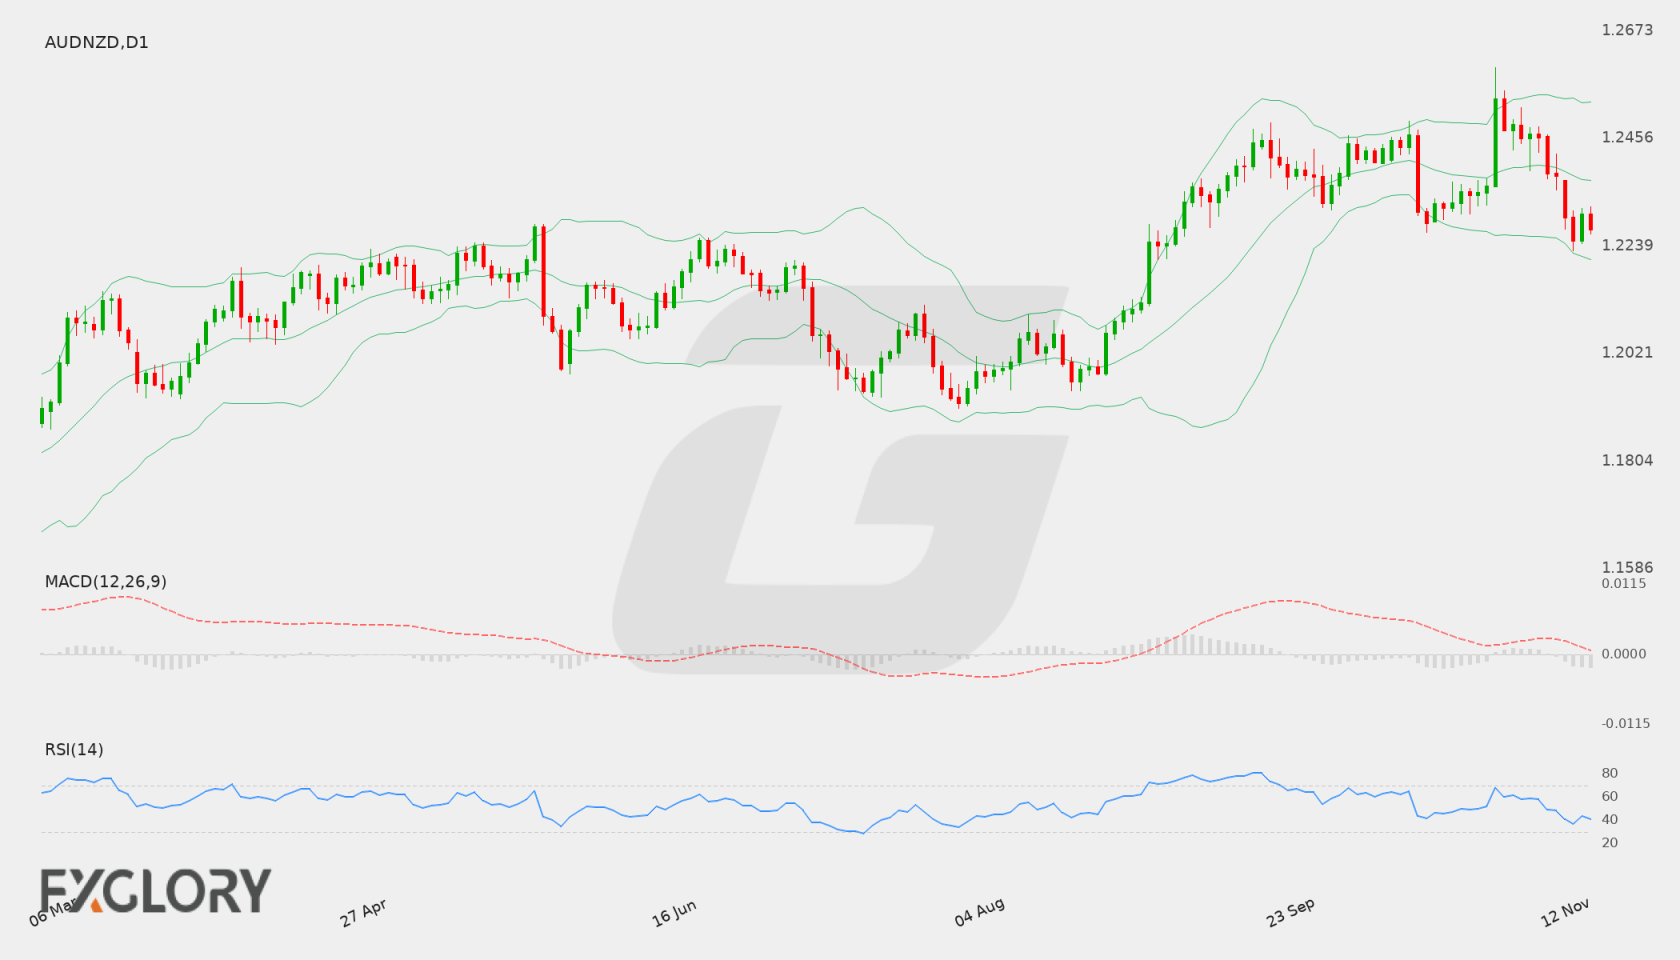
Daily trend is neutral with price holding above the 200-day moving average but below the 20 and 50 period averages, while momentum remains negative and the four-hour picture leans bearish.
AUD/NZD Weekly Forecast at a Glance
In brief
The weekly bias is Neutral, as daily structure is mixed and momentum is negative, while the four-hour tactical picture leans bearish and needs confirmation before it shapes the week.
The daily chart is the controlling timeframe for this forecast, and it is not yet offering a clean direction. Price closed at 1.22627, below the 20 and 50 period exponential averages and below the Bollinger middle band, yet still above the 200 period simple average. That mix of positions, combined with a mixed close sequence, points to a market that has lost its prior upward momentum without yet establishing a new downward structure. The 50 period average is falling while the 200 period average is rising, which reinforces the sense that the longer trend remains constructive while the medium-term path is being repaired.
Momentum adds weight to the caution. Daily MACD sits below its signal line and in negative territory, and RSI is below the midpoint, so the daily picture does not yet support a move higher without first reclaiming the mid-range. The four-hour timeframe is more bearish in tone, with price below its short and medium averages, yet its MACD histogram has turned positive, which suggests the short-term selling pressure is slowing. For the week, the more useful framing is that the daily structure must resolve before the four-hour warnings can be treated as the leading thread.
- Bullish targets
-
- T11.2368
- T21.24339
- Bearish targets
-
- T11.21593
- T21.21211
- Invalidation
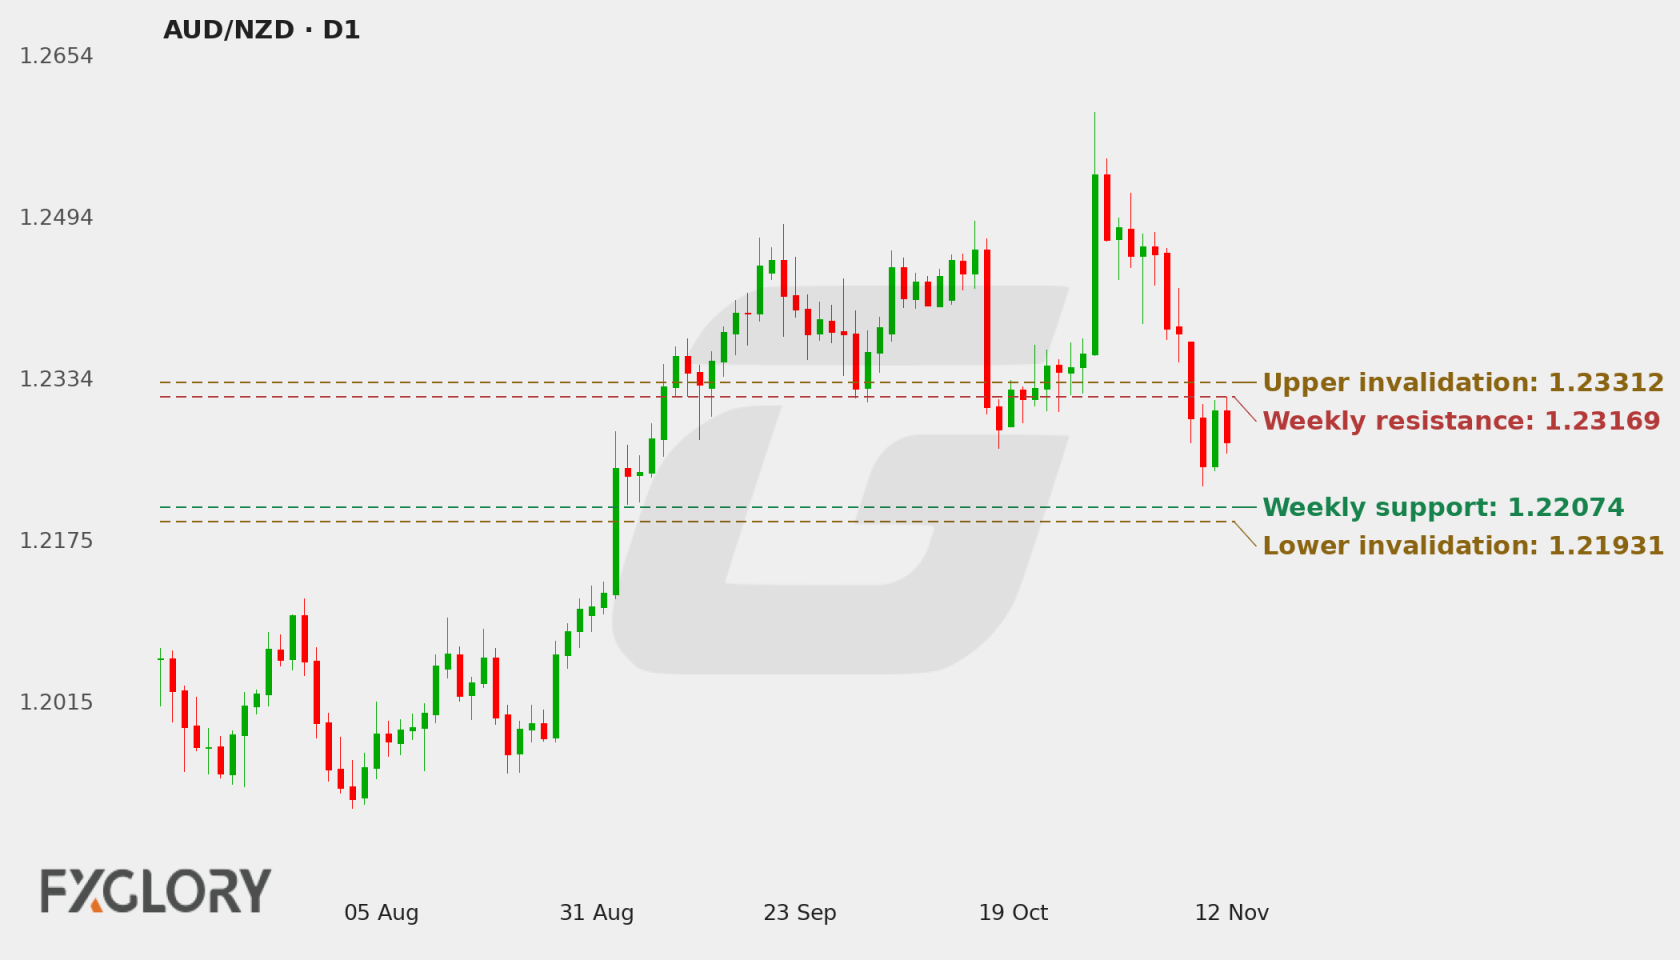
- One completed D1 close above 1.23312 or below 1.21931.
Selected key events
- RBA Gov Bullock Speaks17 Nov 2026 01:50 GMT+3High
- Inflation Expectations q/q17 Nov 2026 05:00 GMT+3High
- Employment Change19 Nov 2026 03:30 GMT+3High
| Price at last update | 1.22635 as of 14 Nov 2026 02:50 GMT+3 |
|---|---|
| Completed D1 reference close | 1.22627 as of 13 November 2026 |
| Primary support | 1.22074 |
| Secondary support | 1.21593 |
| Primary resistance | 1.23169 |
| Bullish targets | 1.2368, 1.24339 |
| Bearish targets | 1.21593, 1.21211 |
| Formal weekly thesis invalidation | Upper 1.23312 — One completed D1 close above 1.23312 formally invalidates the neutral weekly thesis. Lower 1.21931 — One completed D1 close below 1.21931 formally invalidates the neutral weekly thesis. |
Live AUD/NZD Tools
A forecast is a snapshot. These pages keep moving with the market.
- Live
Live chart & price
Watch AUD/NZD move tick by tick. Flip from the 1-minute chart to the monthly, with trading conditions right alongside.
- Live
Technical signals
Buy, sell or sit it out? Oscillators, moving averages and pivot points boiled down to one clear reading, updated live.
Economic calendar
Know what's coming before it hits the price: every scheduled release with impact, forecast and actual.
Historical data
Open, high, low and close on any timeframe from 1 minute to monthly. Test your idea, then download the data.
All AUD/NZD forecasts
Every weekly outlook in one place. Scroll back to see how earlier calls played out against the chart.
AUD/NZD Fundamental Drivers This Week
Scheduled economic events relevant to AUD/NZD during 14–21 November 2026 include RBA Gov Bullock Speaks, Inflation Expectations q/q, Wage Price Index q/q. Directional impact depends on the released data relative to supplied expectations.
Scroll table sideways for more columns →
| Event | Scheduled | Importance | Consensus | Previous |
|---|---|---|---|---|
| RBA Gov Bullock Speaks | 17 Nov 2026 01:50 GMT+3 | High | — | — |
| Inflation Expectations q/q | 17 Nov 2026 05:00 GMT+3 | High | — | 2.34% |
| Wage Price Index q/q | 18 Nov 2026 03:30 GMT+3 | Medium | 0.9% | 0.8% |
| RBNZ Gov Breman Speaks | 18 Nov 2026 21:00 GMT+3 | Medium | — | — |
| Employment Change | 19 Nov 2026 03:30 GMT+3 | High | 25.2K | -39.3K |
Current AUD/NZD Price and Weekly Market Context
The daily trend is neutral and the close sequence is mixed, which means the weekly thesis is not yet anchored to a directional trend. Price sits above the 200 period average but below the 20 and 50 period averages, so the longer structure is intact while shorter-term structure has weakened. Daily momentum is negative, which supports caution against a directional call, and the four-hour state leans bearish with price below its short and medium averages. Volatility is stable, so the week is likely to be governed by level behaviour and scheduled catalysts rather than by an expansion in range.
- D1 trendneutralClose vs 50 EMA and 200 SMA
- H4 tacticalbearishH4 close vs 20 and 50 EMA
- MomentumnegativeRSI and MACD histogram
- VolatilitystableD1 ATR change
Is AUD/NZD Bullish or Bearish This Week?
The primary case is neutral consolidation between the structural boundaries, with a bearish tilt in the four-hour picture and a constructive longer-term average offering a counterweight. The bullish and bearish scenarios are alternatives that require daily closes beyond the boundaries, and the base case remains the most consistent with the current mixed evidence.
Scenario 1 of 3Bullish continuation
- D1 confirmation
- A completed D1 close above 1.23312 would be needed to move the daily picture decisively toward the upside.
- H4 tactical signal
- Four-hour price would need to recover above its short and medium averages and hold above the four-hour resistance level before the bullish scenario gains tactical support.
- Targets
- 1.2368, 1.24339
- Scenario failure condition
- A failure to hold above the primary resistance at 1.23169 after a breakout attempt, or a daily MACD that remains below its signal line, would weaken the upside case.
Scenario 2 of 3Base / neutral
- D1 confirmation
- Daily closes remaining between 1.21931 and 1.23312 would keep the consolidation case intact.
- H4 tactical signal
- Four-hour price oscillating around the four-hour support and resistance zone, with MACD histogram readings that vary in direction, would suit a range-bound week.
- Targets
- Price between the primary support at 1.22074 and the primary resistance at 1.23169, with the secondary levels at 1.21593 and 1.2368 framing the wider range.
- Scenario failure condition
- A break of price through either of the secondary levels with follow-through in the four-hour picture would move the market out of its range and toward one of the directional scenarios.
Scenario 3 of 3Bearish reversal
- D1 confirmation
- A completed D1 close below 1.21931 would be needed to move the daily picture decisively toward the downside.
- H4 tactical signal
- Four-hour price staying below its short and medium averages and failing to recover the four-hour resistance would support the downside case.
- Targets
- 1.21593, 1.21211
- Scenario failure condition
- A recovery of the four-hour MACD histogram into sustained positive readings alongside a reclaim of the daily 20 period average would weaken the downside case.
AUD/NZD D1 Outlook and H4 Technical Triggers
The daily timeframe controls the weekly thesis. H4 evidence is used only for earlier confirmation, tactical warning and scenario-failure context. Complete live H4, H1 and intraday readings remain on the Technical page.
D1 Price Action and Market Structure
The daily close at 1.22627 sits between the primary support and primary resistance, below the 20 and 50 period averages and the Bollinger middle, yet above the 200 period average. The close sequence is mixed rather than trending in one direction, which means the daily structure has not yet confirmed a new leg. The daily setup therefore reads as a market repairing its short-term structure inside a broader range.
H4 Tactical Triggers
The four-hour close at 1.22627 is above its four-hour support but below its four-hour resistance and both short and medium averages, so the tactical state leans bearish. The four-hour MACD sits above its signal line even though both remain in negative territory, and the histogram is positive, which suggests downside momentum may be easing. This tension means the four-hour picture warns against a quick upside push while not yet confirming a fresh downside break, and it should be read as tactical timing context rather than as the weekly thesis.
Technical Indicators at a Glance
Automated technical summary
AUDNZD closed at 1.22627 on the daily timeframe with a neutral trend, mixed close sequence and negative momentum, and the four-hour picture leans bearish. Volatility is stable, and the structural boundaries sit at 1.21931 and 1.23312 for the weekly framework.
Selected snapshot: D1 with H4 tactical context. Updated 14 November 2026.
- RSI39.84Neutral
- MACDBelow signalBearish
- Bollinger Bands17% of bandLower half
- Moving averagesBetweenNeutral
- ATR71.7 pipsStable
RSI (14)
Neutral
H4 39.45
Daily RSI sits below the midpoint, which fits the negative momentum reading and limits the case for an immediate upward push. The four-hour RSI is also below the midpoint, which reinforces the cautious tone in the shorter timeframe.
- D1 RSI
- 39.84
- H4 RSI
- 39.45
MACD (12, 26, 9)
Bearish momentum
Daily MACD is below its signal line and in negative territory, so the daily momentum picture does not yet favour a turn higher. The four-hour MACD is above its signal line with a positive histogram, which points to slowing downside pressure in the shorter timeframe and suggests the tactical selling may be losing some force.
- MACD
- -0.002093
- Signal
- 0.000083
- Histogram
- -0.002176
Bollinger Bands (20, 2σ)
Lower half
Striped ends = price outside the bands.
Price sits below the daily Bollinger middle band yet well inside the outer bands, which fits a market that has pulled back from the upper part of its range without touching a boundary. Daily Bollinger readings therefore support a consolidation interpretation rather than a directional extreme.
- Position in band
- 17%
- Band width
- 323.5 pips (2.62%)
Moving averages (D1)
Neutral structure
- 50 EMA falling1.23325Price is 69.8 pips below (-0.57%)
- 200 SMA rising1.21400Price is 122.7 pips above (+1.01%)
The daily 200 period average is rising while the 50 period average is falling and the 20 period average sits above price, so the longer trend remains supportive while the medium-term average structure has turned against the market. The four-hour averages are both above price, which keeps the tactical picture leaning bearish.
- D1 close
- 1.22627
- 50 EMA
- 1.23325
- 200 SMA
- 1.21400
ATR (14)
Stable volatility
One ATR either side of the latest close. A measure of move size, not a price target.
Daily ATR is steady, which matches the stable volatility state and suggests the market is not in an expansion phase. This favours a range-bound or slower-developing week, in which level tests may take time rather than arrive as sudden moves.
- D1 ATR
- 0.00717 (0.58%)
- H4 ATR
- 0.00254 (0.21%)
Technical conclusion: The daily trend is neutral and momentum is negative, so the weekly thesis is Neutral rather than directional. The strongest supporting evidence is that price remains above the 200 period average while holding between the primary support and primary resistance. The strongest counterargument is the bearish four-hour state, which could lead to a test of the lower support area if the daily structure weakens. The next important levels are the primary support at 1.22074 and the primary resistance at 1.23169.
View all live AUD/NZD oscillators, moving averages, pivot points and timeframe signals.
AUD/NZD Weekly Support, Resistance and Invalidation
| Level | Role | Timeframe | Why it matters |
|---|---|---|---|
| 1.24339 | Outer D1 resistance and bullish target | D1 | It is the furthest upside reference in the resistance set and marks where a bullish extension would need to travel beyond the secondary resistance. |
| 1.2368 | Secondary D1 resistance and first bullish target | D1 | It frames the upper edge of the wider range and is the first reference a bullish scenario would need to clear after the primary resistance. |
| 1.23312 | Upper formal boundary | D1 | A completed D1 close above this boundary would move the weekly framework against the Neutral thesis, so it defines the upper edge of the consolidation case. |
| 1.23169 | Primary D1 resistance | D1 | It is the first overhead reference above the reference close and the main level a recovery attempt would need to resolve. |
| 1.22722 | H4 resistance | H4 | It is the tactical ceiling for the four-hour picture, and the close sitting below it keeps short-term rebounds capped until it is cleared. |
| 1.22618 | H4 support | H4 | It is the nearest tactical floor, and the close sitting just above it means a loss of this level would add pressure to the bearish four-hour state. |
| 1.22074 | Primary D1 support | D1 | It sits at the lower Bollinger band and is the first structural floor below the reference close, so it anchors the lower half of the weekly range. |
| 1.21931 | Lower formal boundary | D1 | A completed D1 close below this boundary would move the weekly framework against the Neutral thesis, marking the lower edge of the consolidation case. |
| 1.21593 | Secondary D1 support and first bearish target | D1 | It is the next structural floor if the primary support gives way, and it frames the lower edge of the wider range. |
| 1.21211 | Outer D1 support and bearish target | D1 | It is the furthest downside reference in the support set and sits below the secondary support, so it marks the outer limit of a bearish extension. |
These are forecast-specific market-structure levels. Formula-based Classic, Fibonacci and Camarilla pivots remain on the Technical page.
Economic News & Events to Watch for AUD/NZD This Week
Selected events may increase AUD/NZD volatility. Direction depends on the released value relative to consensus and previous results.
Scroll table sideways for more columns →
| Event | Date and time | Importance | Previous | Consensus |
|---|---|---|---|---|
| RBA Gov Bullock Speaks | 17 Nov 2026 01:50 GMT+3 | High | — | — |
| Inflation Expectations q/q | 17 Nov 2026 05:00 GMT+3 | High | 2.34% | — |
| Employment Change | 19 Nov 2026 03:30 GMT+3 | High | -39.3K | 25.2K |
| Unemployment Rate | 19 Nov 2026 03:30 GMT+3 | High | 4.7% | 4.7% |
| Wage Price Index q/q | 18 Nov 2026 03:30 GMT+3 | Medium | 0.8% | 0.9% |
Showing 5 of 6 scheduled events; high-importance events appear first.
Calendar source: FXGlory economic calendar. Retrieved 14 Nov 2026 17:26 GMT+3. View the complete AUD/NZD economic calendar.
AUD/NZD Outlook for 14–21 November 2026
The neutral bias reflects a daily structure that has not resolved. Price holds above the long-term average, but it sits below the shorter averages and the Bollinger middle, with negative momentum confirming the lack of upside conviction. The four-hour picture leans bearish, which adds a tactical warning but does not replace the daily thesis.
The week is likely to hinge on whether price resolves between the structural boundaries of 1.21931 and 1.23312, with the primary levels at 1.22074 and 1.23169 acting as the first points of reference. Scheduled Australian and New Zealand releases add potential volatility around that range, although they do not provide a directional outcome on their own.
Weekly Forecast Risks and What Would Change the Outlook
- Timeframe disagreement: The four-hour state is bearish while the daily trend is neutral, so short-term selling could push price toward the primary support before the daily structure resolves.
- Event-driven repricing: High-importance Australian employment and NZD inflation expectations releases fall within the week and could move the cross toward a boundary level.
- Momentum conflict: Daily momentum is negative while the four-hour MACD histogram is positive, so a recovery in the shorter timeframe could test the primary resistance before the daily structure supports it.
Formal weekly invalidation: The neutral weekly thesis is formally invalidated by one completed D1 close above 1.23312 or below 1.21931.
AUD/NZD Weekly Forecast FAQs
Is AUD/NZD bullish or bearish this week?
The weekly bias is Neutral. Daily trend and close sequence are mixed, and daily momentum is negative, so neither side has the structural backing to lead the week.
What scenario would strengthen for AUD/NZD this week?
The base case is consolidation between the two structural boundaries. A bearish tilt would become more relevant if price moves toward the lower support area and the four-hour picture stays weak, while an upward recovery would need the daily close to regain the mid-range before the bullish case gains weight.
What are the key AUD/NZD support and resistance levels?
The primary support is 1.22074 and the secondary support is 1.21593. The primary resistance is 1.23169 and the secondary resistance is 1.2368. Upside reference targets are 1.2368 and 1.24339, and downside targets are 1.21593 and 1.21211.
What would invalidate this AUD/NZD forecast?
The neutral weekly thesis is formally invalidated by one completed D1 close above 1.23312 or below 1.21931.
Methodology, Data and Sources
- Price-data source: FXGlory price feed (AUDNZD)
- Live quote timestamp: 14 Nov 2026 02:50 GMT+3
- Weekly analysis timestamp: 14 November 2026
- Chart timestamp: 14 November 2026 (redrawn daily)
- Daily check: Every day at 04:00 GMT+3: the latest completed D1 close is checked against the invalidation levels and the chart is redrawn.
- Technical snapshot timestamp: 14 November 2026
- Calendar-data source: FXGlory economic calendar
- Calendar retrieval timestamp: 14 Nov 2026 17:26 GMT+3
- Candle convention: FXGlory D1 and H4 candles; D1 candle dates are evaluated in UTC and invalidation uses completed D1 closes only.
- Indicator settings: D1 RSI(14), MACD(12,26,9), Bollinger Bands(20,2), EMA(50), SMA(200), ATR(14); H4 RSI/MACD/Bollinger/EMA/ATR.
- Level-selection method: Weekly D1 support/resistance levels are structural market levels. Formal invalidation uses a hard 0.75× D1 ATR(14) minimum anchor distance plus a 0.20× D1 ATR(14) outward buffer; H4 levels are tactical only.
- Weekly forecast method: D1 controls the weekly thesis; H4 supplies tactical confirmation/warning only.