
The D1 trend remains bullish and the H4 tactical state agrees, but mixed closes and softer MACD momentum keep the setup conditional around 1.24049 and 1.24741.
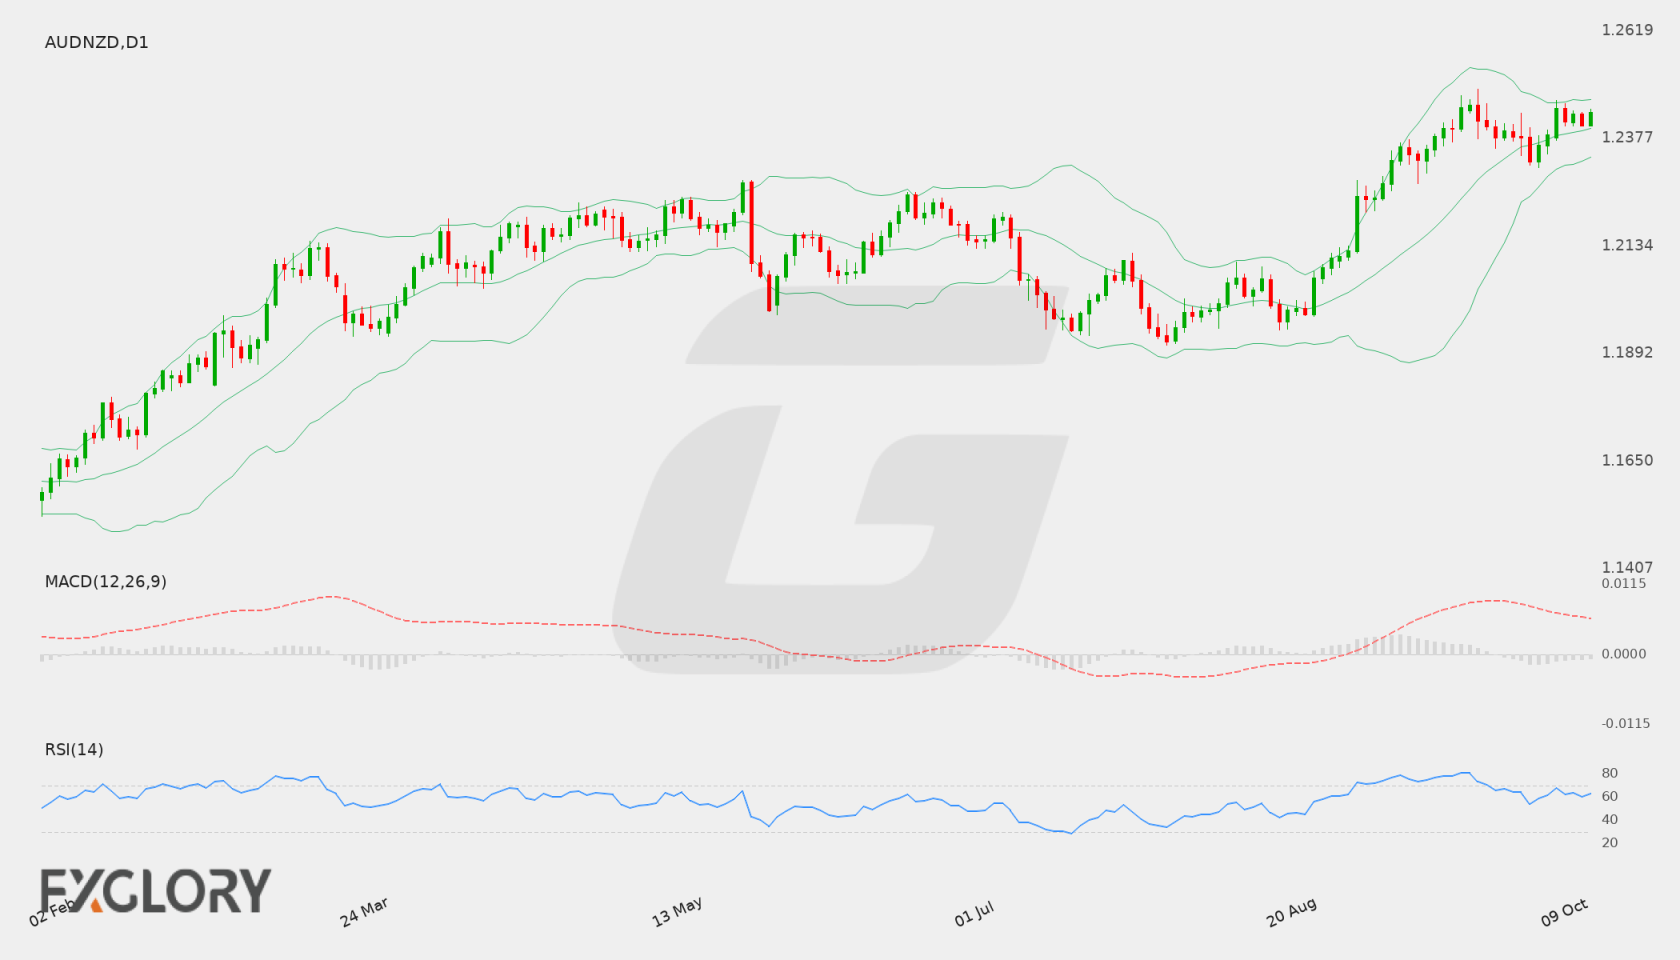
AUD/NZD Weekly Forecast at a Glance
In brief
Bullish bias for 12–17 October 2026 as D1 trend and rising moving averages remain in control, though mixed D1 closes and momentum leave the setup less than fully aligned.
The weekly thesis is controlled by D1, where the trend state is bullish and the reference close of 1.24358 sits above the EMA20 at 1.23746, the EMA50 at 1.22741 and the SMA200 at 1.20445. The EMA20 is above the EMA50 and SMA200, and both the EMA50 and SMA200 are rising, which is the strongest structural evidence for the bias. The weaker side of the picture is momentum and closing behaviour: the close sequence is mixed, and the MACD line at 0.005076 sits below its signal line at 0.005841 with a negative histogram. Price is trading between primary support at 1.24049 and primary resistance at 1.24741, so the trend is intact but has not yet pressed through the nearest overhead level.
H4 adds tactical alignment rather than an independent thesis. The H4 close at 1.24428 is above the H4 EMA20 at 1.2429 and EMA50 at 1.24147, and the H4 MACD is above its signal line with a positive histogram, which supports the bias in the short term. The H4 close remains below the H4 resistance at 1.24544, so that alignment is not yet extended. Volatility is stable on both timeframes, which points to a measured environment rather than rapid displacement. The central weekly question is whether D1 can close above 1.24741 while momentum improves, or whether price stays within the 1.24049 to 1.24741 range.
| Price at last update | 1.24433 as of 12 Oct 2026 15:40 GMT+3 |
|---|---|
| Completed D1 reference close | 1.24358 as of 9 October 2026 |
| Primary support | 1.24049 |
| Secondary support | 1.23536 |
| Primary resistance | 1.24741 |
| Bullish targets | |
| Bearish targets | 1.23536, 1.23117 |
| Formal weekly thesis invalidation | Lower 1.23649 — One completed D1 close below 1.23649 formally invalidates the bullish weekly thesis. |
Live AUD/NZD Tools
A forecast is a snapshot. These pages keep moving with the market.
- Live
Live chart & price
Watch AUD/NZD move tick by tick. Flip from the 1-minute chart to the monthly, with trading conditions right alongside.
- Live
Technical signals
Buy, sell or sit it out? Oscillators, moving averages and pivot points boiled down to one clear reading, updated live.
Economic calendar
Know what's coming before it hits the price: every scheduled release with impact, forecast and actual.
Historical data
Open, high, low and close on any timeframe from 1 minute to monthly. Test your idea, then download the data.
All AUD/NZD forecasts
Every weekly outlook in one place. Scroll back to see how earlier calls played out against the chart.
AUD/NZD Fundamental Drivers This Week
No scheduled events were provided for this forecast, so there are no identified releases to map to the two currencies in AUDNZD. The fundamental layer is therefore treated as unmeasured background rather than a directional driver, and the weekly view rests on technical structure.
Current AUD/NZD Price and Weekly Market Context
D1 structure governs the week: price is above the EMA20, EMA50 and SMA200, and those averages are stacked in bullish order. Momentum does not fully support that structure, because the close sequence is mixed and the MACD line has moved below its signal line. H4 is bullish and supports the direction tactically, but it is still working within its own range, so the D1 thesis depends on whether the higher-timeframe structure can convert into a completed close above primary resistance.
- D1 trendbullishClose vs 50 EMA and 200 SMA
- H4 tacticalbullishH4 close vs 20 and 50 EMA
- MomentummixedRSI and MACD histogram
- VolatilitystableD1 ATR change
Is AUD/NZD Bullish or Bearish This Week?
The bullish scenario is the primary-bias path and depends on D1 extending above primary resistance while momentum catches up. Because no bullish target was supplied, that progression is framed by structure and levels rather than a measured upside objective. The base scenario is consolidation between primary support and primary resistance, and the bearish scenario requires D1 to lose primary support, with reference targets at 1.23536 and 1.23117.
Scenario 1 of 3Bullish continuation
- D1 confirmation
- A completed D1 close above primary resistance at 1.24741 would be the structural confirmation that moves price beyond the nearest overhead level and gives the bullish path its first clear D1 test.
- H4 tactical signal
- A completed H4 close above H4 resistance at 1.24544 would bring the tactical picture into line with a D1 break attempt, since the short-term structure would then also be pressing through its nearest overhead level.
- Targets
- Not identified
- Scenario failure condition
- A completed D1 close back below primary support at 1.24049 would weaken the upward progression and return the structure to the range, with the bullish case losing its immediate structural advantage.
Scenario 2 of 3Base / neutral
- D1 confirmation
- Completed D1 closes that remain between primary support at 1.24049 and primary resistance at 1.24741 would confirm range-bound development, with neither side gaining a structural advantage.
- H4 tactical signal
- H4 price oscillating around H4 support at 1.24333 and H4 resistance at 1.24544 would indicate tactical indecision consistent with a D1 range, rather than a directional tactical push.
- Targets
- Range between primary support at 1.24049 and primary resistance at 1.24741, bounded by the supplied support and resistance levels.
- Scenario failure condition
- A completed D1 close above 1.24741 would move the structure out of the range toward the bullish path, while a completed D1 close below 1.24049 would shift it toward the bearish path.
Scenario 3 of 3Bearish reversal
- D1 confirmation
- A completed D1 close below primary support at 1.24049 would be the first structural signal that the trend is losing ground, making the bearish reference targets at 1.23536 and 1.23117 the relevant downside levels.
- H4 tactical signal
- A completed H4 close below H4 support at 1.24333 would show tactical weakening and signal that the short-term picture is turning against the bias, aligning with a D1 break attempt.
- Targets
- 1.23536, 1.23117
- Scenario failure condition
- A completed D1 close back above primary support at 1.24049 would weaken the bearish case and keep price inside the range, reducing the need for a downside extension.
“Not identified” means the available analysis did not establish that condition.
AUD/NZD D1 Outlook and H4 Technical Triggers
The daily timeframe controls the weekly thesis. H4 evidence is used only for earlier confirmation, tactical warning and scenario-failure context. Complete live H4, H1 and intraday readings remain on the Technical page.
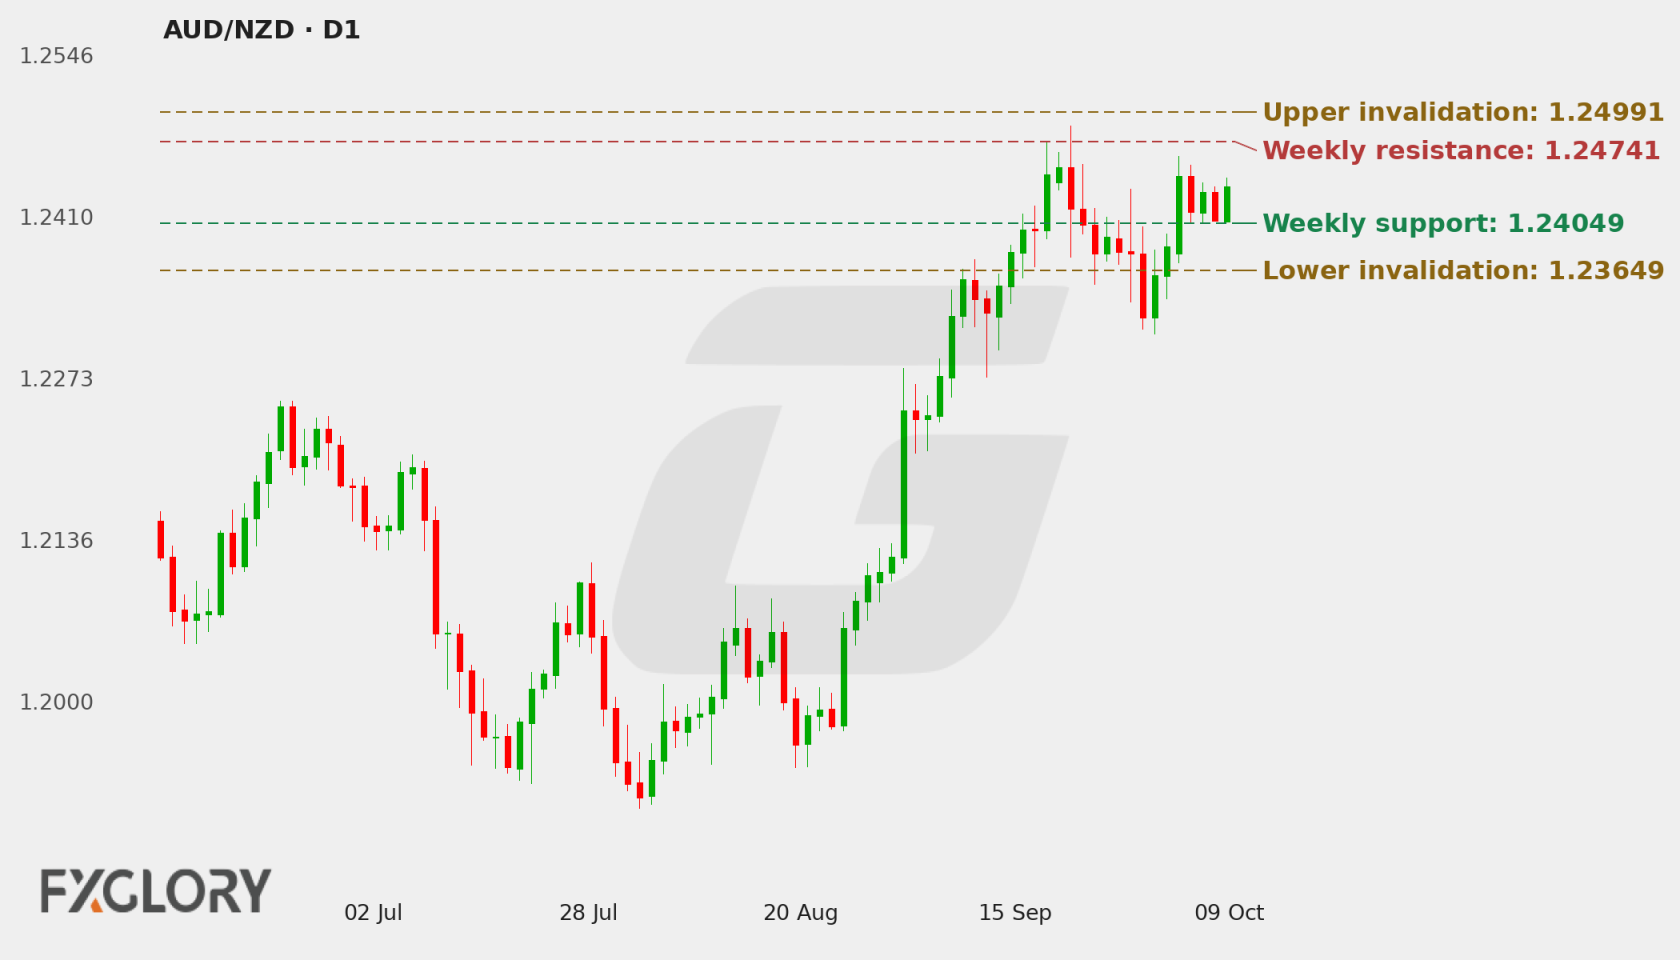
D1 Price Action and Market Structure
The reference D1 close of 1.24358 sits above the Bollinger middle band at 1.23996 and below the upper band at 1.24641, placing price in the upper part of the band structure without reaching the outer band. The close sequence is mixed, meaning recent D1 closes have not produced a clean directional run. Price is inside the primary support at 1.24049 and primary resistance at 1.24741 range, which is the key structural test for the week.
H4 Tactical Triggers
The H4 close at 1.24428 is above both H4 EMAs and the H4 Bollinger middle band at 1.24285, with the H4 MACD above its signal line and a positive histogram, so the tactical picture leans with the bias. The H4 close remains below the H4 upper band at 1.24505 and the H4 resistance at 1.24544, so short-term alignment is constructive but not yet extended. H4 therefore confirms the D1 direction without replacing the weekly thesis, and a completed H4 close above 1.24544 would be the first clear tactical sign of the trend extending.
Technical Indicators at a Glance
Automated technical summary
D1 is bullish with mixed momentum and a mixed close sequence, while H4 is bullish and D1 volatility is stable. The reference close of 1.24358 sits between primary support at 1.24049 and primary resistance at 1.24741.
Selected snapshot: D1 with H4 tactical context. Updated 12 October 2026.
- RSI62.81Neutral
- MACDBelow signalBearish
- Bollinger Bands78% of bandUpper half
- Moving averagesAbove bothBullish
- ATR58.0 pipsStable
RSI (14)
Neutral
H4 59.12
D1 RSI at 62.81 is constructive and consistent with the bullish trend state, indicating that upward momentum is present but not accelerating by itself. The H4 RSI at 59.12 is similarly constructive, so the RSI readings agree across both timeframes.
- D1 RSI
- 62.81
- H4 RSI
- 59.12
MACD (12, 26, 9)
Bearish momentum
On D1, the MACD line at 0.005076 sits below its signal line at 0.005841 with a negative histogram, meaning momentum is softening relative to the trend rather than confirming it fully. On H4 the MACD is above its signal line with a positive histogram, so short-term momentum leans with the bias while weekly momentum is weaker. This is a timeframe tension rather than a divergence, since no divergence is established by these readings.
- MACD
- 0.005076
- Signal
- 0.005841
- Histogram
- -0.000766
Bollinger Bands (20, 2σ)
Upper half
Striped ends = price outside the bands.
On D1 price sits above the middle band and below the upper band, which places the close in the upper part of the band structure without pressing the outer boundary. The H4 close is similarly above the middle band and below the upper band, so both timeframes show constructive but not extended positioning.
- Position in band
- 78%
- Band width
- 129.0 pips (1.04%)
Moving averages (D1)
Bullish structure
- 50 EMA rising1.22741Price is 161.7 pips above (+1.32%)
- 200 SMA rising1.20445Price is 391.3 pips above (+3.25%)
The D1 averages are stacked in bullish order, with the EMA20 above the EMA50 and SMA200, and both the EMA50 and SMA200 are rising. Price is above all three averages, which is the strongest structural support for the trend. The EMA20 at 1.23746 is the nearest D1 average beneath price and sits above the lower boundary at 1.23649, so the averages support the trend without changing the formal boundary. On H4, price is above the EMA20 and EMA50, and the EMA20 is above the EMA50, which confirms short-term alignment.
- D1 close
- 1.24358
- 50 EMA
- 1.22741
- 200 SMA
- 1.20445
ATR (14)
Stable volatility
One ATR either side of the latest close. A measure of move size, not a price target.
D1 ATR of 0.0058 with a stable volatility state suggests a trading environment in which daily ranges are not expanding, so the week may develop through measured tests of nearby levels rather than rapid displacement. Volatility does not indicate direction here. H4 ATR of 0.00177 is consistent with the same measured short-term environment.
- D1 ATR
- 0.0058 (0.47%)
- H4 ATR
- 0.00177 (0.14%)
Technical conclusion: The weekly thesis is bullish because D1 structure, price above all three D1 averages and rising EMA50 and SMA200 slopes establish a controlling uptrend, with H4 supporting the same direction tactically. The strongest counterargument is that the D1 close sequence is mixed and MACD has softened below its signal line, so the trend lacks a clean momentum push. Primary resistance at 1.24741 is the level whose completed D1 close would shift the picture toward the bullish path, while primary support at 1.24049 is the level whose completed D1 close loss would move the structure toward the bearish targets. The lower boundary at 1.23649 remains the formal lower reference for the thesis.
View all live AUD/NZD oscillators, moving averages, pivot points and timeframe signals.
AUD/NZD Weekly Support, Resistance and Invalidation
| Level | Role | Timeframe | Why it matters |
|---|---|---|---|
| 1.24741 | Primary resistance | D1 | Nearest overhead D1 level; a completed D1 close above it is the main structural test for the bullish path. |
| 1.24049 | Primary support | D1 | First D1 level below the reference close; a completed D1 close below it would weaken the bullish progression. |
| 1.23536 | Secondary support and first bearish target | D1 | Lower D1 reference that becomes relevant after a loss of primary support. |
| 1.23117 | Further support and second bearish target | D1 | Deepest supplied D1 reference and the second bearish target if downside pressure develops. |
| 1.24544 | H4 resistance | H4 | Tactical overhead level above the H4 close; a completed H4 close above it would strengthen short-term alignment with the bullish path. |
| 1.24333 | H4 support | H4 | Tactical level beneath the H4 close; a completed H4 close below it would signal short-term weakening against the bias. |
These are forecast-specific market-structure levels. Formula-based Classic, Fibonacci and Camarilla pivots remain on the Technical page.
Economic News & Events to Watch for AUD/NZD This Week
No scheduled events available for this period.
Calendar source: FXGlory economic calendar. Retrieved 12 Oct 2026 12:49 GMT+3. View the complete AUD/NZD economic calendar.
AUD/NZD Outlook for 12–17 October 2026
The bullish bias for 12–17 October 2026 rests on D1 structure: a bullish trend state, price above the EMA20, EMA50 and SMA200, and rising EMA50 and SMA200 slopes. H4 aligns tactically and volatility is stable, which fits a measured development rather than a rapid move.
The thesis is not fully confirmed. Mixed D1 closes, MACD below its signal line and price still inside the 1.24049 to 1.24741 range mean the bullish case must still earn a completed D1 close above primary resistance. Until then, range development remains the main alternative, while the bearish path requires a completed D1 close below 1.24049 with reference targets at 1.23536 and 1.23117.
Weekly Forecast Risks and What Would Change the Outlook
- Momentum conflict on D1: The MACD sits below its signal line with a negative histogram alongside a mixed close sequence, so the trend is not yet backed by a clean momentum push.
- Overhead resistance without a supplied bullish target: Primary resistance at 1.24741 is the nearest overhead D1 level and no bullish target was supplied, so upside progression is framed by structure rather than a measured objective.
- Timeframe tension between H4 and D1 momentum: H4 momentum is positive while D1 momentum is softer, so a short-term rise could look bullish while the weekly thesis still awaits D1 confirmation.
- No scheduled event context: No scheduled events were provided, so the forecast cannot account for an identified event-driven catalyst; an unscheduled move could alter the stable volatility backdrop.
Formal weekly invalidation: The bullish weekly thesis is formally invalidated by one completed D1 close below 1.23649. One completed D1 close above 1.24991 confirms upper structural extension and continuation.
AUD/NZD Weekly Forecast FAQs
Is AUD/NZD bullish or bearish this week?
The bias is Bullish because the D1 trend state is bullish, price sits above the EMA20, EMA50 and SMA200, and the EMA50 and SMA200 are both rising. The bias is not treated as certain, since the D1 close sequence is mixed and MACD sits below its signal line.
What scenario would strengthen for AUD/NZD this week?
The primary path is a bullish extension through primary resistance at 1.24741 on a completed D1 close, supported by H4 strength above 1.24544. No bullish target was supplied, so that path is framed by structure rather than a measured objective. The base path is range development between 1.24049 and 1.24741, while the bearish path requires a completed D1 close below 1.24049.
What are the key AUD/NZD support and resistance levels?
Primary support is 1.24049, secondary support is 1.23536 and primary resistance is 1.24741; no secondary resistance level was supplied. Bearish reference targets are 1.23536 and 1.23117, and no bullish target was supplied. H4 support at 1.24333 and resistance at 1.24544 frame the short-term tactical picture.
What would invalidate this AUD/NZD forecast?
The bullish weekly thesis is formally invalidated by one completed D1 close below 1.23649.
Methodology, Data and Sources
- Price-data source: FXGlory price feed (AUDNZD)
- Live quote timestamp: 12 Oct 2026 15:40 GMT+3
- Weekly analysis timestamp: 12 October 2026
- Chart timestamp: 12 October 2026 (redrawn daily)
- Technical snapshot timestamp: 12 October 2026
- Calendar-data source: FXGlory economic calendar
- Calendar retrieval timestamp: 12 Oct 2026 12:49 GMT+3
- Candle convention: FXGlory D1 and H4 candles; D1 candle dates are evaluated in UTC and invalidation uses completed D1 closes only.
- Indicator settings: D1 RSI(14), MACD(12,26,9), Bollinger Bands(20,2), EMA(50), SMA(200), ATR(14); H4 RSI/MACD/Bollinger/EMA/ATR.
- Level-selection method: Weekly D1 support/resistance levels are structural market levels. Formal invalidation uses a hard 0.75× D1 ATR(14) minimum anchor distance plus a 0.20× D1 ATR(14) outward buffer; H4 levels are tactical only.
- Weekly forecast method: D1 controls the weekly thesis; H4 supplies tactical confirmation/warning only.