

What Is A Forex Inside Bar Strategy?
A forex inside bar strategy is a price-action method built around a candle that forms inside the high and low of the previous candle. The previous candle is usually called the mother bar, and the smaller candle inside it is called the inside bar.
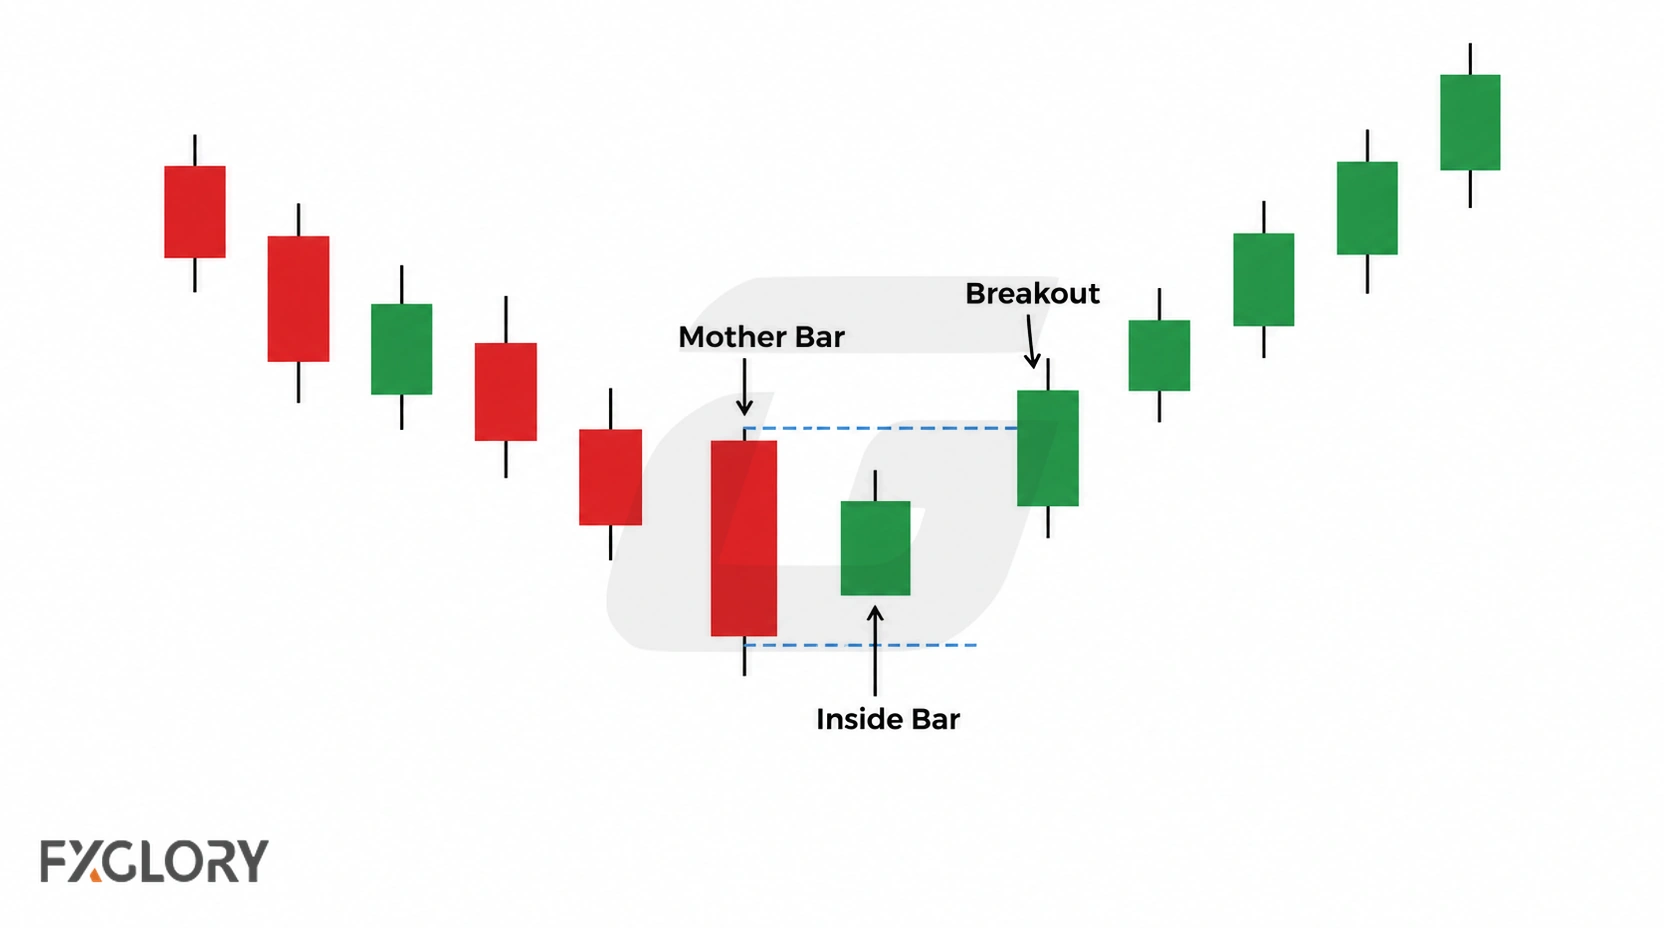
The smaller high-low range records a pause or contraction relative to the mother bar. It does not reveal the next direction, guarantee volatility expansion, or establish an entry signal.
This page focuses on inside-bar-specific decisions: how to judge the mother bar, how to review the inside bar location, how breakout entries are commonly planned, how false breaks happen, where stops and targets can be reviewed, and when the setup should be skipped.
For the broader price-action framework behind candles, swings, failed moves, and structure, use the guide to price action in forex.
For the broader candlestick-strategy framework that connects candle behavior with market context, entries, exits, stop placement, false-signal rules, spread checks, and account risk, use the Forex Candlestick Strategy guide.
Inside Bar vs Mother Bar
The mother bar is the larger candle that contains the inside bar. A strict inside bar has a high below the mother bar high and a low above the mother bar low. Some traders allow equal highs or equal lows, but the rule should be written before review starts.
A body-only inside candle is not the same as a full-range inside bar unless the trader has written that definition into the strategy before reviewing the chart. A strategy should not switch between definitions after price moves.
The mother bar sets the range that many traders use for breakout review. If price breaks above the mother bar high, traders may review a bullish breakout idea. If price breaks below the mother bar low, traders may review a bearish breakout idea. Neither direction is valid without context and risk control.
| Part | What It Means | Why It Matters |
|---|---|---|
| Mother bar | The candle whose high and low contain the inside bar | Defines the range, breakout boundary, stop reference, and false-break area |
| Inside bar | The candle whose high and low stay inside the mother bar range | Shows compression, pause, or reduced movement inside the mother bar |
| Full-range inside bar | The entire high-low range is inside the mother bar | Gives a clearer containment rule for breakout and invalidation |
| Body-only inside candle | The candle body is inside the prior body or range, but wicks may extend outside | Should not be mixed with full-range rules unless the strategy defines it first |
| Equal high or low | Inside bar shares one boundary with the mother bar | Should be accepted or rejected by a written rule, not decided after price moves |
| Oversized mother bar | The containing candle is very large compared with recent movement | May create stop-distance and target-room problems |
Inside Bar Position Inside The Mother Bar
Where the inside bar forms inside the mother bar changes the distance to each potential breakout level and may affect practical stop placement and target room. Position alone does not establish which boundary price will cross.
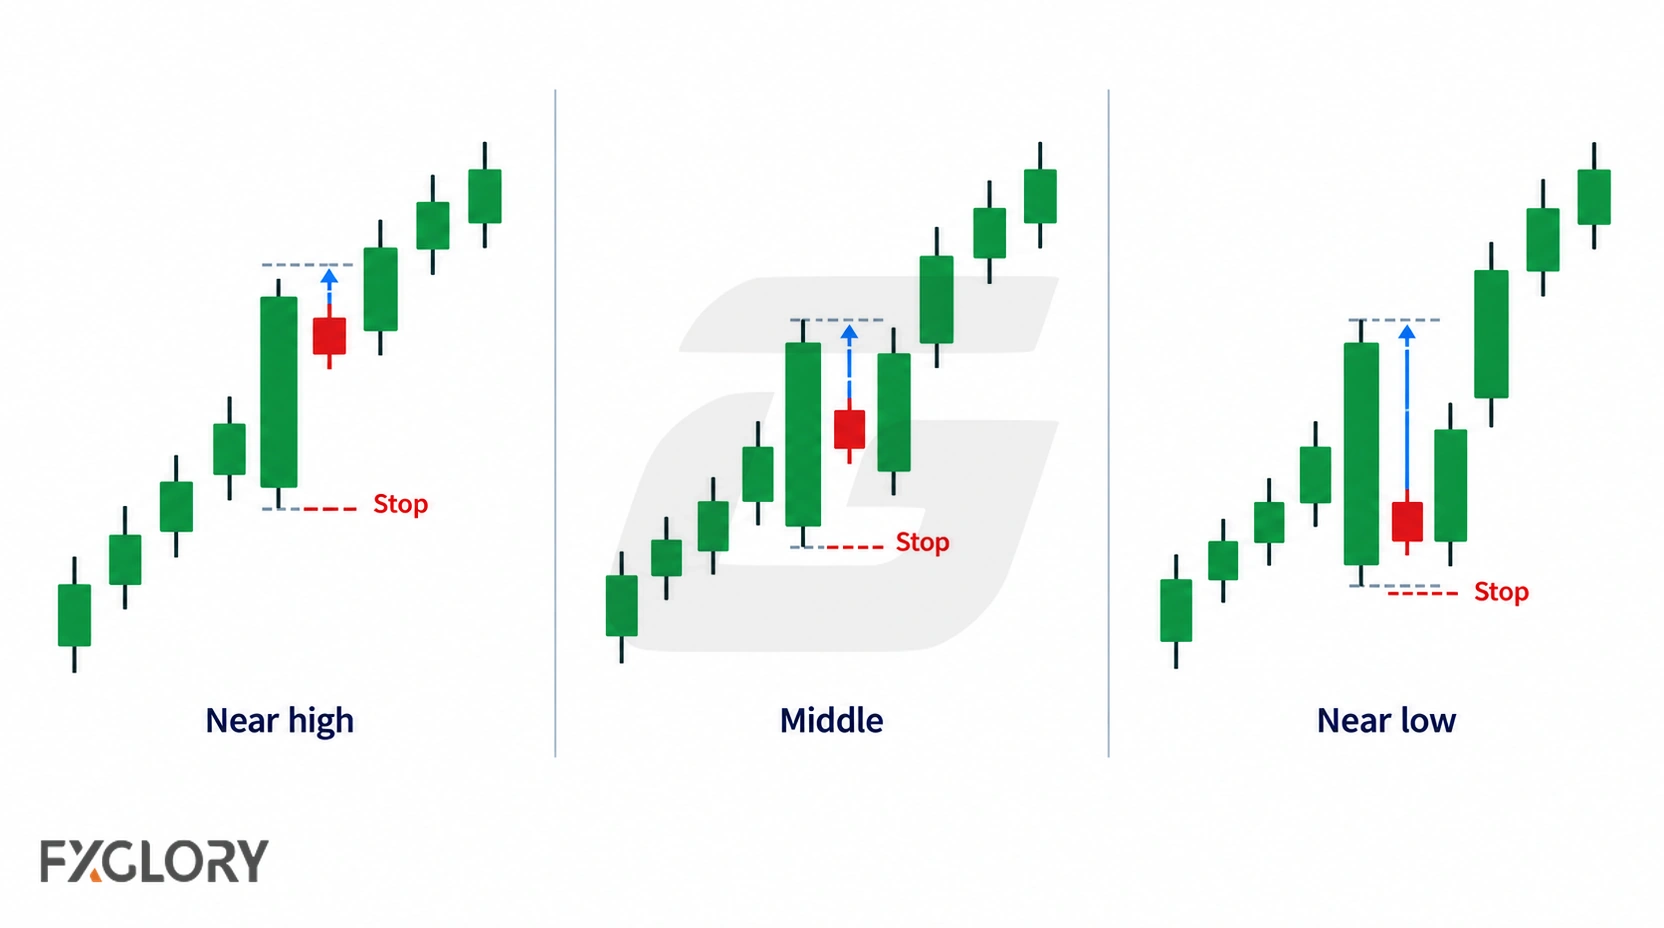
| Inside Bar Position | Possible Meaning | Risk To Review |
|---|---|---|
| Near mother-bar high | May reduce distance to a bullish breakout boundary | Breakout can still fail if target room is poor or resistance is nearby |
| Near mother-bar low | May reduce distance to a bearish breakout boundary | False-break risk still matters, especially near support |
| Middle of mother bar | More neutral compression inside the range | Direction may be less clear and stop/target logic may be weaker |
| Very small inside bar | Shows tight compression | Entry can become spread-sensitive, especially on lower timeframes |
| Inside bar with long wicks | May show noise or two-sided rejection inside the mother bar | Wicks can create unclear breakout and stop decisions |
Single vs Multiple Inside Bars
A single inside bar is contained by one mother bar. Multiple inside bars occur when successive candles remain within the same mother-bar range; their own ranges do not necessarily shrink each time. The term coiling is more precise when successive candle ranges contract. Neither pattern establishes the direction or size of a later move.
Interpret compression using a pre-marked level or trend pullback, the size of the bars relative to recent ranges, the breakout condition, and the available room before the next obstacle. A tight cluster inside overlapping, directionless candles offers a different context from a pullback at a defined level.
| Inside Bar Type | Possible Use | Weak Use |
|---|---|---|
| Single inside bar | Clearer mother-bar range and simpler breakout review | Trader assumes one small candle is enough for a trade |
| Multiple inside bars | Shows extended compression inside the same mother bar | Trader assumes compression must break cleanly |
| Coiling inside bars | Successive smaller ranges can define a tighter structure to monitor for a specified break | Smaller candles are assumed to predict the direction or magnitude of later expansion |
| Inside bars inside chop | Identifies overlapping ranges without a clearly marked location or usable target | Every small candle is treated as a setup |
| Spread-sensitive compression | Needs extra cost and target-room review | Small breakout target is accepted without checking spread |
Inside Bar vs Other Candle Patterns
An inside bar should not be confused with other price-action candles. The difference matters because each pattern gives a different type of information.
| Pattern | Basic Shape | Common Interpretation | Weak Use |
|---|---|---|---|
| Inside bar | Current candle stays inside prior candle range | Compression, pause, or potential breakout setup | Trader assumes direction before breakout context is clear |
| Pin bar or rejection candle | Long wick rejects an area | Possible rejection near a level | Every wick is traded without location or invalidation |
| Engulfing candle | Current real body engulfs the preceding real body under the specified bullish or bearish definition | Possible directional shift; full high-low engulfment is a separate outside-bar feature | Pattern is used without structure or risk review |
| Outside bar | Current candle expands beyond prior candle high and low | Volatility expansion or possible reversal/continuation context | Expansion is chased directly into the next obstacle |
| Doji or hesitation candle | Small body shows indecision | Potential pause or uncertainty | Hesitation is treated as a complete entry signal |
This page stays focused on inside bars. Other candle patterns should be reviewed only when they affect inside-bar context, confirmation, or false-break behavior.
What An Inside Bar Means In Forex
An inside bar records a smaller trading range than its mother bar. It can form after a strong move, at a marked level, within a trend pullback, in a trading range, or ahead of scheduled news. Its appearance before an event does not establish that a directional expansion will follow.
The same pattern can mean different things in different locations. An inside bar that forms in a clean trend pullback is not the same as an inside bar in the middle of a choppy range. A pattern near a higher-timeframe support or resistance zone is not the same as a pattern with no structure nearby.
| Inside Bar Context | Possible Meaning | Risk To Review |
|---|---|---|
| After strong momentum | Price pauses before possible continuation or reversal | Breakout may fail if the move is already extended |
| Inside a trend pullback | Market may be pausing before the trend resumes | Pullback may become a reversal if structure fails |
| Near support or resistance | Price is compressing near a decision zone | False break or wick beyond the level may occur |
| Inside a range | Price is compressing inside sideways conditions | Breakout may lack room or return into the range |
| Before a news event | A scheduled release provides a known event time, not a directional forecast from the candle | Spread, speed, and slippage can change abruptly around the release |
Inside Bar Is Not A Trade By Itself
Identify the candle pattern first, then distinguish a boundary breach from a trigger that meets the written confirmation rule. A valid pattern may have no executable entry.
The table separates the pattern, a possible breakout event, and the full trade decision; the procedural requirements are set out in the decision sequence below.
| Item | What It Means | Why It Is Not Enough Alone |
|---|---|---|
| Inside bar pattern | A candle forms within the range of the mother bar | The pattern does not decide direction or risk |
| Breakout trigger | Price moves beyond the mother bar or inside bar range | The breakout can fail or move directly into an obstacle |
| Inside bar trade | The trader has context, trigger, stop, target, false-break rule, and risk limit | The plan can still be invalid if spread, volatility, or structure changes |
For the full entry-and-exit chain behind a pattern-based trade, use the entry and exit strategy guide.
Forex Inside Bar Decision Sequence
Mark the market context and mother-bar boundaries before selecting a breakout direction. This keeps the later trigger and invalidation rule from being selected retrospectively to fit price movement already observed.
| Step | Decision | Continue Only If |
|---|---|---|
| 1. Market condition | The market is trending, ranging, pulling back, breaking out, reversing, or unclear | The condition supports an inside-bar setup |
| 2. Timeframe | The pattern appears on a timeframe that fits the trader's holding period and risk | Stop distance and target room are realistic |
| 3. Mother bar | Mother bar has clear range, useful location, and acceptable size | It is not too large, random, or buried in chop |
| 4. Inside bar | Inside bar is clearly contained under the trader's written rule | The pattern is not forced after price moves |
| 5. Location | Setup forms near trend structure, support/resistance, pullback area, or breakout context | The pattern has a reason beyond candle shape |
| 6. Breakout trigger | Entry rule is defined before price breaks | The entry is not early, late, or emotional |
| 7. Stop and target | Invalidation and target are known before entry | Risk and reward still make sense after spread |
| 8. False-break rule | The trader knows what cancels the breakout idea | The setup is not held after it fails |
How To Judge Inside Bar Quality
Inside bars can occur frequently, but their frequency says nothing about the quality of a particular setup. Compare candidates using predefined location, stop-distance, target-room, and cost criteria rather than assuming every contained candle is tradable.
| Quality Check | Better Version | Weak Version |
|---|---|---|
| Clear mother bar | Mother bar range is obvious before the trade is planned | Mother bar is chosen after the breakout |
| Useful location | Pattern forms near trend structure, support/resistance, or breakout context | Pattern forms in the middle of random movement |
| Timeframe and cost fit | Pattern range and target leave meaningful room relative to spread and typical movement | Potential target is small relative to execution costs |
| Not messy chop | Price is not trapped inside overlapping candles with no direction | Every small candle inside chop is treated as a setup |
| Mother bar not too large | Stop distance can fit account risk and target room | Mother bar is so large that risk becomes distorted |
| Inside bar position | Inside bar location inside the mother bar supports the written breakout and risk rule | Position is ignored even when entry distance or stop logic is poor |
| Target room | There is space before the next support, resistance, or swing obstacle | Breakout points directly into the next obstacle |
| Spread check | Entry and target still make sense after spread | Small target is damaged by cost |
| Event risk | Scheduled news and session conditions are checked before entry | Breakout order is left exposed into high-impact volatility without a rule |
Trend-Continuation Inside Bar Strategy
One application is a trend-continuation review: price establishes directional structure, pulls back or pauses within a mother-bar range, and subsequently meets the trader's breakout rule in the trend direction. The candle alone does not demonstrate that this approach performs better than other inside-bar setups.
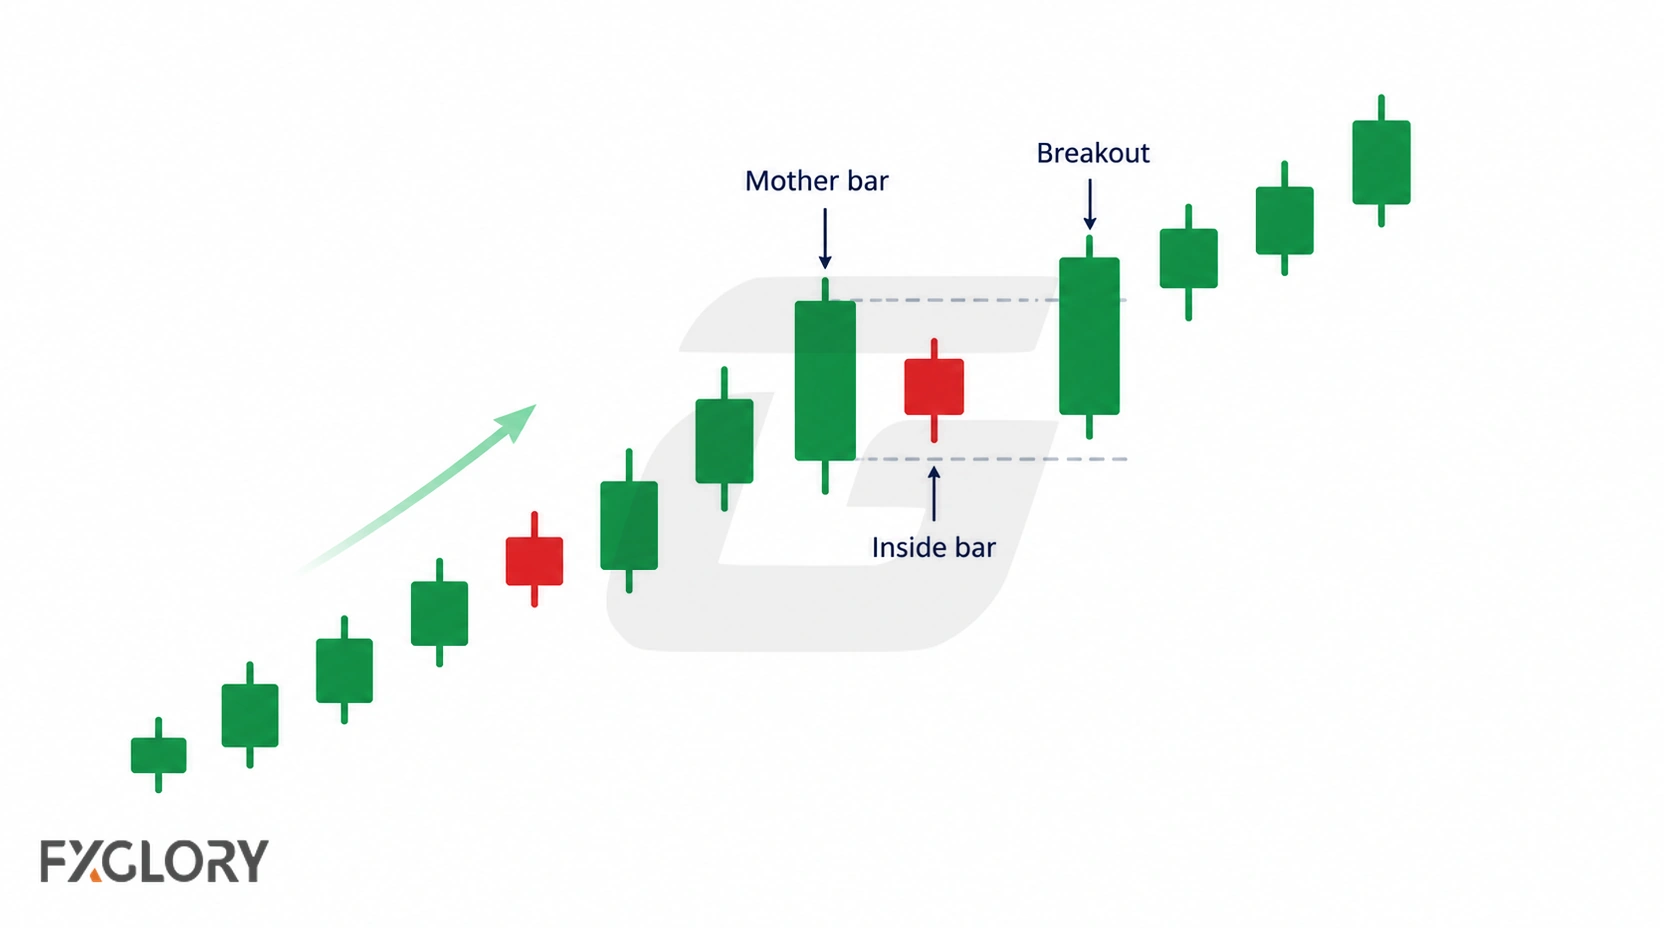
This does not mean every inside bar inside a trend should be traded. The trend should still be valid, the setup should not be late, and the breakout should not point directly into nearby support or resistance.
| Trend-Continuation Check | Better Version | Weak Version |
|---|---|---|
| Trend context | Directional structure is visible before the inside bar forms | One strong candle is treated as a trend |
| Inside bar location | Pattern forms after a pause, pullback, or continuation area | Pattern appears after price is already stretched |
| Breakout direction | Breakout is reviewed in the direction of the valid trend | Trader takes the opposite break without reversal evidence |
| Target room | There is space before the next swing level or resistance/support area | Entry is taken directly into an obstacle |
| Invalidation | Stop is placed where the continuation idea becomes wrong | Stop is moved because the trend looked strong earlier |
For broader directional rules, use the forex trend trading strategy guide.
Inside Bar At Support Or Resistance
An inside bar near support or resistance can show compression at a decision zone. That location can be useful, but it also increases false-break risk because price may pierce the level before deciding direction.
The level should be marked before the inside bar forms. If support or resistance is added only after the pattern appears, the trader may be fitting the chart around the desired trade.
| Location | Possible Use | Risk |
|---|---|---|
| Inside bar near support | Review both a support hold with a qualifying upside break and a confirmed downside breakdown through support | An intrabar pierce can reverse, and either scenario may lack target room |
| Inside bar near resistance | Review both resistance rejection with a qualifying downside break and an upside breakout through resistance | Resistance can hold or fail; a boundary breach alone may not confirm either scenario |
| Inside bar below resistance before breakout | Review bullish breakout only if breakout rules support it and target room remains | Breakout may fail and return below resistance |
| Inside bar above support before breakdown | Review bearish breakdown only if breakdown rules support it and target room remains | Breakdown may fail and return above support |
| Inside bar at role-reversal zone | Review retest behavior after a broken level | Old level may not hold after the break |
| Inside bar in the middle of a range | Usually lower-quality unless the strategy has a written rule | Target and invalidation may be unclear |
For level quality, role reversal, false breaks, wicks, and spread-aware support/resistance rules, use the forex support and resistance strategy guide.
Inside Bar Breakout Entry Rules
Inside-bar strategies can define different entry events. An intrabar move beyond a high or low is a boundary breach; a completed candle beyond that level is a separate close-based confirmation; a retest is a later event that may or may not occur. Specify which event triggers a trade before observing the breakout.
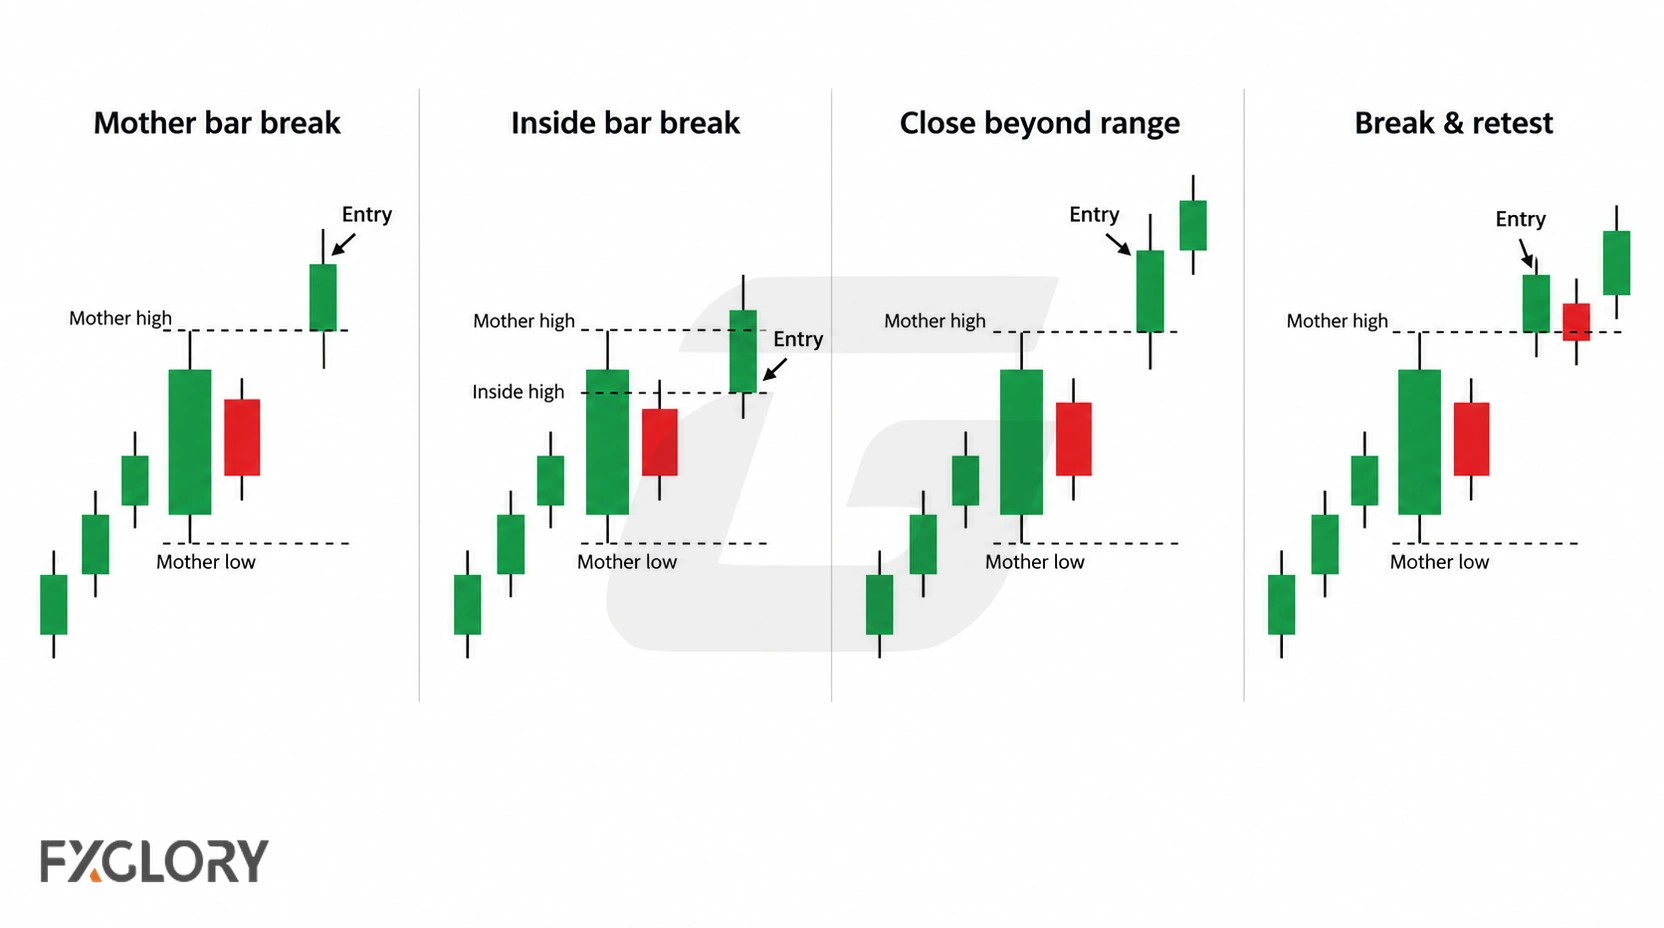
| Entry Method | Possible Use | Main Risk |
|---|---|---|
| Mother bar breakout | Entry is reviewed after price breaks beyond the mother bar high or low | Stop distance may be large if the mother bar is oversized |
| Inside bar breakout | Entry is reviewed after price breaks the inside bar high or low | Breakout may happen inside the mother bar and fail quickly |
| Close beyond range | Trader waits for price to close beyond the boundary | Entry may be later and closer to the next obstacle |
| Break and retest | Trader waits for price to break and return to the old boundary | Retest may never come or may fail |
| No breakout | Pattern stays compressed and no entry is taken | Trader enters early from impatience |
For complete breakout, fakeout, retest, and failed-break rules, use the forex breakout strategy guide.
Inside Bar False Breaks And Fakey Risk
A temporary move beyond an inside-bar or mother-bar boundary followed by a return inside may be called a false break or a fakey pattern. That is not automatically a failed confirmed breakout: the latter requires the strategy's confirmation condition to have occurred first, followed by the separately defined failure or invalidation condition.
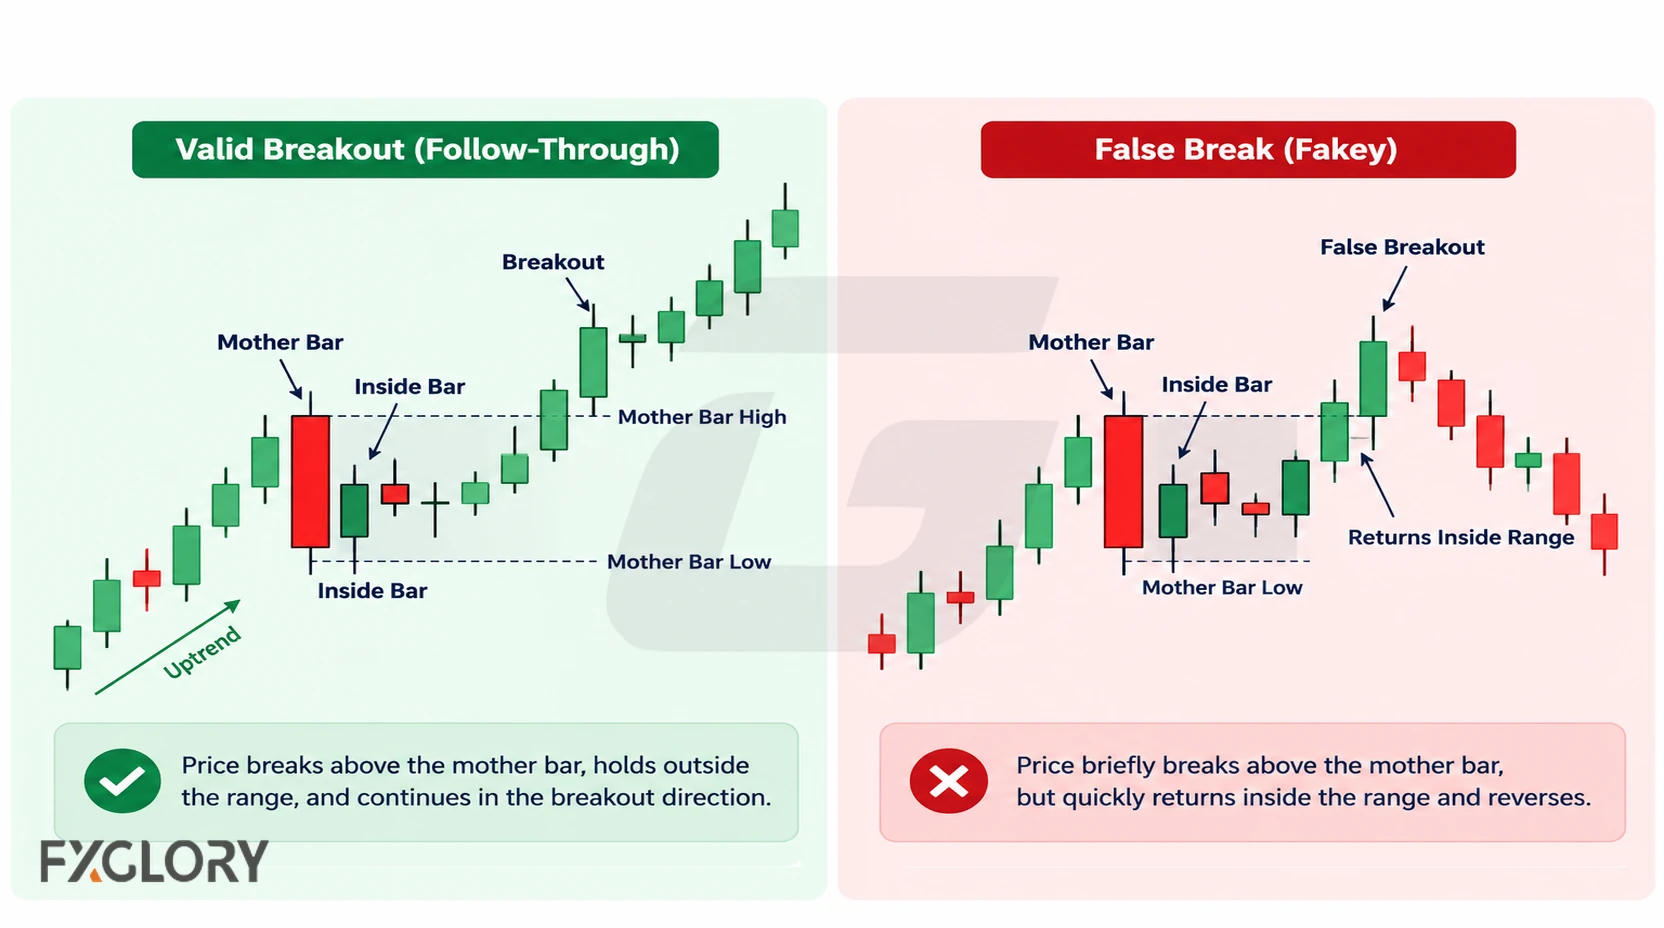
The trader should know in advance what cancels the breakout idea. Without a false-break rule, an inside bar breakout can turn into an emotional hold.
| Break Behavior | Possible Meaning | Response |
|---|---|---|
| Clean break and hold | Price may be leaving the mother bar range | Continue only if stop, target, and risk rules still fit |
| Break and immediate return | Possible false break; it may never have met a close-based confirmation rule | Apply the specified trigger and cancellation criteria instead of automatically reversing direction |
| Break one side then reverse through the other | Strong failure of the original direction | Review only if the strategy includes a separate false-break setup |
| Wick beyond boundary | Observable intrabar breach, not proof of participant intent or a completed-candle break | Check whether the selected trigger requires a wick, close, or retest |
| Repeated failed breaks | Market may be choppy or undecided | Stand aside until structure is clearer |
Stop, Target, And Exit Rules
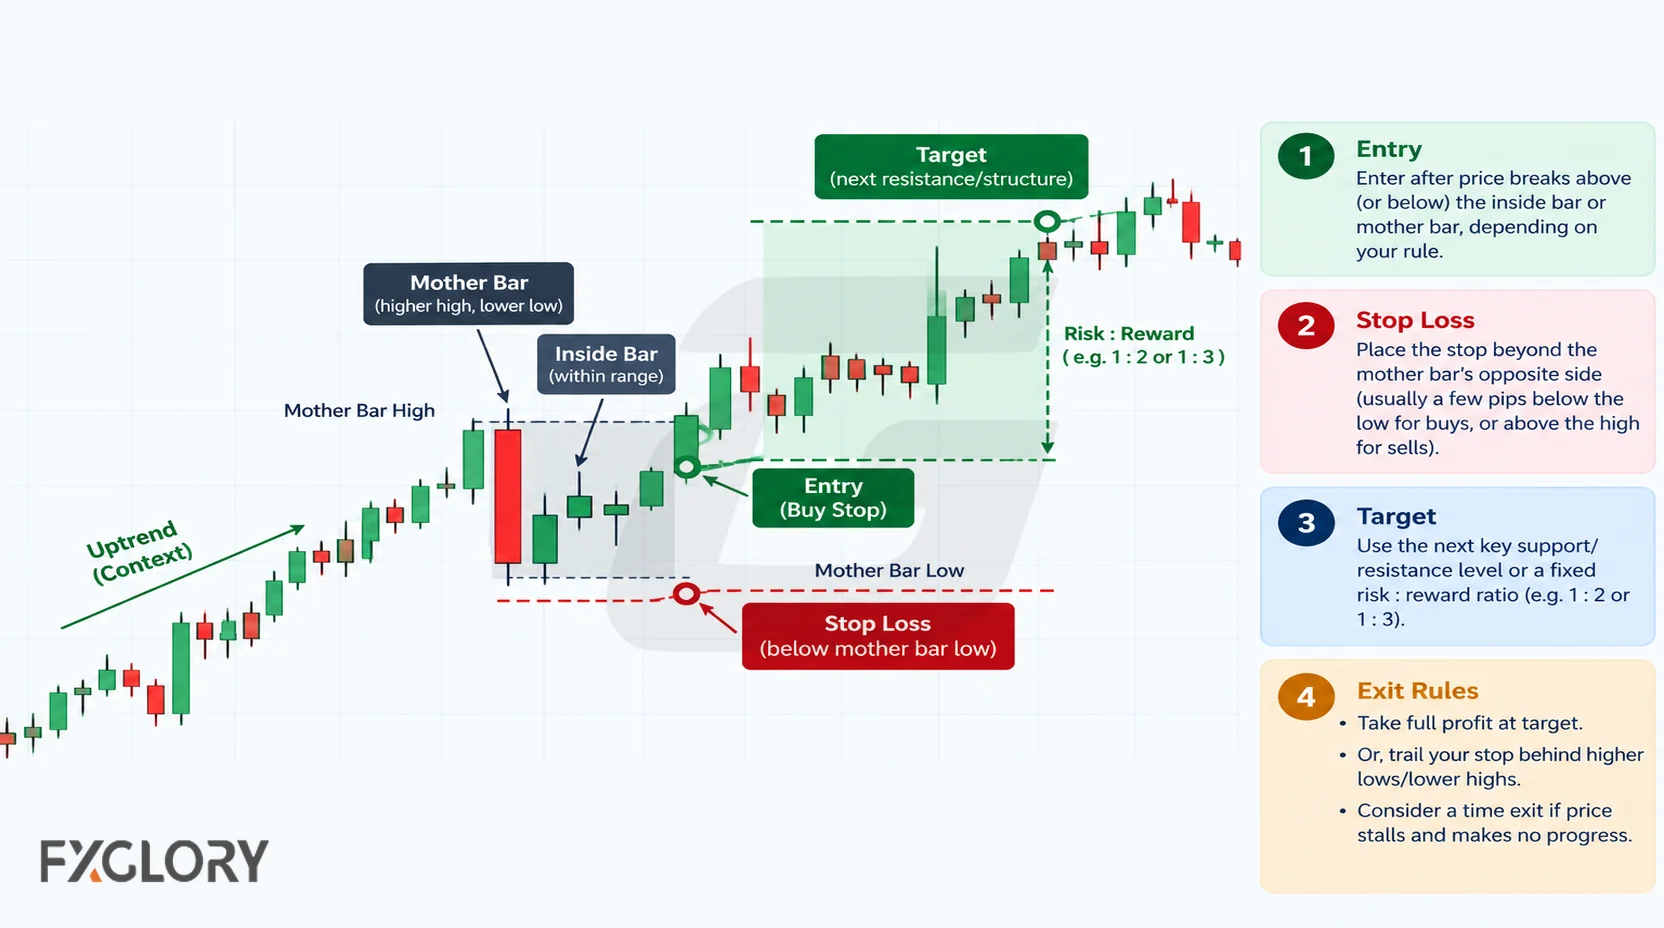
The mother-bar range offers identifiable stop references, but those levels can be too far from the entry or too close to normal intrabar movement. Choose invalidation from the setup structure before calculating position size.
| Rule Area | Possible Inside Bar Rule | Weak Version |
|---|---|---|
| Opposite mother-bar stop | Stop is placed beyond the opposite side of the mother bar | Stop distance is too large but the trade is forced anyway |
| Opposite inside-bar stop | Stop is placed beyond the opposite side of the inside bar | Stop is too tight for normal mother-bar noise |
| Half mother-bar reference | Used only when the trader has a written rule for oversized mother bars | Used randomly to reduce risk without real invalidation |
| Structure stop | Stop is placed beyond support, resistance, swing high, swing low, or failed retest | Stop is guessed after price moves against the trade |
| Target at next structure | Target is planned near next support, resistance, swing high, or swing low | Target is chosen without checking obstacles |
| Mother-bar range or R-multiple target | Target uses a measured move from the mother-bar range or fixed R-multiple only if nearby structure allows it | Target is forced even when support or resistance is too close |
| Trailing exit | Trade is managed by ATR, structure, moving average, or written trailing rule | Trail is changed whenever price pulls back |
| Time exit | Trade is closed or reviewed if breakout does not develop within the planned window | A stalled breakout becomes an unplanned hold |
Hypothetical EUR/USD Inside-Bar Breakout Calculation
Assume a four-hour EUR/USD mother bar has a high of 1.1050 and a low of 1.1000. The next candle has a high of 1.1040 and a low of 1.1015, so it meets the strict full-range inside-bar definition. This example is invented for arithmetic illustration, not taken from the article's trading history or a verified backtest.
| Illustrative Input | Value Or Calculation |
|---|---|
| Confirmation and entry | Suppose a completed four-hour candle closes at 1.1056, above the mother-bar high, and a long entry executes at 1.1060 under a close-confirmation rule. |
| Structural stop | 1.0995, five pips below the mother-bar low; entry-to-stop distance = 65 pips. |
| Target near next resistance | 1.1150; entry-to-target distance = 90 pips before costs. |
| Illustrative round-trip costs | Assume a total 2-pip effective cost for spread and slippage: estimated target gain = 88 pips and expected stop loss = 67 pips if the stop fills as assumed. |
| Reward relative to risk | 88 / 67 = approximately 1.31 to 1 after assumed costs, not a forecast of actual returns. |
| Position-size illustration | For a hypothetical USD 10,000 account and a USD 100 risk cap, assuming EUR/USD pip value of USD 10 per standard lot: 100 / (67 × 10) ≈ 0.149 lots. Rounding down to 0.14 standard lots gives approximately USD 93.80 expected stop loss under those assumptions. |
The trade remains conditional on the original market-context and breakout rules. Slippage may exceed the assumption, the stop may fill worse than planned, and nearby resistance may prevent the estimated target from being reasonable. The numbers are hypothetical, not evidence of an inside-bar edge.
When inside bar exits depend on volatility, use the ATR forex strategy framework to review stop distance and target realism. When stop distance, position size, leverage exposure, and margin need to be reviewed together, use the margin calculator before the order is placed.
Higher Timeframes, Sessions, And News Risk
Inside bars can appear on any timeframe. On shorter charts, a fixed spread may represent a larger share of the mother-bar range or target distance; more observed patterns do not demonstrate a stronger trading edge.
Daily and four-hour charts can define broader structural boundaries, while shorter charts can be used for entry timing within an already defined higher-timeframe setup. Compare their stop distances, holding periods, and cost sensitivity rather than ranking timeframes by assumed reliability.
| Context | Useful Role | No-Trade Warning |
|---|---|---|
| Daily chart | Reviews broader inside bar structure and major context | Mother bar may create a stop too large for the account |
| 4-hour chart | Reviews swing or trend continuation setups with more detail | Pattern is traded without higher-timeframe context |
| 1-hour chart | May help refine entry or reaction | Lower-timeframe noise overrides larger structure |
| Very low timeframes | May create frequent patterns | Execution costs can be large relative to small ranges and target distances |
| News window | Sets a known release time when price and execution conditions may change | Breakout order is exposed to fast spread and volatility changes without a rule |
| Session change | Can change liquidity and movement speed | Pattern formed in quiet conditions breaks during faster conditions without preparation |
For context-timeframe and entry-timeframe separation, use the multiple time frame analysis guide.
Forex Volume, Spread, Wick, And Volatility Rules
Inside bar breakouts in forex can be affected by spread, wicks, session changes, and volatility expansion. A break beyond the mother bar is not automatically clean just because the candle crossed the boundary.
Some traders review volume or activity around breakouts, but spot forex does not have one centralized exchange volume feed. Platform volume may be tick volume or broker-feed activity. It can be a participation clue, but it should not replace context, breakout behavior, stop placement, spread checks, or risk rules.
| Forex-Specific Issue | Why It Matters | Better Rule |
|---|---|---|
| Spread near breakout | Entry and stop distance can be affected around the boundary | Check spread before accepting small targets |
| Wick beyond mother bar | A brief pierce may not confirm a clean breakout | Use a written break, close, hold, or retest rule |
| Volatility expansion | Price may move outside a previously narrow range; the prior contraction does not determine direction or magnitude | Use the planned boundary and stop distance without assuming an expansion will follow |
| Tick volume or broker-feed volume | May show activity on the available feed | Do not treat it as total global forex volume |
| Nearby support/resistance | Breakout may run directly into an obstacle | Skip if target room is weak after spread |
| Event-driven break | News can change speed, spread, and slippage risk | Use the event-risk rule or stand aside |
Short-term inside bar entries can be sensitive to cost. Check the spread conditions that affect trade planning before accepting a small breakout target.
Why Forex Inside Bar Strategies Fail
A correctly identified inside bar can still lead to an unsuccessful trade. Failure analysis should distinguish poor setup selection, a failed confirmed breakout, execution costs, and deviations from the planned stop or exit.
| Failure Reason | What Happens | Better Rule |
|---|---|---|
| Every inside bar is traded | Low-quality patterns create repeated weak decisions | Trade only setups that pass context and quality checks |
| Low-timeframe noise | Short distances can leave small targets vulnerable to spread and repeated attempts | Compare target distance and execution costs across timeframes |
| Messy chop | Inside bars form inside overlapping candles with no clear structure | Skip until price has cleaner context |
| No location | Pattern appears away from meaningful structure | Require trend, level, pullback, range, or breakout context |
| Oversized mother bar | Stop distance becomes too large for the account or target | Resize, wait, or skip |
| No false-break rule | Failed breakout becomes an emotional hold | Write the cancel rule before entry |
| Stop too tight | Normal movement inside or around the mother bar exits the trade | Place stop where the idea is invalid, then size accordingly |
| Recovery re-entry | Trader re-enters after a false break to recover a loss | Stop trading when the risk rule is reached |
Risk Rules And No-Trade Conditions
Inside bar trades can look simple because the high and low are easy to see. That does not make the trade safe. A setup should be rejected when the pattern, context, stop, target, market condition, or account risk does not support the trade.
| No-Trade Condition | Why It Matters | Action |
|---|---|---|
| Market condition is unclear | The trader may be forcing meaning onto a neutral pattern | Skip until structure is clearer |
| Mother bar is too large | Stop distance may damage risk-to-target logic | Resize, wait, or skip |
| Inside bar forms in messy chop | Breakout direction is less meaningful | Do not trade the pattern |
| No useful location | Pattern has no trend, level, pullback, or breakout context | Skip |
| Target is too close | Nearby structure or spread weakens the setup | Skip if target room is poor |
| Stop is unclear | The trader cannot define where the pattern idea is wrong | Do not enter |
| Breakout already failed | The original direction has lost validity | Cancel the setup |
| News risk is too close | Spread, speed, and volatility can change quickly | Use event rule or stand aside |
| Daily stop reached | More attempts can become recovery trades | Stop trading for the session |
| Recovery motive appears | The trade exists because the trader wants to recover a prior loss | Step away and review the plan |
For account-level risk rules, use the forex risk-management strategy page.
Testing And Review Before Live Trading
A forex inside bar strategy should be reviewed on historical examples or demo conditions before it is used with real funds. The purpose is not to find perfect inside bars. The purpose is to check whether the same context rules, mother bar rules, breakout triggers, stop rules, target rules, and false-break rules can be followed repeatedly.
Record both taken and skipped setups. Skipped setups matter because many inside bar mistakes come from low-timeframe noise, oversized mother bars, poor location, nearby obstacles, news risk, and trades taken after the breakout already failed.
- Record the market condition before the inside bar forms.
- Record the timeframe used for context and the timeframe used for entry.
- Record the mother bar high, mother bar low, and whether the inside bar is clearly contained.
- Record whether the setup formed near trend structure, support/resistance, pullback context, range context, or breakout context.
- Record the planned breakout trigger before entry.
- Record whether the stop and target were known before entry.
- Record whether spread, volatility, news risk, margin, and position size were checked before entry.
- Record whether the trade exited by target, trail, time rule, false-break rule, or invalidation.
- Compare trades that followed the plan with trades that broke it.
Forex Inside Bar Checklist
Use this checklist as a quick pre-entry screen after studying the decision sequence; it is not a separate strategy or a substitute for testing the rules.
- Define whether the market is trending, ranging, pulling back, breaking out, reversing, or unclear.
- Choose the timeframe and confirm it fits stop distance, target room, spread, and risk.
- Mark the mother bar high and low before price breaks.
- Confirm that the inside bar is clearly contained under the written rule.
- Check the inside bar position inside the mother bar.
- Check whether the setup is a single inside bar, multiple inside bars, or messy chop.
- Check whether the setup has useful location, such as trend structure, support/resistance, pullback, range, or breakout context.
- Reject the setup if the mother bar is too large for account risk.
- Reject the setup if price is in messy chop or directly near the next obstacle.
- Write the breakout trigger before entry.
- Define the invalidation point before entry.
- Choose position size only after stop distance is known.
- Set the target by next structure, support/resistance, swing point, measured mother-bar range, R-multiple, trail, time rule, or invalidation.
- Write the false-break cancel rule before entry.
- Check spread, volatility, event risk, margin, and correlated exposure before entry.
- Stop trading when the daily loss, drawdown, or trade-count rule is reached.
- Review whether the trade followed the plan, not only whether it made or lost money.