
D1 structure remains below its key moving averages and Bollinger middle, while mixed momentum and a bearish H4 tactical picture keep the setup conditional on completed daily closes.
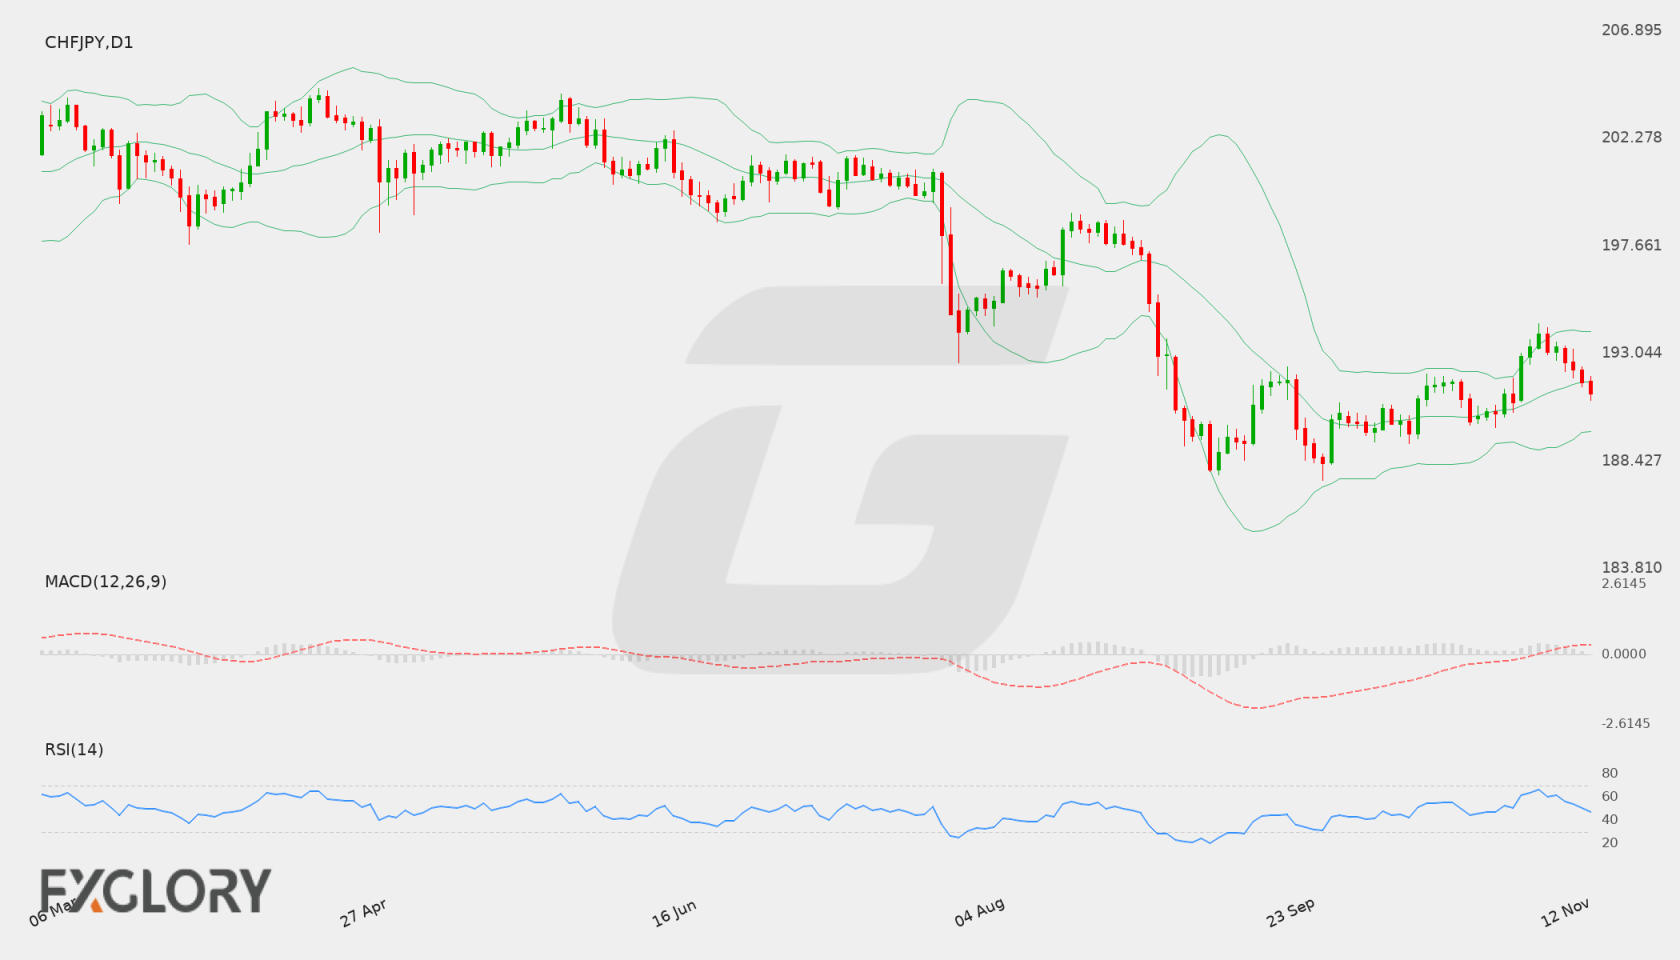
CHF/JPY Weekly Forecast at a Glance
In brief
Bearish bias for CHF/JPY over 9–14 November 2026: D1 trend and closes below key moving averages lead, though D1 momentum remains mixed and H4 is only tactically bearish.
The weekly bias is bearish because the D1 timeframe controls the thesis and the reference close of 191.802 sits below EMA20 at 191.91058, EMA50 at 192.23964, SMA200 at 198.14183 and the Bollinger middle at 191.8102. Price nevertheless remains above primary support at 189.954 and below primary resistance at 192.469, so the picture is one of structural weakness within a range rather than a completed breakdown. The close sequence is mixed rather than a clean run of lower closes, and the falling SMA200 supports the broader downtrend while the rising EMA50 shows the medium-term average is still climbing, which is the main structural tension in the setup.
Momentum and the H4 tactical picture supply the qualifications. D1 MACD remains above its signal line with a positive histogram and D1 RSI sits above 50, so momentum has not yet aligned with the bearish trend. H4 is more favourable to sellers, with MACD below signal, a negative histogram, RSI below 50 and a close beneath the H4 EMA20, EMA50 and Bollinger middle, although the close still sits between H4 support at 191.667 and H4 resistance at 191.817. Because D1 has not yet closed beneath primary support, the setup is best read as a bearish bias with downside development still conditional. Stable volatility, with D1 ATR at 1.12705, points to a regular trading environment rather than an expanding one.
- Bullish targets
-
- T1193.96376
- T2195.606
- Bearish targets
-
- T1189.384
- T2188.445
- Invalidation
- One completed D1 close above 194.30188.
Selected key events
- Tokyo Core CPI y/y27 Nov 2026 02:30 GMT+3Medium
| Price at last update | 190.324 as of 14 Nov 2026 02:50 GMT+3 |
|---|---|
| Completed D1 reference close | 191.802 as of 11 November 2026 |
| Primary support | 189.954 |
| Secondary support | 189.384 |
| Primary resistance | 192.469 |
| Bullish targets | 193.96376, 195.606 |
| Bearish targets | 189.384, 188.445 |
| Formal weekly thesis invalidation | Upper 194.302 — One completed D1 close above 194.302 formally invalidates the bearish weekly thesis. |
Live CHF/JPY Tools
A forecast is a snapshot. These pages keep moving with the market.
- Live
Live chart & price
Watch CHF/JPY move tick by tick. Flip from the 1-minute chart to the monthly, with trading conditions right alongside.
- Live
Technical signals
Buy, sell or sit it out? Oscillators, moving averages and pivot points boiled down to one clear reading, updated live.
Economic calendar
Know what's coming before it hits the price: every scheduled release with impact, forecast and actual.
Historical data
Open, high, low and close on any timeframe from 1 minute to monthly. Test your idea, then download the data.
All CHF/JPY forecasts
Every weekly outlook in one place. Scroll back to see how earlier calls played out against the chart.
CHF/JPY Fundamental Drivers This Week
Scheduled economic events relevant to CHF/JPY during 9–14 November 2026 include Tokyo Core CPI y/y. Directional impact depends on the released data relative to supplied expectations.
Scroll table sideways for more columns →
| Event | Scheduled | Importance |
|---|---|---|
| Tokyo Core CPI y/y | 27 Nov 2026 02:30 GMT+3 | Medium |
Current CHF/JPY Price and Weekly Market Context
D1 is the controlling frame: the trend is bearish and the 191.802 close sits below the EMA20, EMA50, SMA200 and Bollinger middle, while remaining inside the 189.954 to 192.469 range. Momentum is mixed, with D1 MACD above its signal and RSI above 50 partially contradicting the downtrend. H4 is bearish tactically, with RSI at 34.26 and negative MACD, yet its close holds between 191.667 and 191.817, so tactical pressure has not produced a break of H4 support. Volatility is stable, with D1 ATR at 1.12705 and H4 ATR at 0.41922.
- D1 trendbearishClose vs 50 EMA and 200 SMA
- H4 tacticalbearishH4 close vs 20 and 50 EMA
- MomentummixedRSI and MACD histogram
- VolatilitystableD1 ATR change
Is CHF/JPY Bullish or Bearish This Week?
The bearish path is the primary weekly reading because D1 structure leads and H4 tactical tone agrees on direction. The base case reflects the current consolidation inside 189.954 to 192.469 until a completed D1 close resolves it. The bullish path is a counter-scenario that requires D1 to reclaim primary resistance before H4 alignment carries weight.
Scenario 1 of 3Bullish reversal
- D1 confirmation
- A completed D1 close above primary resistance at 192.469 would be the first structural step toward the bullish case, and a completed D1 close above 193.96376 would add further D1 confirmation toward the upper bullish reference.
- H4 tactical signal
- An H4 close above H4 resistance at 191.817, which currently sits just above the H4 close, would show tactical momentum turning toward a D1 recovery attempt.
- Targets
- 193.96376, 195.606
- Scenario failure condition
- The bullish recovery would lose relevance if H4 closes fail to hold above 191.817 and return beneath H4 support at 191.667, or if D1 closes remain below primary resistance at 192.469 while momentum stays mixed without strengthening.
Scenario 2 of 3Base / neutral
- D1 confirmation
- Consolidation is confirmed by D1 closes that remain between primary support at 189.954 and primary resistance at 192.469, consistent with the current close below the Bollinger middle without a breakdown or breakout.
- H4 tactical signal
- H4 closes continue to alternate around the narrow band between 191.667 and 191.817, showing tactical indecision rather than directional follow-through.
- Targets
- Range between primary support at 189.954 and primary resistance at 192.469, with secondary references at 189.384 and 193.96376 marking the wider edges of the consolidation context.
- Scenario failure condition
- The consolidation read weakens if a completed D1 close moves outside the 189.954 to 192.469 range, shifting the balance toward either the bearish or the bullish path.
Scenario 3 of 3Bearish continuation
- D1 confirmation
- A completed D1 close below primary support at 189.954 would confirm downside structural continuation and open the bearish reference targets at 189.384 and 188.445.
- H4 tactical signal
- An H4 close below H4 support at 191.667 would align tactical timing with the bearish D1 trend and add H4 confirmation to the weekly thesis.
- Targets
- 189.384, 188.445
- Scenario failure condition
- The bearish path loses strength if a completed D1 close recovers above primary resistance at 192.469, or if H4 closes move back above H4 resistance at 191.817 and hold, pulling tactical momentum back toward the D1 range.
CHF/JPY D1 Outlook and H4 Technical Triggers
The daily timeframe controls the weekly thesis. H4 evidence is used only for earlier confirmation, tactical warning and scenario-failure context. Complete live H4, H1 and intraday readings remain on the Technical page.
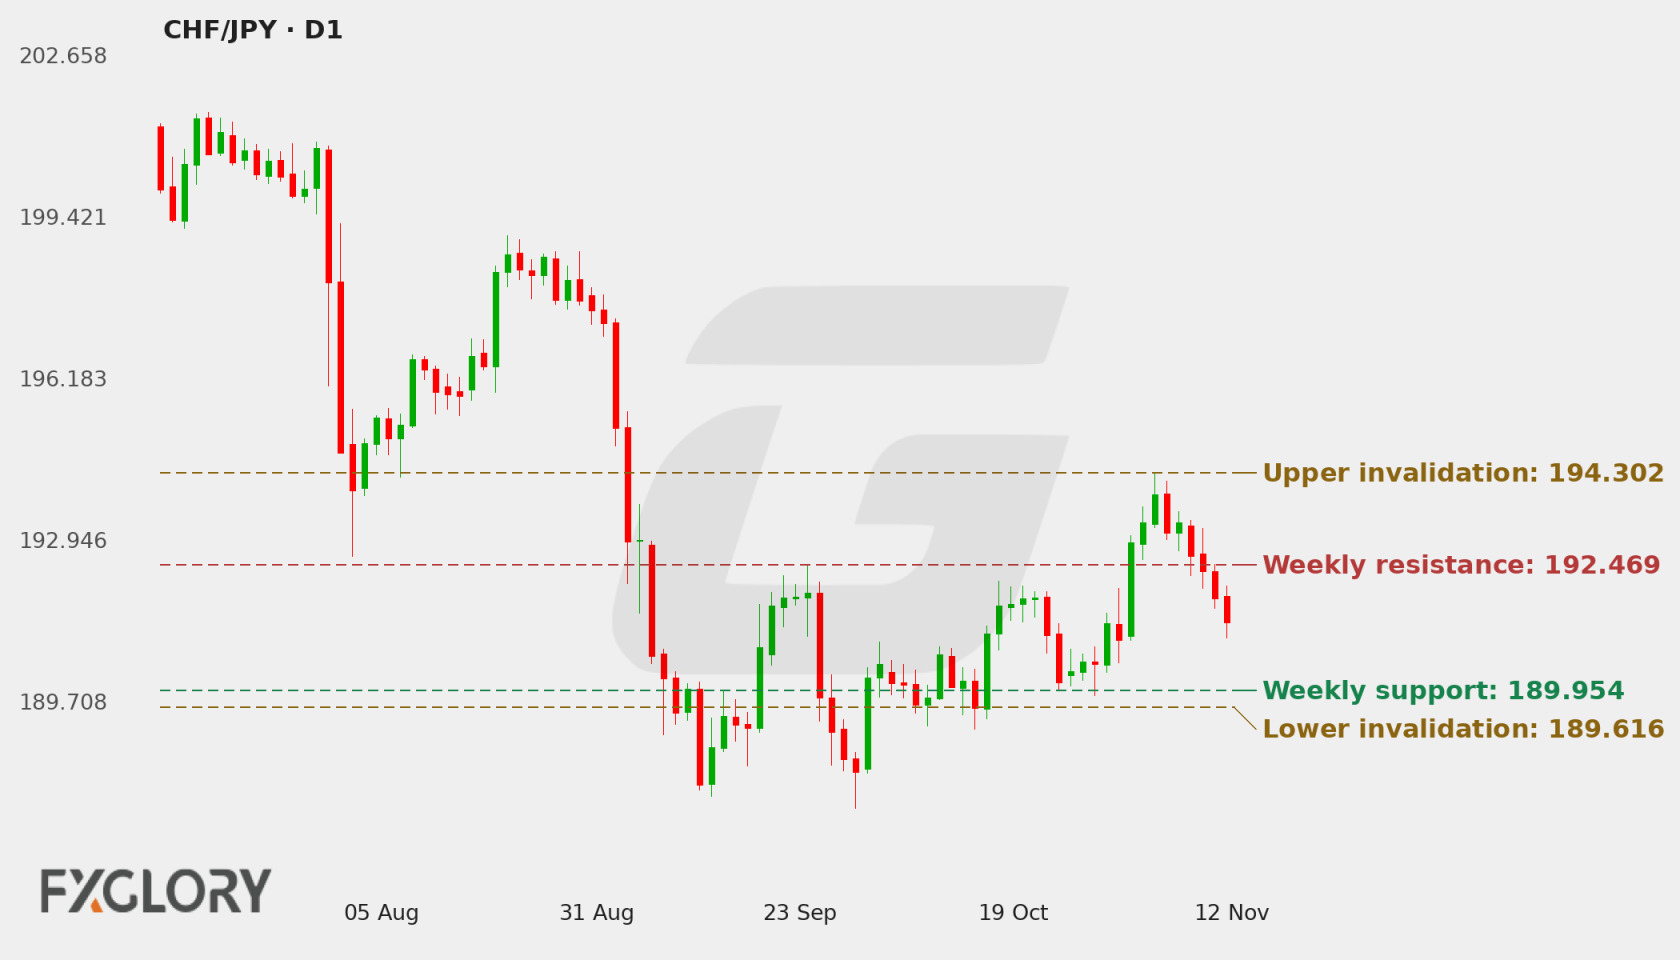
D1 Price Action and Market Structure
The 191.802 close sits between primary support at 189.954 and primary resistance at 192.469, below the EMA20, EMA50, SMA200 and Bollinger middle. The close sequence is mixed, so recent closes have not produced a clean downward progression. The rising EMA50 alongside the falling SMA200 suggests the medium-term structure is flattening rather than decisively trending lower. The Bollinger upper band at 193.96376 coincides with secondary resistance, reinforcing that overhead zone.
H4 Tactical Triggers
H4 adds tactical confirmation of pressure but not yet a break. The close sits below the H4 EMA20 at 192.43076, EMA50 at 192.46986 and Bollinger middle at 192.5408, and H4 MACD and RSI both lean lower. Yet the close remains above H4 support at 191.667 and below H4 resistance at 191.817, so the tactical timeframe is compressed. This means H4 partially supports the D1 bearish thesis while delaying any decisive tactical signal until a close moves outside that band.
Technical Indicators at a Glance
Automated technical summary
D1 trend is bearish with mixed momentum, mixed closes and stable volatility. H4 is bearish tactically, with negative momentum and a close held inside the narrow 191.667 to 191.817 band.
Selected snapshot: D1 with H4 tactical context. Updated 14 November 2026.
- RSI50.04Neutral
- MACDAbove signalBullish
- Bollinger Bands50% of bandLower half
- Moving averagesBelow bothBearish
- ATR112.7 pipsStable
RSI (14)
Neutral
H4 34.26
D1 RSI above 50 shows momentum not yet supporting the bearish trend, while H4 RSI below 50 shows the tactical timeframe leaning weaker. The split means RSI supports neither a clean bearish acceleration on D1 nor a convincing bullish reversal.
- D1 RSI
- 50.04
- H4 RSI
- 34.26
MACD (12, 26, 9)
Bullish momentum
D1 MACD above its signal with a positive histogram indicates momentum firmer than the trend structure, which is the main source of the mixed momentum read. H4 MACD below its signal with a negative histogram confirms tactical downside pressure. The timeframes are in conflict on sign, which weakens the quality of the weekly setup until D1 structure resolves.
- MACD
- 0.42751
- Signal
- 0.335225
- Histogram
- 0.092285
Bollinger Bands (20, 2σ)
Lower half
Striped ends = price outside the bands.
The D1 close below the middle band at 191.8102 places price on the weaker side of the average, while the upper band at 193.96376 coincides with secondary resistance and reinforces it as an overhead reference. On H4, the close below the middle band at 192.5408 keeps tactical pressure in place, although band positions are context rather than levels in their own right. Stable volatility means the bands are not signalling expansion.
- Position in band
- 50%
- Band width
- 430.7 pips (2.25%)
Moving averages (D1)
Bearish structure
- 50 EMA rising192.240Price is 43.8 pips below (-0.23%)
- 200 SMA falling198.142Price is 634.0 pips below (-3.20%)
Price below the D1 EMA20, EMA50 and SMA200 aligns with the bearish structure, but the rising EMA50 and falling SMA200 describe a medium-term average that is no longer moving in step with the long-term decline. On H4, the EMA20 and EMA50 sit close together above the close, adding tactical resistance context without creating new levels.
- D1 close
- 191.802
- 50 EMA
- 192.240
- 200 SMA
- 198.142
ATR (14)
Stable volatility
One ATR either side of the latest close. A measure of move size, not a price target.
Stable volatility, with D1 ATR at 1.12705 and H4 ATR at 0.41922, describes a regular trading environment without an expansion signal. This favours slower level development over abrupt repricing within the week, though it gives no directional signal on its own.
- D1 ATR
- 1.12705 (0.59%)
- H4 ATR
- 0.41922 (0.22%)
Technical conclusion: The main thesis is a bearish D1 structure, with the 191.802 close beneath the key moving averages and Bollinger middle. The strongest support for that view is the combined location below the EMA20, EMA50, SMA200 and Bollinger middle, with the falling SMA200 reinforcing the broader downtrend. The strongest counterargument is D1 momentum, where MACD sits above its signal and RSI is above 50, alongside a rising EMA50. The next levels that matter are primary support at 189.954 and primary resistance at 192.469 on D1, with H4 support at 191.667 and resistance at 191.817 framing the tactical band.
View all live CHF/JPY oscillators, moving averages, pivot points and timeframe signals.
CHF/JPY Weekly Support, Resistance and Invalidation
| Level | Role | Timeframe | Why it matters |
|---|---|---|---|
| 192.469 | Primary resistance | D1 | It caps the current range and is the reference for a completed D1 close that would begin to challenge the bearish structure. |
| 193.96376 | Secondary resistance and bullish target reference | D1 | It coincides with the upper Bollinger band and marks the first bullish reference above primary resistance. |
| 195.606 | Upper bullish target reference | D1 | It is the second bullish reference, sitting above secondary resistance and representing the wider recovery path. |
| 191.817 | H4 resistance | H4 | It is the tactical level that H4 closes would need to move above to add H4 support to a recovery attempt; the close currently sits just beneath it. |
| 191.667 | H4 support | H4 | It is the tactical level that an H4 close beneath would align short-term timing with the bearish D1 trend; the close currently sits just above it. |
| 189.954 | Primary support | D1 | A completed D1 close below it would confirm downside structural continuation and is the first D1 break reference for the bearish path. |
| 189.384 | Secondary support and bearish target reference | D1 | It is the first bearish reference below primary support and sits within the bearish target set. |
| 188.445 | Lower bearish target reference | D1 | It is the deeper bearish reference, representing the extended downside path if primary support gives way on a completed D1 close. |
These are forecast-specific market-structure levels. Formula-based Classic, Fibonacci and Camarilla pivots remain on the Technical page.
Economic News & Events to Watch for CHF/JPY This Week
Selected events may increase CHF/JPY volatility. Direction depends on the released value relative to consensus and previous results.
Scroll table sideways for more columns →
| Event | Date and time | Importance | Previous | Consensus |
|---|---|---|---|---|
| Tokyo Core CPI y/y | 27 Nov 2026 02:30 GMT+3 | Medium | — | — |
Calendar source: FXGlory economic calendar. Retrieved 12 Nov 2026 04:17 GMT+3. View the complete CHF/JPY economic calendar.
CHF/JPY Outlook for 9–14 November 2026
The weekly thesis is bearish because D1 structure is clearly below its key moving averages and Bollinger middle, and the falling SMA200 keeps the broader trend leaning lower. Confirmation on a completed D1 close below primary support at 189.954 would strengthen that thesis, while the current position inside the range keeps the setup conditional rather than settled.
The quality of the setup is tempered by mixed D1 momentum, a rising EMA50, a mixed close sequence and H4 tactical pressure that has not yet broken its own narrow band. The bearish reference targets at 189.384 and 188.445 and the bullish references at 193.96376 and 195.606 frame the two paths, while the upper boundary at 194.30188 remains the formal reference for this bearish thesis.
Weekly Forecast Risks and What Would Change the Outlook
- Mixed D1 momentum: D1 MACD above its signal with a positive histogram and RSI above 50 give a recovery attempt some momentum support, which could slow or reverse the bearish structure.
- Timeframe disagreement: H4 is bearish tactically while D1 momentum is not, so the tactical signals can diverge from the weekly framework and reduce the quality of the setup.
- Compressed H4 band: The H4 close between 191.667 and 191.817 means a close outside that band could change the tactical read quickly, although the weekly thesis still depends on completed D1 closes.
- Rising EMA50 against a bearish close: A rising medium-term average with the close beneath it signals that the medium-term structure is flattening, which could allow sideways consolidation to persist longer than the bearish structure implies.
- JPY event timing: The Tokyo Core CPI release is a potential JPY volatility catalyst, but it falls after this window, so it is relevant to the following forecast rather than to these levels.
Formal weekly invalidation: The bearish weekly thesis is formally invalidated by one completed D1 close above 194.30188. One completed D1 close below 189.61588 confirms lower structural extension and continuation.
CHF/JPY Weekly Forecast FAQs
Is CHF/JPY bullish or bearish this week?
The bias is bearish because the D1 trend structure places the close below its key moving averages and Bollinger middle, and the medium-term structure is leaning lower. Momentum is mixed, however, so the bias reflects structural location rather than a confirmed directional push.
What scenario would strengthen for CHF/JPY this week?
Price is currently inside the 189.954 to 192.469 range, so consolidation is the active reading until a completed D1 close resolves it. A completed D1 close below 189.954 would give the bearish path more relevance, while a completed D1 close above 192.469 would give the bullish recovery path more relevance.
What are the key CHF/JPY support and resistance levels?
On D1, primary support is 189.954 and primary resistance is 192.469, with secondary references at 189.384 (support) and 193.96376 (resistance). Bearish target references are 189.384 and 188.445, and bullish target references are 193.96376 and 195.606. On H4, support sits at 191.667 and resistance at 191.817, framing the tactical band.
What would invalidate this CHF/JPY forecast?
The bearish weekly thesis is formally invalidated by one completed D1 close above 194.30188.
Methodology, Data and Sources
- Price-data source: FXGlory price feed (CHFJPY)
- Live quote timestamp: 14 Nov 2026 02:50 GMT+3
- Weekly analysis timestamp: 9 November 2026
- Chart timestamp: 14 November 2026 (redrawn daily)
- Daily check: Every day at 04:00 GMT+3: the latest completed D1 close is checked against the invalidation levels and the chart is redrawn.
- Technical snapshot timestamp: 9 November 2026
- Calendar-data source: FXGlory economic calendar
- Calendar retrieval timestamp: 12 Nov 2026 04:17 GMT+3
- Candle convention: FXGlory D1 and H4 candles; D1 candle dates are evaluated in UTC and invalidation uses completed D1 closes only.
- Indicator settings: D1 RSI(14), MACD(12,26,9), Bollinger Bands(20,2), EMA(50), SMA(200), ATR(14); H4 RSI/MACD/Bollinger/EMA/ATR.
- Level-selection method: Weekly D1 support/resistance levels are structural market levels. Formal invalidation uses a hard 0.75× D1 ATR(14) minimum anchor distance plus a 0.30× D1 ATR(14) outward buffer; H4 levels are tactical only.
- Weekly forecast method: D1 controls the weekly thesis; H4 supplies tactical confirmation/warning only.