
Price sits below the D1 EMA20 and EMA50 with negative momentum and bearish H4 tactical structure, while a neutral D1 trend and a close above the SMA200 keep the week conditional.
Daily check — 11 November 2026: The latest completed D1 close was 1.22490 on 10 November 2026. It remains below the upper formal invalidation level 1.23831; the lower calibrated boundary 1.21684 is an extension/confirmation boundary. The authored weekly thesis remains valid.
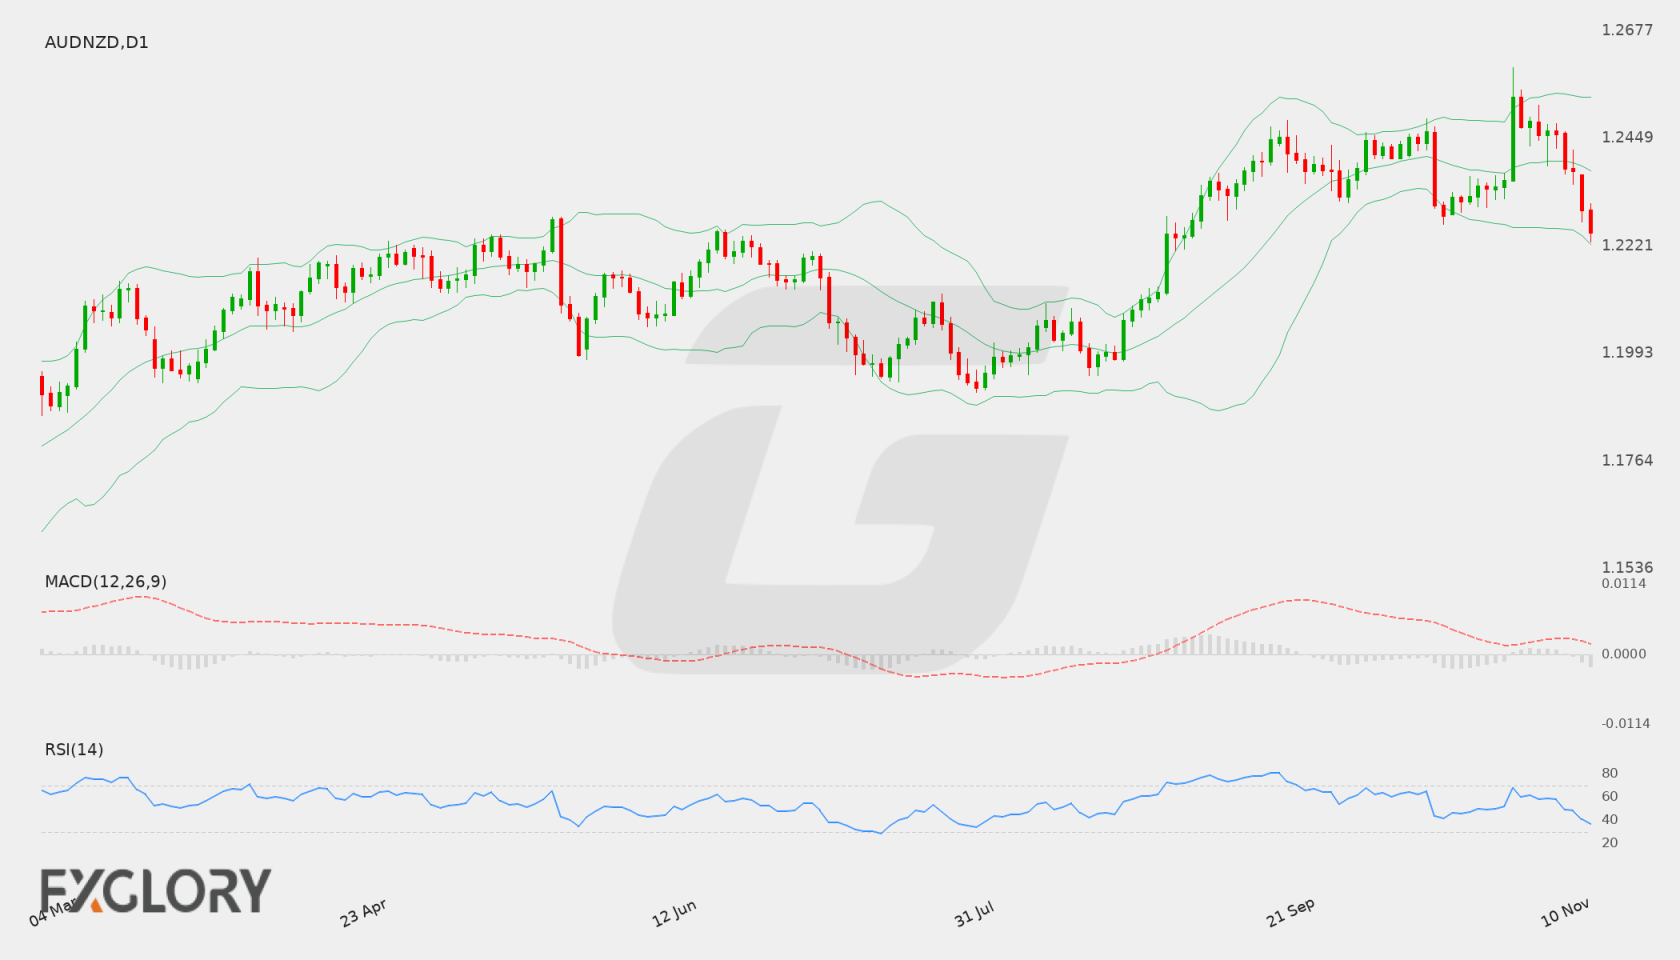
AUD/NZD Weekly Forecast at a Glance
In brief
Bearish bias for the week of 9–14 November 2026: price sits below the D1 EMA20 and EMA50 with negative momentum, though the neutral D1 trend and a close above the SMA200 keep the setup conditional.
The weekly thesis leans bearish because the reference close of 1.22961 remains below both the D1 EMA20 and the D1 EMA50, and recent closes have been consecutively lower. Momentum supports that lean: D1 MACD is below its signal line with a negative histogram, and RSI is below 50. The D1 trend state is neutral, so the structure is weakening rather than having fully rolled over.
The main counterweight is the close above the rising SMA200, which keeps the longer-term structure from being decisively bearish. H4 is bearish and reinforces near-term pressure, but it only adds tactical timing and does not replace the D1 thesis. Traders should treat the week as a test of whether price can hold the D1 support band, with the upper boundary at 1.23831 as the level that would overturn this view.
- Bullish targets
-
- T11.23895
- T21.24339
- Bearish targets
-
- T11.21835
- T21.21323
- Invalidation
- One completed D1 close above 1.23831.
Selected key events
- Inflation Expectations q/q17 Nov 2026 05:00 GMT+3High
- Employment Change19 Nov 2026 03:30 GMT+3High
- Unemployment Rate19 Nov 2026 03:30 GMT+3High
| Price at last update | 1.22583 as of 11 Nov 2026 06:05 GMT+3 |
|---|---|
| Completed D1 reference close | 1.22961 as of 9 November 2026 |
| Primary support | 1.22427 |
| Secondary support | 1.21835 |
| Primary resistance | 1.23430 |
| Bullish targets | 1.23895, 1.24339 |
| Bearish targets | 1.21835, 1.21323 |
| Formal weekly thesis invalidation | Upper 1.23831 — One completed D1 close above 1.23831 formally invalidates the bearish weekly thesis. |
Live AUD/NZD Tools
A forecast is a snapshot. These pages keep moving with the market.
- Live
Live chart & price
Watch AUD/NZD move tick by tick. Flip from the 1-minute chart to the monthly, with trading conditions right alongside.
- Live
Technical signals
Buy, sell or sit it out? Oscillators, moving averages and pivot points boiled down to one clear reading, updated live.
Economic calendar
Know what's coming before it hits the price: every scheduled release with impact, forecast and actual.
Historical data
Open, high, low and close on any timeframe from 1 minute to monthly. Test your idea, then download the data.
All AUD/NZD forecasts
Every weekly outlook in one place. Scroll back to see how earlier calls played out against the chart.
AUD/NZD Fundamental Drivers This Week
Scheduled economic events relevant to AUD/NZD during 9–14 November 2026 include Inflation Expectations q/q, Wage Price Index q/q, Employment Change. Directional impact depends on the released data relative to supplied expectations.
Scroll table sideways for more columns →
| Event | Scheduled | Importance | Previous |
|---|---|---|---|
| Inflation Expectations q/q | 17 Nov 2026 05:00 GMT+3 | High | 2.34% |
| Wage Price Index q/q | 18 Nov 2026 03:30 GMT+3 | Medium | 0.8% |
| Employment Change | 19 Nov 2026 03:30 GMT+3 | High | -39.3K |
| Unemployment Rate | 19 Nov 2026 03:30 GMT+3 | High | 4.7% |
Current AUD/NZD Price and Weekly Market Context
The D1 picture is mixed rather than cleanly directional. The reference close of 1.22961 sits below the D1 EMA20 at 1.23954 and the EMA50 at 1.2343, yet remains above the SMA200 at 1.21273, with both the EMA50 and SMA200 slopes rising. Price is therefore pressured within the shorter-term average band while the longer-term structure has not broken down. Consecutive lower closes reinforce the short-term pressure. Momentum agrees with the caution: D1 MACD is below its signal line with a negative histogram, and RSI is below 50, so directional momentum has not yet returned. H4 is bearish and adds near-term weakness, but the weekly thesis remains anchored to the D1 structure.
- D1 trendneutralClose vs 50 EMA and 200 SMA
- H4 tacticalbearishH4 close vs 20 and 50 EMA
- MomentumnegativeRSI and MACD histogram
- VolatilitystableD1 ATR change
Is AUD/NZD Bullish or Bearish This Week?
The Bearish bias is the primary path because D1 price is below its short-term averages with weakening momentum, while H4 confirms near-term pressure. A base range between primary support and primary resistance is the main alternative, reflecting the neutral D1 trend and the close above the SMA200. A bullish progression requires a clear D1 structural shift that the current evidence does not yet show.
Scenario 1 of 3Bullish reversal
- D1 confirmation
- A completed D1 close above primary resistance at 1.2343 would be the first structural sign that the downside framework is losing control.
- H4 tactical signal
- An H4 close above H4 resistance at 1.23019 would show short-term tactical strength returning, which would need to align with the D1 move.
- Targets
- 1.23895, 1.24339
- Scenario failure condition
- A failure to hold above primary resistance on a completed D1 close, or H4 rejection beneath 1.23019, would leave the upside case as a retest rather than a shift in structure.
Scenario 2 of 3Base / neutral
- D1 confirmation
- Completed D1 closes remaining between primary support at 1.22427 and primary resistance at 1.2343 would confirm a range-bound structure.
- H4 tactical signal
- H4 closes oscillating around H4 support at 1.22915 and H4 resistance at 1.23019 would indicate the tactical picture is balanced rather than directional.
- Targets
- Price rotating between primary support at 1.22427 and primary resistance at 1.2343, with the reference close of 1.22961 positioned inside that range.
- Scenario failure condition
- A completed D1 close beyond either range boundary would move the market out of consolidation and make one of the directional scenarios more relevant.
Scenario 3 of 3Bearish continuation
- D1 confirmation
- A completed D1 close below primary support at 1.22427 would confirm that the weekly structure is moving toward the bearish targets.
- H4 tactical signal
- An H4 close below H4 support at 1.22915 would add tactical confirmation to the D1 move and point toward the bearish reference targets.
- Targets
- 1.21835, 1.21323
- Scenario failure condition
- A reclaim of 1.22427 on a completed D1 close, or an H4 close back above 1.23019, would weaken the downside progression and keep price in the base range.
AUD/NZD D1 Outlook and H4 Technical Triggers
The daily timeframe controls the weekly thesis. H4 evidence is used only for earlier confirmation, tactical warning and scenario-failure context. Complete live H4, H1 and intraday readings remain on the Technical page.
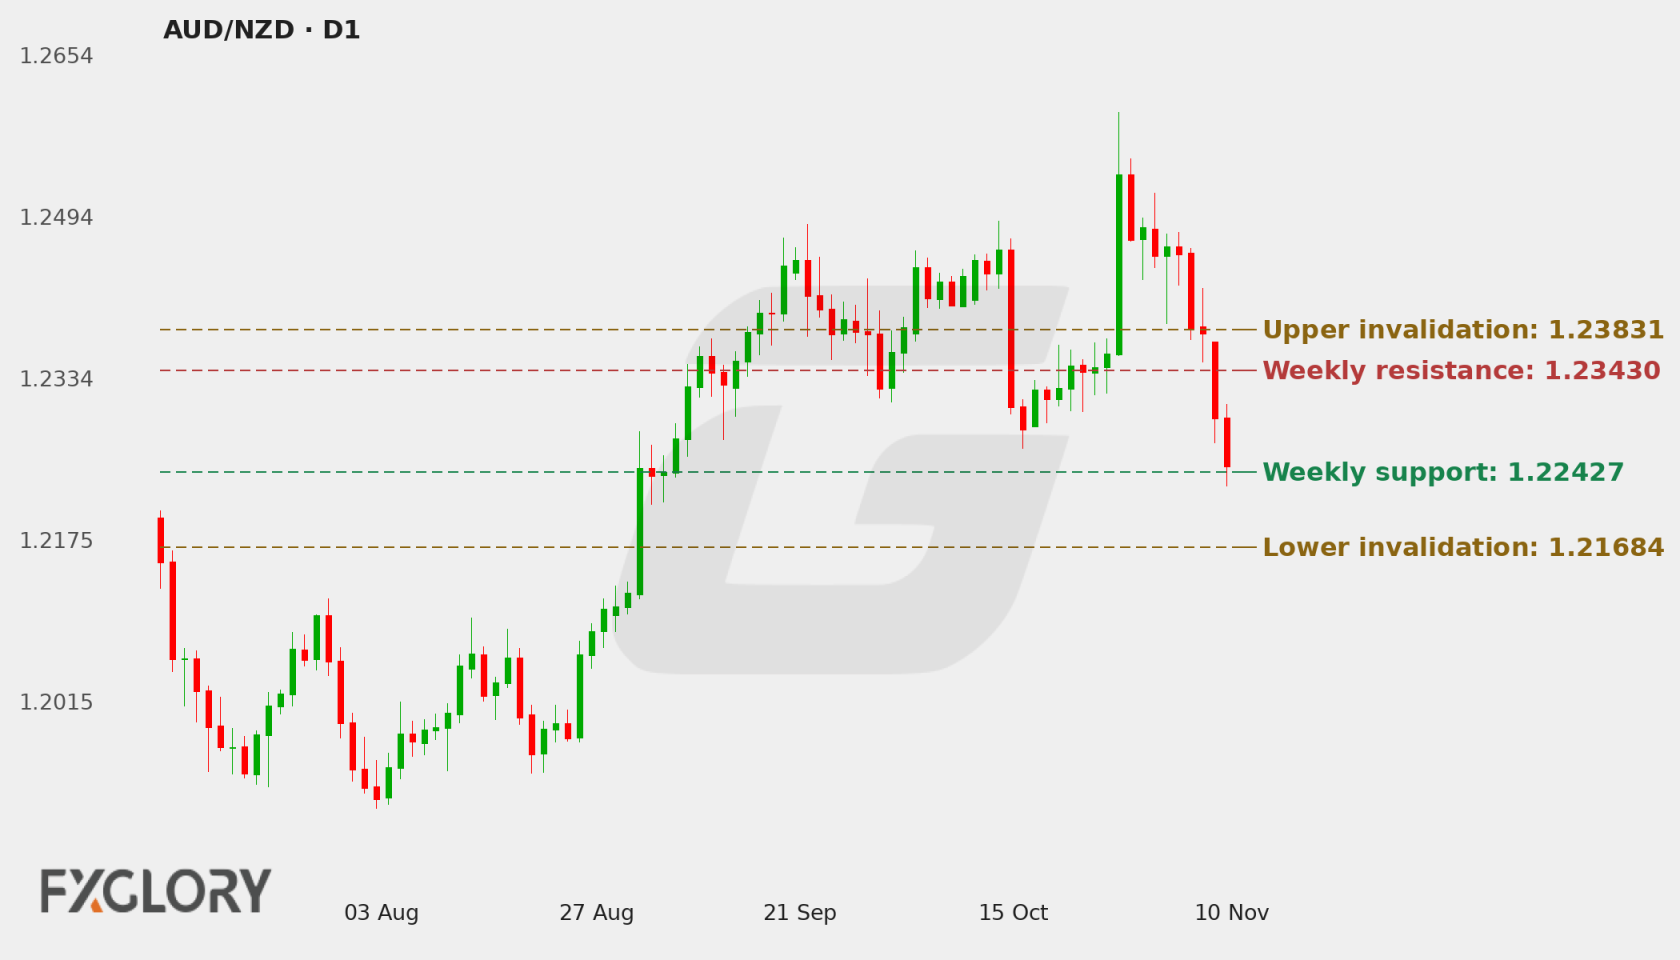
D1 Price Action and Market Structure
The D1 close of 1.22961 sits above primary support at 1.22427 and below primary resistance at 1.2343, which places price in the middle of the weekly range. Consecutive lower closes show a steady erosion of recent strength, and the close sits below the EMA20 and EMA50 while remaining above the SMA200. The rising EMA50 and SMA200 slopes suggest the broader structure is still supported even as the shorter-term average band caps price.
H4 Tactical Triggers
H4 confirms the near-term bearish tactical state, with the close of 1.22961 above H4 support at 1.22915 but below H4 resistance at 1.23019. The H4 close sits below both the EMA20 and EMA50, and H4 MACD is below its signal line with a negative histogram. The close is only marginally above H4 support, so H4 provides tactical warning rather than a separate weekly thesis, and the D1 structure still controls the direction.
Technical Indicators at a Glance
Automated technical summary
D1 is neutral with a bearish near-term structure: price is below the EMA20 and EMA50 but above the SMA200, and momentum is negative. H4 is bearish and confirms the short-term pressure. Volatility is stable, so the week is more likely to develop through level tests than through abrupt expansion.
Selected snapshot: D1 with H4 tactical context. Updated 11 November 2026.
- RSI40.41Neutral
- MACDBelow signalBearish
- Bollinger Bands18% of bandLower half
- Moving averagesBetweenNeutral
- ATR75.4 pipsStable
RSI (14)
Neutral
H4 32.2
D1 and H4 RSI both sit below 50, which confirms that momentum is on the weaker side of neutral on both timeframes. The H4 reading is lower than the D1 reading, which points to sharper near-term weakness.
- D1 RSI
- 40.41
- H4 RSI
- 32.2
MACD (12, 26, 9)
Bearish momentum
D1 MACD is positive in sign but below its signal line, with a negative histogram, which indicates that momentum is fading even though the MACD line remains above zero. H4 MACD is negative and below its signal line, confirming bearish momentum on the shorter timeframe.
- MACD
- 0.000967
- Signal
- 0.00215
- Histogram
- -0.001183
Bollinger Bands (20, 2σ)
Lower half
Striped ends = price outside the bands.
The D1 close sits below the Bollinger middle band, inside the bands, which shows that price has not yet regained the mid-range of its recent volatility envelope. This supports the view that the D1 structure is weak but not yet extended to either band.
- Position in band
- 18%
- Band width
- 293.5 pips (2.37%)
Moving averages (D1)
Neutral structure
- 50 EMA rising1.23430Price is 46.9 pips below (-0.38%)
- 200 SMA rising1.21273Price is 168.8 pips above (+1.39%)
The D1 close sits below both the EMA20 and EMA50, which keeps the short-term average structure pressured. Price remains above the SMA200, and both the EMA50 and SMA200 slopes are rising, so the longer-term backdrop has not turned bearish. On H4, the close sits below both the EMA20 and EMA50, aligning the tactical picture with the D1 pressure.
- D1 close
- 1.22961
- 50 EMA
- 1.23430
- 200 SMA
- 1.21273
ATR (14)
Stable volatility
One ATR either side of the latest close. A measure of move size, not a price target.
Stable volatility suggests a measured environment in which the week is more likely to test the supplied levels in an orderly way than to produce abrupt expansion. This affects the pace of the scenarios rather than their direction.
- D1 ATR
- 0.00754 (0.61%)
- H4 ATR
- 0.00358 (0.29%)
Technical conclusion: The weekly thesis is Bearish because the D1 close sits below its short-term averages with negative momentum, and H4 confirms that pressure. The strongest counterargument is the close above the rising SMA200 and the neutral D1 trend, which keep the structure from being decisively weak. The key levels to watch are primary support at 1.22427 and H4 support at 1.22915 on the downside, and primary resistance at 1.2343 and H4 resistance at 1.23019 on the upside.
View all live AUD/NZD oscillators, moving averages, pivot points and timeframe signals.
AUD/NZD Weekly Support, Resistance and Invalidation
| Level | Role | Timeframe | Why it matters |
|---|---|---|---|
| 1.22427 | Primary support | D1 | A completed D1 close below this level is the first structural step toward the bearish targets. |
| 1.21835 | Secondary support and bearish target | D1 | This is the first bearish reference target and the next structural area if primary support gives way. |
| 1.21323 | Tertiary support and bearish target | D1 | This is the lower bearish reference target and marks the deepest supplied downside level. |
| 1.2343 | Primary resistance | D1 | A completed D1 close above this level would be the first structural sign that the downside framework is losing control. |
| 1.23895 | Secondary resistance and bullish target | D1 | This is the first bullish reference target and aligns with the D1 Bollinger middle band. |
| 1.24339 | Tertiary resistance and bullish target | D1 | This is the upper bullish reference target and marks the highest supplied upside level. |
| 1.22915 | H4 support | H4 | An H4 close below this level would add tactical confirmation to the bearish D1 scenario. |
| 1.23019 | H4 resistance | H4 | An H4 close above this level would indicate near-term tactical strength returning against the D1 bias. |
These are forecast-specific market-structure levels. Formula-based Classic, Fibonacci and Camarilla pivots remain on the Technical page.
Economic News & Events to Watch for AUD/NZD This Week
Selected events may increase AUD/NZD volatility. Direction depends on the released value relative to consensus and previous results.
Scroll table sideways for more columns →
| Event | Date and time | Importance | Previous | Consensus |
|---|---|---|---|---|
| Inflation Expectations q/q | 17 Nov 2026 05:00 GMT+3 | High | 2.34% | — |
| Employment Change | 19 Nov 2026 03:30 GMT+3 | High | -39.3K | — |
| Unemployment Rate | 19 Nov 2026 03:30 GMT+3 | High | 4.7% | — |
| Wage Price Index q/q | 18 Nov 2026 03:30 GMT+3 | Medium | 0.8% | — |
Calendar source: FXGlory economic calendar. Retrieved 10 Nov 2026 04:16 GMT+3. View the complete AUD/NZD economic calendar.
AUD/NZD Outlook for 9–14 November 2026
The weekly framework leans Bearish because D1 price is below the short-term averages, momentum is negative and H4 confirms near-term pressure. The bias is qualified by the neutral D1 trend state and the close above the rising SMA200, which keep the broader structure unresolved. The base range between 1.22427 and 1.2343 is the main alternative while that conflict remains.
The scheduled AUD and NZD releases fall after the forecast window, so they add context for the following week rather than this one. Within this window, the most useful signals are whether D1 closes accept below 1.22427 or reclaim 1.2343, and whether H4 follows those moves.
Weekly Forecast Risks and What Would Change the Outlook
- Mixed D1 structure: The D1 trend is neutral and price remains above the SMA200, so the longer-term structure does not yet confirm the downside.
- Range rotation: Price sits between primary support and primary resistance, so a range-bound week could delay any directional confirmation.
- Upside reversal in H4 tactics: H4 resistance at 1.23019 sits just above the reference close, so a tactical recovery could challenge the bearish setup before D1 confirms.
- Event timing after the window: The AUD and NZD releases fall after the forecast window closes, so they add post-window repricing risk rather than a direct test of this week's levels.
Formal weekly invalidation: The bearish weekly thesis is formally invalidated by one completed D1 close above 1.23831. One completed D1 close below 1.21684 confirms lower structural extension and continuation.
AUD/NZD Weekly Forecast FAQs
Is AUD/NZD bullish or bearish this week?
The forecast bias is Bearish because the D1 close sits below its short-term averages and momentum is negative, with H4 aligned to the downside. The bias is not stronger than that, since the D1 trend is neutral and the close remains above the SMA200.
What scenario would strengthen for AUD/NZD this week?
The main scenario is a bearish progression if price closes below primary support at 1.22427 on D1 and H4 confirms weakness below 1.22915. A range between 1.22427 and 1.2343 is the most likely alternative, and a move above the resistance zone would be needed to shift the picture higher.
What are the key AUD/NZD support and resistance levels?
The primary support is 1.22427, followed by secondary support at 1.21835, and the primary resistance is 1.2343, with secondary resistance at 1.23895. Bearish targets are 1.21835 and 1.21323, and bullish targets are 1.23895 and 1.24339.
What would invalidate this AUD/NZD forecast?
The bearish weekly thesis is formally invalidated by one completed D1 close above 1.23831.
Methodology, Data and Sources
- Price-data source: FXGlory price feed (AUDNZD)
- Live quote timestamp: 11 Nov 2026 06:05 GMT+3
- Weekly analysis timestamp: 9 November 2026
- Chart timestamp: 11 November 2026 (redrawn daily)
- Daily check: Every day at 04:00 GMT+3: the latest completed D1 close is checked against the invalidation levels and the chart is redrawn.
- Technical snapshot timestamp: 9 November 2026
- Calendar-data source: FXGlory economic calendar
- Calendar retrieval timestamp: 10 Nov 2026 04:16 GMT+3
- Candle convention: FXGlory D1 and H4 candles; D1 candle dates are evaluated in UTC and invalidation uses completed D1 closes only.
- Indicator settings: D1 RSI(14), MACD(12,26,9), Bollinger Bands(20,2), EMA(50), SMA(200), ATR(14); H4 RSI/MACD/Bollinger/EMA/ATR.
- Level-selection method: Weekly D1 support/resistance levels are structural market levels. Formal invalidation uses a hard 0.75× D1 ATR(14) minimum anchor distance plus a 0.20× D1 ATR(14) outward buffer; H4 levels are tactical only.
- Weekly forecast method: D1 controls the weekly thesis; H4 supplies tactical confirmation/warning only.